Help sought - How to set the Domino Joiner for mating angled pieces

ChuckM

Member
Joined
Sep 7, 2015
Messages
5,757
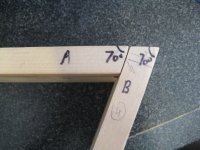
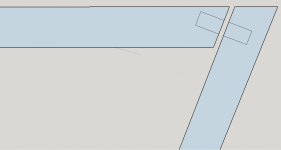
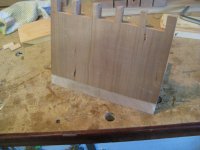
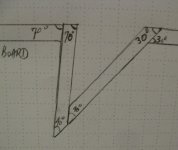
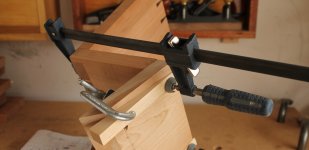
I am new here and would like to ask for your advice on setting the DJ.  I am trying to join pieces cut at various angles, e.g. two at 70 degrees as shown in the attached pic.

What fence angle and height (say for 3/4" stock) should I set to cut the mortises for piece A and the same question for piece B? And which face should I use as the registration face for the different pieces, too?

Many thanks for any suggestions you can give.

Chuck
 

Attachments

  • IMG_6556.JPG
    IMG_6556.JPG
    3.5 MB · Views: 1,710
If possible, I'd cut the mortises in both pieces before you cut the bevels. You would probably have to shorten the tenons a small amount.

If you absolutely have to cut the mortises with the bevels already cut, I'd try to figure out a way to keep the fence at 90 degrees. Cutting the mortises as if both pieces were not beveled would work if you used a deeper mortise. With those angles and with 3/4" stock, you will not lose all that much mortise depth.

You always want to use the same side faces for registration.
 
Top edge of B is the primary reference face. Set the fence angle to align to the to the inner face where the Domino is going, I'd set the height 3/4 of the way down the height of A. Make sure you put a reference mark on A. The reference face on A is the bottom long edge, you have to set the fence height to match the reference mark.

You could go centered in A as long as you do not plunge through the top face of A.

I don't believe Birdhunters way will work, it will    the mortice in B 20º while the mortice in a is still parallel to the long edge.

I just discovered you can't type the word C>O>C>K and have it show in a post, insert the censored word between "will" and "the' in the sentence directly above this one.

Tom
 
The way I tried to outline would cut both mortises parallel to the top sides of both pieces A and B. The fence is set at 90 degrees. The references are both on the top sides of both A and B. You would lose a little mortise depth, but not a lot.
 
Thank you all for your quick help and advice. I'll look into your suggestions and try them out in the shop.

Chuck
 
Birdhunter said:
The way I tried to outline would cut both mortises parallel to the top sides of both pieces A and B. The fence is set at 90 degrees. The references are both on the top sides of both A and B. You would lose a little mortise depth, but not a lot.

I understand what you are doing, the issue I have is when you move B on the angle the mortise moves to the same angle.

Tom
 
This is what happens to the mortice in B if you create the mortice on the square top edge, then trim the edge to plane with A.

Tom
 

Attachments

  • Screen Shot 2015-09-07 at 8.45.54 PM.png
    Screen Shot 2015-09-07 at 8.45.54 PM.png
    67.8 KB · Views: 582
I can think of 2 approaches to consider.
One would be to simply Domino 90 degrees to the mating faces. See attached pic.

The other would be to make sacrificial wedges that are taped or hot glued to the joint faces, drilled ('dominoed') through and then removed.

A lot would depend on the requirements of the joint. The use of the joint would also determine the need for clamping pressure- if you're building furniture you may need temporary wedges on the outside of the joint to get clamping pressure in the exact direction of the joint.

I would aim to sink the domino in the middle third of your (in this example 3/4") thickness. Your fence height would be affected by the thickness of the domino you're using.

Dave

[attachthumb=1]
 

Attachments

  • 70 deg Domino.png
    70 deg Domino.png
    24.9 KB · Views: 527
Hi Birdhunter and Tom (and Dave whose post came in just as I'm typing this which I'll read right after this),

Before I had a chance to read your advice, I did a trial & error in the shop and this is how I did the joinery:

For piece A - I cut the mortises on the endgrain with the Domino joiner's baseplate front edge butt flat against the endgrain. The square fence did not rest on the surface, just the edge. The mortises were therefore angled to the face. The fence height was set to half the thickness of the stock.

For piece B - I cut the mortises on the facegrain with the square fence resting against the top edge of the bevel. The fence did not rest on the entire bevel and the mortises were perpendicular to the face. The fence height was set to half of the stock plus 7 mm to compensate the bevel distance as the fence rested on the top edge.

Birdhunter - is mine the same as you suggested.

Tom - I'll try out yours with the next joint when I get to it.

Dave - Will check out your post for more ideas.

Many thanks for all of your suggestions.

Chuck
 

Attachments

  • IMG_6560.jpg
    IMG_6560.jpg
    157.9 KB · Views: 995
  • IMG_6557.jpg
    IMG_6557.jpg
    138.8 KB · Views: 821
  • IMG_6561.jpg
    IMG_6561.jpg
    147.4 KB · Views: 820
Hi Dave,

I think the method I reported is the same as the first one you outlined. Yes, your second method using a wedge will work, too.  Thanks,

Chuck
 
Cut the angle on B, set the fence to allow the Domino face to contact the face of B. The fence should be in fill contact with the top of B, face to face should be full contact. Cut the angle on A, flip the Domino over, if the angles were cut properly the reference face is the bottom of A and the face of the Domino will be in full contact with the end grain of A .

You will have to adjust the fence height to make it all come together.

No matter what you have to cut you mortices to be aligned on the same plane.

Tom
 
I'm really intrigued by this problem.

I can't tell for sure if the inside and outside edges are beveled at 70 degrees or just where you have the angles marked.
 
Since the edges are parallel, yes, the opposite corners are also at 70 degrees. As a familiar DJ user, I thought the joinery was straight-forward, thinking that's what the fence angles were for. As it turned out, it took a few test cuts to figure out the settings for this simple-looking joint. The manuals available cover the mitre joints and poly sides and even the three-way mitres but seem to be silent on this type of angled joints.

I have since used this approach for two other angled joints at 40 & 30 degrees as illustrated in the photo. If someone has a better method, please share it here (and with diagrams or photos if possible, as sometimes it's hard to understand the steps so described).  [thumbs up]

Chuck
 

Attachments

  • IMG_6565.JPG
    IMG_6565.JPG
    2 MB · Views: 853
So I have a few "different" questions...

Is this a 500 or 700?  Does the workpiece need to not show any fasteners on all 4 sides?  If you can do it, you might want to use pocket holes or something else. Hell, if you need to just screw it together and make some plugs to match and cover the screws.

The reason I bring this up is that I learned to love my Domino XL for all the things it is great at. I had to learn that doesn't mean to use it for EVERY project!  Once I got that through my thick skull, I can fly through my workflow a lot better.

Cheers. Bryan.
 
Something else to consider: with acute angles in the mix and using dominos it becomes really hard to do the glue up.

My experience is that even with a simple square mitered box you will break a sweat, so
 
Hi Brian,

I agree; the DJ is not a solution for everything. But for this fine furniture piece, no screws are allowed. Also, I looked to the use of DJ in this project as a challenge and hoped to be able to use the proven technique in other future angled pieces.

Mine is a DF 500.

Chuck
 
You're absolutely right, Bert about the glue-up. It took half a day get the clamping and gluing done (not including the dry-fittings).  For this kind of complex glue-up, I use either Old Brown glue or white glue. This time I went with the latter.

The attached pic shows the second joint (after the dovetail) being clamped and glued. The whole job had four dovetail joints and three angled joints to deal with. I needed to glue up one joint and wait half hour to clean up the squeeze-out with a chisel and then waited another 15 minutes or so (if it was yellow glue, the second wait would not be necessary) before moving on to the next joint.

Chuck


Attachments

  • IMG_7625.jpg
    IMG_7625.jpg
    2.2 MB · Views: 716
Back
Top