Help with domino placement

Carsie

Member
Joined
Sep 20, 2019
Messages
1
I was trying to deviate from using pegs on a project (see attached directions) to use dominos instead.  Now I'm in trouble because I can't seem to find how to line up the corresponding mortise.

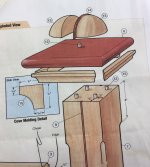
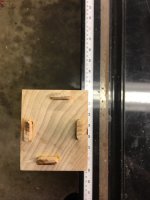
This is a bedpost.  The bedpost is 2-1/2" x 3".  sitting on top is a square platform.  I used the domino to cut the initial[attachimg=1][attachimg=2]View attachment 1View attachment 2 mortises in the post.  I used the left guide and set the mortise all the way around the post going in a clockwise direction.  See the picture attached of existing placement.  How do cut the mortise in the corresponding square piece that does on top so that it fits?
 

Attachments

  • Directions.jpg
    Directions.jpg
    824.1 KB · Views: 725
  • existing domino placement.jpg
    existing domino placement.jpg
    1.6 MB · Views: 677
It doesn’t look like there is consistency in the placement of those dominos from either edge.  If that’s true, I would cut them flush and start over.

Mark the centerlines on the top of the post and bottom of the cap.  Cut a spacer that is as thick as the overlap of the cap over the post.  This can be used as a shim under the fence when cutting mortises in the post. 

Trace out where the post will meet the underside of the cap.  Set your fence height to offset the mortise from the edge so you are sufficient inside the line you traced.  Use the centerline on the domino base to line to up with your centerline marks and plunge straight down into the cap.

For your posts, again line up the centerline on your post with the bottom of the domino and insert your spacer between the fence and post. 

I would just use 2 opposing dominos to attach the cap. 
 
Michael Kellough said:
This is a very simple task using dowel centers to locate dowels.

This is also a very simple task with Dominos. However, it appears you used four different datums when you installed the Dominos.

In your photo, it appears on the top Domino you indexed off the LH side of the post, while on the bottom Domino you indexed off of the RH side of the post.

It's the same situation for the LH & RH Dominos. Choose an edge and use only that for a datum. So, one datum for the top & bottom Dominos and one datum for the LH & RH Dominos.

I'm also curious as to why the Domino mortises seem larger than the Dominos. It's been my experience that the Domino's and mortises are line-to-line fits.
 
I guess my approach would seem crude and doesn’t offer use of the Domino.

I’d draw corner to corner diagonals to locate the center on the post and on the cap.

I’d drill a dowel hole at each center, glue a dowel into the post making sure it sits just high enough to go into but not out the cap’s top. Slather T88 epoxy on to the surfaces, press and let dry.

The cap will be perfectly centered a d solidly attached.
 
I did almost exactly the same thing for my nieces bed.  I drew center lines for the dominos, cut the ones in the cap narrow, the ones in the post wide.  I used the base of the domino machine as my reference point for height.  To get the posts, it was just clamping them flat on an MFT.  For the caps, I used a surface perpendicular to the MFT to keep them upright.  Then I used a flat board planed to the right offset to register the base of the domino against the MFT.
 

Attachments

  • IMG_1137.JPG
    IMG_1137.JPG
    1.9 MB · Views: 225
Looking further down the road, past the present locating issue, I'd simply reduce the number of Domino's used to ONE. That's the nice thing about using Domino's. Using only 1 will locate the part and provide anti-rotation capabilities at the same time. It will take 2 dowels to provide the same feature.

If this was my project, I'd countersink the bottom side of Item 6 to hold 2 flathead screws that would secure both halves of Item 13.

I'd then place 1 Domino in the top surface of Item 9 to secure Item 6. All the items will be wood glued to each other so that's where the real joint strength is coming from.
 
In my experience the easiest solution to connect two widely differing parts using dominos is to use a paper template, a slim center punch to transfer reference points onto the workpiece, then using a square to construct the needed references lines to align the domino machine onto. Doing that I havn't experienced any issues with alignmene, even when morticing both sides in the small setting (using a DF 700 XL).

Though on this design I wouldn't use a domino buthttps://www.rampa.com/de/en/hardwood/142-muffen-typ-skd330.html (or a similar insert) going into the center of the #13+14 decorative assembly, replace #12 with a screw (going into the insert from below #6) that I would glue/epoxy to #6 (but not the insert) while being tightened to the decorative assembly (and while that is in the intended orientation to #6). After the epoxy cured I would unscrew the decorative assembly and simply screw #6 to #7 (with the #15s fixed to #7, not #6), countersunk from the top in the area that is hidden by the top decorative assembly, then screw that back on to hide these screws.

This would allow for disassembly, eg. in case #6 needs a new finish (as that part would be what would rub off on a wall in case that bed is located next to one while being used for nighttime sports) which would be way easier to apply when it can be separated from the rest.
 
Back
Top