Frank Pellow
Member
- Joined
- Jan 16, 2007
- Messages
- 2,742
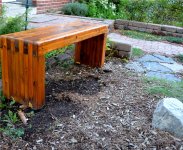
I built a garden bench out of construction grade cedar 2x4s a few years ago and left it outside winter and summer in direct contact with the ground. I should have known better. [embarassed]
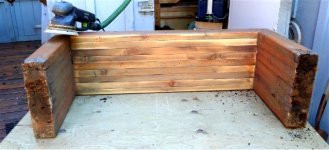
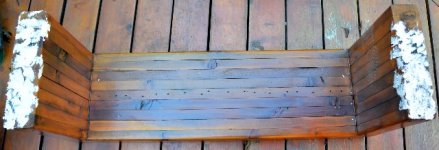
When I examined the bench closely, I found that the feet were beginning to rot:
[attachthumb=#1]
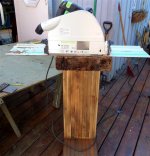
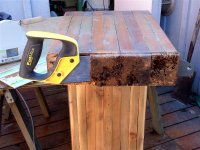
I first cut about 1 centimetre off both feet:
[attachthumb=#2] [attachthumb=#3]
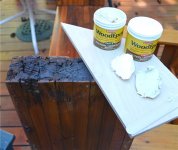
I decided to try this wood restoration kit:
[attachthumb=#4] [attachthumb=#5]
that I found at Lee Valley: http://www.leevalley.com/en/wood/page.aspx?p=20075&cat=1,190,42997
The first step was to mix up the liquid wood stabilizer and pour it onto most of the bottom of the feet. After allowing that to dry for a day, I mixed up the wood filler. Just kneading it by hand worked best:
[attachthumb=#6]:
I applied this "putty" by hand to fill the remaining holes:
[attachthumb=#7]
After drying for a couple of hours, I sanded it:
[attachthumb=#8]
The colour does not match, of course, but its just at the bottom of an outside bench and I don't think that it will be noticed. I believe that I could have added dye when mixing the putty and I will probably try this the next time that I use this kit.
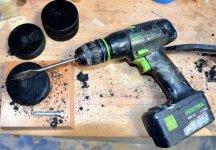
If I stopped at this point, the legs would just rot again in a few years. I searched for appropriate feet but could not find any. Then, it occurred to me that there was a very good and cheap solution to the problem. Use hockey pucks (being Canadian, I should have thought of this sooner [embarassed]). So, that's what I did:
[attachthumb=#9] [attachthumb=#10] [attachthumb=#11]
When I examined the bench closely, I found that the feet were beginning to rot:
[attachthumb=#1]
I first cut about 1 centimetre off both feet:
[attachthumb=#2] [attachthumb=#3]
I decided to try this wood restoration kit:
[attachthumb=#4] [attachthumb=#5]
that I found at Lee Valley: http://www.leevalley.com/en/wood/page.aspx?p=20075&cat=1,190,42997
The first step was to mix up the liquid wood stabilizer and pour it onto most of the bottom of the feet. After allowing that to dry for a day, I mixed up the wood filler. Just kneading it by hand worked best:
[attachthumb=#6]:
I applied this "putty" by hand to fill the remaining holes:
[attachthumb=#7]
After drying for a couple of hours, I sanded it:
[attachthumb=#8]
The colour does not match, of course, but its just at the bottom of an outside bench and I don't think that it will be noticed. I believe that I could have added dye when mixing the putty and I will probably try this the next time that I use this kit.
If I stopped at this point, the legs would just rot again in a few years. I searched for appropriate feet but could not find any. Then, it occurred to me that there was a very good and cheap solution to the problem. Use hockey pucks (being Canadian, I should have thought of this sooner [embarassed]). So, that's what I did:
[attachthumb=#9] [attachthumb=#10] [attachthumb=#11]
Attachments
-
 The feet of the garden bench are starting to rot -small.JPG78.1 KB · Views: 467
 -
 The feet of the garden bench are starting to rot -2 -small.JPG120.9 KB · Views: 432
 -
 The feet of the garden bench are starting to rot -3 -small.JPG95.3 KB · Views: 437
 -
 The feet of the garden bench are starting to rot -04.jpg44.7 KB · Views: 430
 -
 The feet of the garden bench are starting to rot -05 -small.JPG109.1 KB · Views: 407
 -
 The feet of the garden bench are starting to rot -06 -small.jpg168.1 KB · Views: 365
 -
 The feet of the garden bench are starting to rot -07 -small.JPG84 KB · Views: 378
 -
 The feet of the garden bench are starting to rot -08 -small.JPG107.3 KB · Views: 425
 -
 The feet of the garden bench are starting to rot -09 -small.JPG133.9 KB · Views: 609
 -
 The feet of the garden bench are starting to rot -10 -small.JPG119.1 KB · Views: 426
 -
 The feet of the garden bench are starting to rot -11 -small.jpg674.1 KB · Views: 666
") (trying to not get killed by wives)
(trying to not get killed by wives)