Home made parallel guides?

Scorpion

Member
Joined
Jan 15, 2014
Messages
587
What did ya make and why?  Curious to see what other's have done instead of buying Seneca, Woodpeckers, or Festool.  I was thinking about making some but I'd like a little inspiration from other Festoolers.

Some requirements: 

I'm not super concerned with "narrow strips" being a capability.  Length isn't critical.  I'm going to want a few different lengths and sets so I can swap between super easily and/or have multiple setups so I'll likely make multiple sets in various lengths.

TIA,

Matt
 
I have the Seneca and Festool versions.  Prefer the Seneca ones.  I liked the Woodpecker ones for easy breakdown but it was a lot of money.

I would like to see,Seneca type with faster attachment and removal.  The square nuts and Allen screws don't make them easy to set up or change width of guides on the rail location.  Their narrow adapter is great.  I just ripped 50 plus furring strips to a consistent 1.5 inch width from quarter inch plywood.  So fast and simple. 

Did you see the ones Ron Paulk made from the Festool Carvex jigsaw circle cutting attachment?  Might be something there to give you ideas.

Neil
 
neilc said:
I would like to see,Seneca type with faster attachment and removal.  The square nuts and Allen screws don't make them easy to set up or change width of guides on the rail location. 

Did you see the ones Ron Paulk made from the Festool Carvex jigsaw circle cutting attachment?  Might be something there to give you ideas.

Neil
Thanks for the feedback.  What about the fastener system makes them cumbersome?  Do the square nuts not slide easily or is it fumbling with an Allen wrench?  Woodpeckers have Philips screws which are easier from a hand tool perspective but have received criticism because they tend to strip easier. 

I did see the Ones Paulk has shown on his channel.  Whomever that contest winner was that submitted that as an idea was a clever individual.  Only thing I dislike about that setup is how fragile those circle cutting jigs are.  I'd like the fixture to easily stay in place while the rail gets moved around or hung on the wall.
 
Once the square nuts are in they slide just fine, it's just that you have to position the nuts just so to get them to slide into the rail channel, and sometimes it can take a few extra seconds to wiggle them on.  But it's really not that big a deal.

Scorpion said:
neilc said:
I would like to see,Seneca type with faster attachment and removal.  The square nuts and Allen screws don't make them easy to set up or change width of guides on the rail location. 

Did you see the ones Ron Paulk made from the Festool Carvex jigsaw circle cutting attachment?  Might be something there to give you ideas.

Neil
Thanks for the feedback.  What about the fastener system makes them cumbersome?  Do the square nuts not slide easily or is it fumbling with an Allen wrench?  Woodpeckers have Philips screws which are easier from a hand tool perspective but have received criticism because they tend to strip easier. 

I did see the Ones Paulk has shown on his channel.  Whomever that contest winner was that submitted that as an idea was a clever individual.  Only thing I dislike about that setup is how fragile those circle cutting jigs are.  I'd like the fixture to easily stay in place while the rail gets moved around or hung on the wall.
 
Edward A Reno III said:
Once the square nuts are in they slide just fine, it's just that you have to position the nuts just so to get them to slide into the rail channel, and sometimes it can take a few extra seconds to wiggle them on.  But it's really not that big a deal.

Scorpion said:
neilc said:
I would like to see,Seneca type with faster attachment and removal.  The square nuts and Allen screws don't make them easy to set up or change width of guides on the rail location. 

Did you see the ones Ron Paulk made from the Festool Carvex jigsaw circle cutting attachment?  Might be something there to give you ideas.

Neil
Thanks for the feedback.  What about the fastener system makes them cumbersome?  Do the square nuts not slide easily or is it fumbling with an Allen wrench?  Woodpeckers have Philips screws which are easier from a hand tool perspective but have received criticism because they tend to strip easier. 

I did see the Ones Paulk has shown on his channel.  Whomever that contest winner was that submitted that as an idea was a clever individual.  Only thing I dislike about that setup is how fragile those circle cutting jigs are.  I'd like the fixture to easily stay in place while the rail gets moved around or hung on the wall.
with all the discussion about parallel guides, is there anything not satisfactory about the Woodpeckers system other than wishing for lower prices? Would like to hear feedback from one of the actual WP Onetime Parallel Guide users.
 
Edward A Reno III said:
Once the square nuts are in they slide just fine, it's just that you have to position the nuts just so to get them to slide into the rail channel, and sometimes it can take a few extra seconds to wiggle them on.  But it's really not that big a deal.

Yeah, the square nuts aren't fun in that regard.  The t-nuts used by woodpecker are better in that regard.  They're longer oval shapes that naturally find their way into the groove if you get them close.  Depending on the thread pitch of the button head machine screws used on the ones you have, you may be able to switch over to this other kind for not much money.
 
Klemm said:
with all the discussion about parallel guides, is there anything not satisfactory about the Woodpeckers system other than wishing for lower prices? Would like to hear feedback from one of the actual WP Onetime Parallel Guide users.
I would buy the Woodpeckers again, but I have been using mine differently only using one side not connected to the Festool rail, and haven't been breaking down sheet goods lately to give them a real world cabinet building test.

Since you can't get them anymore, or at least for awhile, one of the other brands like Precision, Seneca, etc would find it's way to me.

The t-nuts are nothing special and can be bought from Amazon, Ebay etc. They are commonly used for 80/20.
 
Klemm said:
with all the discussion about parallel guides, is there anything not satisfactory about the Woodpeckers system other than wishing for lower prices? Would like to hear feedback from one of the actual WP Onetime Parallel Guide users.

I'm curious too.  Specifically I'm interested to know how the extendable stuck works out given its in so many pieces.

What id really like to do is take some measurements from the two different systems and compare accuracy.  The way they both attach to the rail is different in concept in how they locate and square themselves to the track.

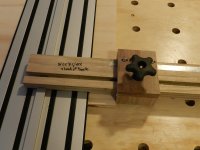
Seneca uses a slot that captures the extrusion slot on the outside profile of it. 

5434aa6a2683abd6d5681208de916ccb.jpg


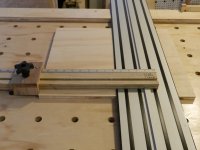
Woodpeckers uses the inside of the slot to align with a small tapered profile.

7fcc7b35efc6f77aa56605ac62926c60.jpg


Between the two, the WP design should locate better however the extrusion slot may begin to widen from over tightening (or damage created by clamps or something like them that deforms it from the inside).

If the Seneca version were machined with tight tolerances it would locate just as well but instead protect the integrity of the extrusion shape.  The same is true for its forms ability to locate if the channel shape becomes deformed inward.

Now to how the brackets attach to the "sticks".  Seneca fits inside a machined pocket in the bracket which should ensure its attached correctly (unless the slot is way over sized).  They use hex button cap screws that require an Allen wrench.  PITA unless you keep them handy but very hard to strip.  Head shape has no locating properties so they depend on the hole to do the dirty work.

1a512d78d2167940e0dbd89c3f819d7e.jpg


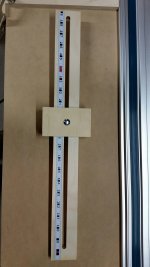
WP's is captured by only the bolts and t-nuts into the double slots in the extrusion (stick).  Technically having only two t-bolts next to each other won't guarantee the stick to be straight.  Three would do better but still rely on the t-bolts and how tightly they fit the slot and the hope that the screws pull straight.  Screws on the WP are Phillips counter sink machine screws.  By nature of the design, the screws attempt to self locate but may not be perfect if the fastener below isn't allowed to seat squarely.

a9a2507d61cb4bdfe2ebae26516fd819.jpg


7fcc7b35efc6f77aa56605ac62926c60.jpg


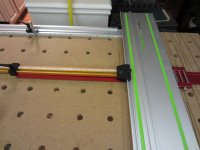
One is red...the other is black...
 
Why not create a bar that connects the two nuts on the Seneca or WP guide to remove the issue of the nuts being hard to insert?    Far easier for insertion and spreads the clamping pressure.

I'd like to see a place to store the hex key with a hole drilled into one of the guides with a rubber grommet to keep it in place, perhaps.

 
I have the Ripdogs (Ripdogs), they have worked well for me. Though I have the Festool parallel guides now, I still use the ripdog set for certain setups. There is also a basic 3D printed version on thingiverse for those who have the ability to print there own and add the connectors to the Incra tracks. Not the quality of Ripdogs or Seneca, but an alternative for those who have the technology.
 
The Rip dogs are nice.  I like the design the best with how it goes inside the slot with a straight piece instead of a machines taper like WP's and it hugs the outside of the profile.  It also has a pocket for the stick forcing it to be straight. 

ba8a4cd804003867cf827ba65c1a5759.jpg


I also like how simple thumb screws are used instead of the Phillips or hex fasteners on the other two designs.  Also notice the elongated t-nut. 

My preference thus far.
 
Scorpion, thanks for the extensive picture documentation. I have the SENECA guides, very nicely made, but short on final gaging accuracy and user friendliness when it comes to INCRA track and scales.
Where I am less than satisfied is that last bit of accuracy in installing of many of the accessories I have had a chance to see up close or actually use. The issues I see are less of manufacturing problem and more of fundamental design issues.
This thread is really a great and helpful overview all in one place. I'll save it for future reference.

Hans
 
I had to make my own parallel guides for my DeWalt, nobody offers one.  I basically copied a design from a guy on the SawMill Creek website.  I like them but I can't clamp while using them.  They have to go at the ends of the wood you're cutting, like the festool ones, and I don't like that.  So I built what I call track positioning guides.  They have a dado that goes over the guide rail of the track.  The scale is adjusted so it reads the size of the piece you will cut.  There is one to use kind of like a parallel guide with the wood you are cutting under the track and another positioning guide that is for cutting pieces off ahead of the track - like for thin strips.  They are simple but work well.  They are kind of like setting a stop for a CMS.  Repeatability and no measurements to potentially get wrong (I have been an inch off many times).  Sometimes I mark and use the guide, however, figuring that the two check each other.
 

Attachments

  • DSCN1527.JPG
    DSCN1527.JPG
    2.4 MB · Views: 2,649
  • track positioning jig, work under track.JPG
    track positioning jig, work under track.JPG
    231.8 KB · Views: 3,221
  • track positioning jig, work ahead of track.JPG
    track positioning jig, work ahead of track.JPG
    239.1 KB · Views: 1,550
not sure I follow this DeWalt guide - how does the saw run on the track when clamps holding the guides  straddle part of the rail?
or - if you remove the clamps after set-up, how do you pick up on the previous set-up for repeat cuts?
Hans
 
I just used my Ripdogs parallel guides for the first time today. I really like how they work. Evidently one of the corners on my guide rail got dinged at some point. I couldn't slide the guide block into the rail so a few strokes with a file were needed to clean up the slot in the rail.

The Rip Dogs product is well made and seems very reasonably priced. It made breaking down $500 worth of plywood a little less nerve wracking! And FOG members get a 15% discount if I recall correctly.
 
Here's a couple photos of some simple and low tech parallel guides that I made last year.  I have one jig with a built in tape that I set to the measurement that I'm looking for and then both of the guides get set off of the jig.  Then I just clamp the guides on and set the track against them.  Not the slickest system in the world but it was quick to make and is very accurate.
 

Attachments

  • 20150416_101740_resized.jpg
    20150416_101740_resized.jpg
    821.7 KB · Views: 20,346
  • 20150416_101755_resized.jpg
    20150416_101755_resized.jpg
    909.1 KB · Views: 6,973
Ripdogs are a well thought solution, PROVIDED, you have a 20mm hole pattern worktable [smile]

Dan's approach using an adjustable gage block to ensure absolutely identical parallel guide settings is a great way to go. No way to let parallax scale reading problems or anything like that get in the way. I had been considering this approach with my SENECA guides.  - now I will explore this approach in hopes of getting me away from those pesky INCRA segmented scales. I will just use the INCRA tracks as a means of providing stop blocks.
thanks Dan - you're a very creative fellow and craftsman. I had seen you're Multipurpose Table video before- very well thought out!
 
Kleem,

My DeWalt guides clamp to the edge of the track, probably less than an inch is available for the clamp while still allowing the saw to go past.  It works but there is not as much space as I have in that picture.

My track setting jig is like the post a couple below it except I register off the guide rail instead of the track edge (which is flexible).  My point it just that the idea is the same except for where you touch the track.

Jim
 
What size bars do you use ?I was thinking to buy the 24" bars Plus the 7" rail giving me a 35" capacity.
Making small rips does that make the setup tip off the edge of table?
 
Back
Top