Home office

rnt80

Member
Joined
Mar 30, 2008
Messages
953
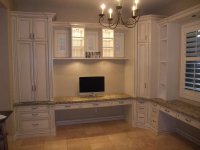
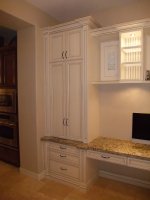
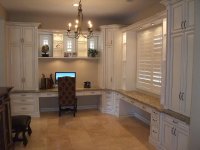
I ended up working on this project a lot longer than I had originally anticipated, in large part due to reduced time in the shop.  With that said, I finally wrapped the install up on Saturday.  Before I got started the room housed a couple of desks that served as a home for a computer and a sewing station.  The intent of the project was to transform the room into a home office/homework base for the family.  I started with a blank canvas and through discussions with the homeowners came up with a design that would allow four of their kids to be seated at a time (thus the wide openings in the base sections), provide a wealth of storage for books, games, etc, and also be aesthetically pleasing.  Between the four bookshelves and the openings in front of the shuttered windows there is plenty of space for them to display pictures, collectables, etc.  To save a little money the drawers are half inch maple ply with side mount soft close slides.  Outside of recommending someone to the homeowner for the granite I had nothing to do with the countertops.  The finish is Target's pastel white base topped with sealer and then hit with Van Dyke brown glaze.  Everything was then coated with Target's satin poly.
 

Attachments

  • DSCF4665.jpg
    DSCF4665.jpg
    278.2 KB · Views: 1,469
  • DSCF4667.jpg
    DSCF4667.jpg
    269.3 KB · Views: 1,046
  • DSCF4669.jpg
    DSCF4669.jpg
    240.7 KB · Views: 977
Nicely executed as usual!  Love the translucent shelves with wooden edging.  Glass or plexi?  How thick are the doors?  They look thicker than normal due to the molding / interior profile.

Peter
 
Peter Halle said:
Nicely executed as usual!  Love the translucent shelves with wooden edging.  Glass or plexi?  How thick are the doors?  They look thicker than normal due to the molding / interior profile.

Peter

Thanks, Peter.  The shelves are 1/4" thick glass and are a pretty standard feature on most built-ins/display cabinetry that I do.  The doors are a standard 3/4" thick and are constructed from mitered door stock that I get from a local moulding company.  I'm helping a friend redo his kitchen next and will be using the same profile except that they will be stained, not painted.
 
Very nice indeed. I am really impressed with the finish. The dark highlights really caught my eye. That must be the brown glaze?
 
Mopowers said:
Very nice indeed. I am really impressed with the finish. The dark highlights really caught my eye. That must be the brown glaze?

You're correct, that is the glaze.  I really should be charging more for this finish.  The process is incredibly time consuming and on a job of this size it takes a loooooooong time to get through the finishing process.
 
Russ:
Looks great! Is that a granite/quartz top?
Do you have it made to fit under the upper cabinets or is there a cut out?
Tim
 
Thanks, Tim.  It is a granite top.  I had to wait for that to be installed before I could get the uppers in.  They did a really nice job with the granite - it bumps out in front of the pillars and they drilled a couple of holes for cord access.  The customer is thrilled with the entire project and that's what I aim for.
 
Looks great,

Can you share some more about the door frame material.  How do you fasten the mitered corners?  Does it already have a groove for the panels?
 
Russ,

Are the crown molding pediments already made to size and finished?  Or did you cut the molding to fit once the cabinets were in?  The miters look great.

Jon
 
http://qwpdoors.com/yahoo_site_admin/assets/images/new_Mitered_copy.24284350_std.jpg

This is pretty close to the profile of the door stock.  I buy two sizes (for doors and drawer fronts) locally.  There are router bits that you can buy to make the profile but you would have to run the groove separately.
Thanks, Jon.  All the trim work was done on site - you should have seen the mountain of crown off-cuts I had by the end of the day  [eek]
 
I'm sure it was great work but I wouldn't know.  The pictures are so large they take way to long to pull up to full size.  Please people resize your picture before posting.
 
Russ,

That leads me to my next question:  do you measure for your crown?  Or do you cut them oversized then mark each piece?  I do the latter.  It takes time, but I find I make more trips to the saw when I try to just measure and fit them.

Thanks,

Jon
 
Jonhilgen said:
Russ,

That leads me to my next question:  do you measure for your crown?  Or do you cut them oversized then mark each piece?  I do the latter.  It takes time, but I find I make more trips to the saw when I try to just measure and fit them.

Thanks,

Jon

Jon, I typically measure and cut to a rough fit and then mark it.  Some days I'm spot on and some days you'd think I'd never done this before  :-\.  I guess I could pre-cut the pediments but since I don't have the room to pre-assemble much of what I do I always like having the ability to adjust for things on site.  Here's one more pic with all the lights on and some items on the shelves.
 

Attachments

  • DSCF4715.jpg
    DSCF4715.jpg
    281.4 KB · Views: 497
rnt80 said:
I started with a blank canvas and through discussions with the homeowners came up with a design that would allow four of their kids to be seated at a time (thus the wide openings in the base sections), provide a wealth of storage for books, games, etc, and also be aesthetically pleasing. 

Great space for the kids to get some real work done.
Coming from a family of 7 children, you don't often see families with 5 children any more.
I believe it is important to have a quiet secure place to do their  home work etc. Sadly, many children do not and it's a miracle they get anything done.

Tim
 
The customer on this job cc'd me on an email he sent to the granite installer about issues they're having with the granite.  The seam to connect the two slabs is to the left of the corner cabinet and it has come apart (see picture).  When they put the underlayment on top of the cabinets they did so using wide strips, not a solid continuous piece.  I'm not sure how much that has led to the current situation but I don't think it has helped matters.  I'm not responsible for the granite but do you guys have any suggestions?  The LAST thing I want to do is uninstall some of the cabinetry in order for the granite issue to be fixed.
 
Back
Top