How can I recover these patio stairs?

SittingElf

Member
Joined
May 28, 2013
Messages
1,371
OK... so we're renting a house in Warner Robins, Georgia for the next two years while my wife is stationed at Robins Air Force Base.  25 year old ginormous house with a variety of "issues".

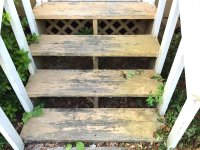
We have two screened patios off the back of the house with stairs leading down to the pool area. The stairs have been neglected, probably since the house was built. I don't intend on replacing the stairs because we're just renting, but I DO want to "improve" them.

I'm up from my Florida permanent home to get my wife and son settled into the house, and with some forethought, I loaded the SUV with various tools I thought I might need for whatever I might find in the house. So I have to make do with what I have with me.

Here's the inventory of tools I have on site:
RO90, RO150, ETS 150/3, DTS400
Granat assortments from 40 up for all the above
CXS, T 18+3
PSC 420 plus the Accessory kit
Grex Pinner driven off my Rolair JC10
Bosch Multi-tool (Waiting for the Vecturo and making do in the meantime)
Centrotec Installer Kit, Centrotec Ratchet set
CT36

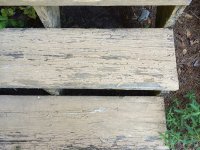
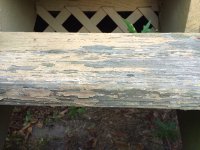
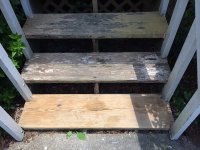
So....The question is whether I can go directly to the RO's, starting with 40 grit, or do I really have to scrape first?  I realize that the big loose chips can be quickly removed with the Multitool Scraper... but I only have one blade and don't think it would last scraping all the stairs except for the big chips.

Once I'm down to bare wood, I'll pin and/or screw some loose connections to the rails, and then use Behr Weatherproofing Stain to finish. Doesn't have to be a fine art project, just functional.

Your expert assistance is greatly appreciated... especially since my wife will be seeing my Festool "collection" in use for the first time, and she NEEDS to be impressed before she realizes just how much MORE of the green is in my garage in Florida!! [scared]

[attachimg=#]

[attachimg=#]

[attachimg=#]

Cheers,

Frank
 

Attachments

  • Stairs1.JPG
    Stairs1.JPG
    427.7 KB · Views: 1,024
  • Stairs2.JPG
    Stairs2.JPG
    457.3 KB · Views: 1,008
  • Stairs3.JPG
    Stairs3.JPG
    358.9 KB · Views: 1,126
Frank,

Based on what you have with you RO150 and RO90 for areas to small for the RO150.  I personally would run the CT at a little higher suction than normal.

Screw the connections.  Pins would be worthless.

Peter
 
Peter Halle said:
Frank,

Based on what you have with you RO150 and RO90 for areas to small for the RO150.  I personally would run the CT at a little higher suction than normal.

Screw the connections.  Pins would be worthless.

Peter

Thanks Peter,

How fine a grit would you go to before staining?  These are old boards!

Frank
 
Frank,

As you said these are old boards, and they are part of a stair.  The stain you end up applying may be either a semi transparent or a solid (basically paint).  I would stop at what grit you have closest to 100 - 120 and see if you are happy.  In my opinion courser for steps is better.  Starting next week my RAS and I get to start on some decks.  Yippee!

Peter
 
A lot of that paint looks like it will come off if a snail tries to pass so just use an old fashioned paint scraper.
Get a file to keep it sharp. Don't bother with carbide. While it's might be true that carbide doesn't dull
it's is absolutely true that carbide is never sharp enough. Okay maybe they're good for paint on concrete...

Since you don't want too smooth (slick) a surface on steps I wouldn't sand finer than 80 with a machine.
If hand sanding 120 will be equivalent.

Once the surfaces are sanded you'll end up with square edges. Round those over to a minimum radius of 3mm.
 
Any rot in those boards, that is my main concern that they will give out on you. If the wood is ok I would use the scraper around the nails/screws, set them at a good depth then send away with RO 90 to a grit of a 100. You may need to do a couple of epoxy patches then paint/ finish. Then you can buy some anti slip strip to put on the stairs if they are to slick.
 
It looks to me that those treads are removable without too much effort, so just pull them off and work on them on your MFT (Workmate or a workbench of any sort).  Better and easier than working on them in situ.  Once you pull them you can determine if any (or all) need to be replaced rather than rehabilitated. 

 
The Ro 90 and 60 granat will make short work of that

I'd then just treat them straight away you don't want it too smooth outside
 
Easy job. First use a paint scraper and you'll remove half of the paint with ease.

Then The RO150 with 80 grit to sand everything you can reach, and then use the RO90 with the same grit to do the final spots you couldn't reach with the 150.

Finally a quick hand sanding with 120. I would use a sanding sponge.

 
I would go to HD and buy 4 or 5 PT boards and replace the ones on the stairs.  Those boards will cost
 
+1 on replace them
I had an issue with some rotted trim here in Atlanta I found a 3" dia wire brush in my TDK12 was the most efficient at removing paint and any funky wood.
In the end I guess I spent more time scraping sanding filling and sanding that it would have taken to just replace it to begin with. 
 
I would start with assessing the stringers, the pads, and the attachment to the house and work my way up. The vegetation around the stringers keeps a lot of moisture around the wood. There appears to be some chips or large   cracks in the stingers that are visible.
 
Well....2.5 hours later, and after paint remover, scraping, brushing, aggressive sanding with the RO90 starting with 40, then 60, then 80 grit Granat. This is the result.

Problem as previously mentioned is that the support system is clearly rotting and pieces are falling away with only finger pressure.

Guess I'm gonna be headed to the BORG and then try to figure out how to build the under supports which I've never done before! [sad]  Wish I'd brought my domino's up here with some SIPO.  Gonna be stuck with nails and screws, unless I put this off until my next return from Nigeria in late August.  HEYYYY! That's a GREAT idea... procrastinate!! [thumbs up]

Oh well.... other projects including a lot of landscaping that the previous tenant apparently didn't think was necessary. They seemed to think weeds were pretty flowers, and limbs that nearly reach the ground as well as overgrown hedges were esthetically pleasing. [mad]

Thanks for all the advice folks.  Anyone care to tell me how to build the step supports??

[attachimg=#]

Cheers,

Frank
 

Attachments

  • Sanded.JPG
    Sanded.JPG
    394.7 KB · Views: 963
The stringers/carriages are not cut properly to begin with.

Go to the App Store- down load BuildCalc. I'll type you through getting the stringers laid out properly.

You'll need- a framing square, stair gauges, circular saw (Peter has a way toy do this with the TS posted somewhere), hand or jig saw.

My preferred material for stringers are LVL's if you can get treated 1-3/4"x 11-7/8" LVL's that would be great. Odds are you'll end up with 2x12's.

Use 2- 5-1/2 planks for the treads, you can gap them and they'll drain better.

Your code may now require risers also.

Tom

 
Here is a link to the thread that Tom mentioned.  http://festoolownersgroup.com/festool-tools-accessories/ts-saws-cut-great-stair-stringers/.  Probably overkill in this situation.  But if you decide to go the route I show, use 2 x 12's and rip them using a rail to make sure that the sides are parallel to each other and that they all match.  Otherwise the method will create uneven stringers.

For pressure treated stringers, especially if a closed riser is required, I attach blocking to the inside of each stringer where the treads will be and fasten them to the stringer.  I then fasten the treads to them.  The stringers are carrying the load but when fastening I am not attaching to end grain which will over time split the stringer.  Call me stupid, call me crazy, but it works.

Peter
 
VW mick said:
Frank

You will probably need a kapex to replace those steps

Great point!! [big grin]

"Honey, those stairs are dangerous. Kai might get badly hurt, and I just need this one more machine to make really nice ones!"

Cheers,

Frank
 
Back
Top