How Can I Repair a Cut Appliance Cord

GoingMyWay

Member
Joined
Oct 11, 2017
Messages
3,784
One of the conductors in the cord of my neck/shoulder massager has been cut.  I think the dog started chewing through it when he was a puppy and it recently completely broke.

[attachimg=1]

[attachimg=2]

My initial thought was to use wire nuts and some electrical tape, but that will create a "lump/bump" in the cord.  Maybe solder the wire back together? 

There is stitched closed zipper that should give access to where the wire connects to the motor, but I'd rather not mess with disassembling the whole massager to replace the entire cord.

[attachimg=3]

Does anyone have any suggestions on how I can most easily (but safely) repair this? 

Thanks!
 

Attachments

  • 20190617_153159.jpg
    20190617_153159.jpg
    814.5 KB · Views: 1,671
  • 20190617_153205.jpg
    20190617_153205.jpg
    768.1 KB · Views: 1,635
  • 20190617_153952.jpg
    20190617_153952.jpg
    685.1 KB · Views: 1,591
Cut through the complete flex all wires, at the point of the damage.
Slide a piece of heat shrink tubing over the main flex, and keep it away from the severed part.
Strip both ends of all wires back enough to solder them. Slide smaller shrink tubing over the small wires, make sure the lengths are long enough to cover the repairs.
Solder each small wire back together, don’t get the joint over hot, as it will start to shrink the tubing.

As each wire is soldered, let it cool, then slide the shrink tubing over the repair, warm it with a lighter until it shrinks. Repeat with the other wires. Once they’re all soldered and insulated with the shrink tubing, slide the larger shrink tubing over the repairs, shrink the larger tubing, let it cool and you’re done.

If done properly, this is a safe and durable repair. Otherwise it’s a full replacement flex.
 
Thanks for the reply and the instructions.  I kinda thought that might be the proper way to fix it.

Does anyone have any recommendations for a soldering iron or ideally a kit that includes the soldering iron, solder, and shrink tubing?

I've never done any of the this type of soldering.  I've only had limited success soldering copper plumbing pipes.
 
Stop in your local Ace or similar hardware store.  Weller makes a range of guns.  A basic 'pencil type' will do just fine.  They should have a small pack of solder as well as shrink wrap tubing. 

Or you can get this all on Amazon.

A match or lighter will shrink the tubing once you get ready.

Good luck -
 
Is patching a cord with this method ok with your electrical code? I would think it is only allowed for low voltage, not high voltage. 
 
If this type of repair isn’t inline with your area code, you could use a plug type connection, I didn’t suggest this originally because looking at the massager, and how close the cut is to it, a plug may impair comfort?
 
Is it possible to access the end of the power cord inside the device. If so since the damage is so close to the end maybe just elect to lose those couple inches in the overall cord length and make the repair internal. That way no splices to worry about and nothing visible on the exterior to indicate it was ever repaired.

Without being able to see the termination of the power cord internally it's difficult to advise if this type repair is even possible, but it may be worth considering if it is possible to gain access to inside the device without damaging it.

If you are not comfortable with soldering then this type repair might be something left to someone with more experience but it shouldn't cost much to have a small appliance repair shop fix it. You could invest in the tools and learn to solder but in the end it may be cheaper (and a better quality repair) to let someone else do it.
 
Jiggy Joiner said:
If this type of repair isn’t inline with your area code, you could use a plug type connection, I didn’t suggest this originally because looking at the massager, and how close the cut is to it, a plug may impair comfort?

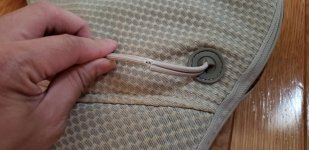
I'm not sure if there is any code or regulations regarding an appliance cord like this.  You're exactly right about the proximity of the cut in the wire relative to the massager itself.

Bob D. said:
Is it possible to access the end of the power cord inside the device. If so since the damage is so close to the end maybe just elect to lose those couple inches in the overall cord length and make the repair internal. That way no splices to worry about and nothing visible on the exterior to indicate it was ever repaired.

Without being able to see the termination of the power cord internally it's difficult to advise if this type repair is even possible, but it may be worth considering if it is possible to gain access to inside the device without damaging it.

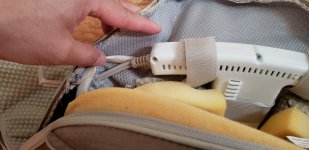
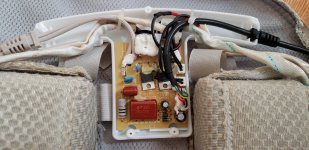
I cut the stitch that held the zipper closed.  This is what's inside.

[attachimg=1]

We still can't see the termination points unless I open up the plastic housing.  The housing just appears to be closed with screws.  I wonder if I should investigate further and open up the housing.  I am a little worried that the more I disassemble, the more likely I might not be able to put it back together again so that it works.  Though, since the wire is cut it's not like the massager is currently working anyway.

I've had bad experiences in the past taking working items apart only to usually end up breaking them or something in the process.  That's why my motto now is "if it ain't broke, don't fix it."  I guess I should be ok in this case since it's already broken.

Bob D. said:
If you are not comfortable with soldering then this type repair might be something left to someone with more experience but it shouldn't cost much to have a small appliance repair shop fix it. You could invest in the tools and learn to solder but in the end it may be cheaper (and a better quality repair) to let someone else do it.

This seems like the ideal time to try to learn how to solder, but you're right this is something that would definitely be a better quality repair being done by someone who knows what he or she is doing.  Also I don't know how many times, if ever I'll need to solder wires together in the future.

I guess I'll try to open up the plastic housing to see how the wires terminate.  If it's something easy then I wouldn't need to buy anything to make the repair.

Doh - after typing everything up, I just realized that the wire doesn't exactly pass straight through directly into the plastic housing.  It's got that joint/elbow thingie (not sure what you call it) that likely "slides/locks" into the housing and also allows the cord to flex a little.  If I cut that section of wire out then I will no longer have that piece.  Hmmmmmmmm.  Back to the soldering option?
 

Attachments

  • 20190618_075817.jpg
    20190618_075817.jpg
    639.9 KB · Views: 1,622
The plastic, flexible device is a strain relief, it keeps any tugs on the cord from pulling on the connections inside the white plastic case. It looks to be a type that's molded onto the cord, there are other types that can slip onto the cord.
As mentioned, the best repair might be to shorten the cord to eliminate the damaged section and redo the connections inside the plastic case. If you're lucky there may be spade connectors inside, and you would just need to crimp new connectors onto the wires, so you'd need to buy a crimper instead of a soldering iron. Accessing the connections is likely possible by removing the screws that hold the white plastic shell together.

It's likely that the repair is simple, but if you don't have the tools and knowledge, it's not so simple anymore. Are there any small appliance repair shops or perhaps maker spaces near you where you could get it repaired, or perhaps get guidance and access to the needed tools (maker space)?

For a possible alternative if you want to tackle it yourself; There are two wire plugs and in-line outlets that don't require tools, if this device doesn't draw a lot of current, you could probably use those to make a plug connection that could nestle inside the cover. Any hardware store should carry them, you would put the outlet part on the long cord and the plug on the short piece of cord. This would more or less turn the long part of the cord into an extension cord with a very short power cord on the device.

 
Oh, it's called a strain relief!  I didn't know that's what it's called, but the name makes perfect sense.

I just unscrewed the cover. 

[attachimg=1]

The wires are soldered directly on to the board.  Is the white goop just like a glue or caulking to better secure the wires so it's not relying on the solder connection alone?

Seems to me like it might be easier to splice the wire on the outside like Jiggy had suggested, especially because I'm not sure what would secure the wire if I cut out the strain relief.
 

Attachments

  • 20190618_091716.jpg
    20190618_091716.jpg
    836.3 KB · Views: 1,576
You're kind of stuffed on this one because of the over-molded strain relief. The white flexible material is probably used to keep the soldered wire ends and the wire itself all vibrating at the same level & frequency. Because of the vibration, that would ensure a longer life for the connection.

As Bob D. suggested, If you don't have the tools needed this repair will not be free.  [smile]

You'll need a chisel point soldering iron in the 30-35 watt range.

Some rosin core solder, do NOT us flux core solder!

While not absolutely necessary, a soldering iron stand is a welcome accessory. When hot, the iron will be in the 450º to 475º range. Because of the form and the stiff electrical cord, the irons have been known to roll around on the table and burn wood, plastic and anything else they come in contact with. They also sometimes roll off the table and land on your leg (that really hurts) or on the carpet/floor.

If you purchase good quality tools, Ungar or Weller, you're probably looking at a $50-$75 purchase price. Ungar & Weller are owned by the same company. I'm sure there are cheaper alternatives out there but I'm unaware of what they are.

I'm going to show in pictures what Jiggy said in words. [big grin]

Here's a photo of a 33 watt Ungar iron with a chisel point tip. This is what you'd use for your repair. The chisel point maximizes the amount of heat that goes into the solder connection.
Also shown is a 25 watt Weller with a needle point tip. It's used for LEDs.
A Weller soldering stand & a roll of resin core solder complete the photo. I think the solder alone was $20.
These hand irons are usually purchased in 3-pieces. The handle...the heating element...the solder tip. You choose each item.
The yellow sponge on the soldering stand is kept moist and is used to remove excess solder from the tip and to keep the tip clean for maximum heat generation.

[attachimg=1]

Here's what Jiggy was talking about. Two small pieces of heat shrink, one for each solder connection and a single large piece to cover both solder connections. That produces a nice looking professional result.

The individual heat shrink pieces need to be some distance from each solder joint. The iron's putting out 450º but the heat shrink will start the shrinking process at 200º.  Put just enough heat into the solder joint to get a good connection, then remove the iron and cool down the joint by blowing on it. Slide the heat shrink over the solder joint and shrink the tubing. Then move to the next solder joint and repeat. Finally, shrink the large heat shrink over both solder joints.

[attachimg=2]

A couple of final notes. Make sure the joint is cool before you slide the heat shrink over the connection. At times I've rushed the process and when I started to slide the heat shrink over the joint, there was still so much heat in the joint that the heat shrink tubing shrunk before I could slide it fully over the joint. [crying] [crying]

I prefer to offset the solder joints by 3/4"-1". There will be a slight bulge when the joints are soldered and covered with heat shrink. So 2 bulging connections next to each other produce a larger bulge in the finished product. Offset them slightly and the cord will be straighter and look better.

Let us know what path you decide to take.  [smile]
 

Attachments

  • 7288.JPG
    7288.JPG
    872.3 KB · Views: 1,476
  • 7289.JPG
    7289.JPG
    257.1 KB · Views: 1,494
GoingMyWay said:
I'm not sure if there is any code or regulations regarding an appliance cord like this. 

If it's anything on 110v or 200v mains electricity, there's a whole library full of rules about them.

But if you use the method Jiggy and Cheese explained I think you should be ok. It is not that difficult, but because it is a possibly deadly voltage you can't make any mistakes. Especially with an appliance like this that is in close contact with your body you should be very careful.
 
Whatever repair you use, make it outside the cover. If it is inside you won't be able to see it or know if it is working loose, not holding up, etc.

Soldering will give you the smallest "lump" comfort wise. But you cold also go with crimp connectors. Or even heat shrink crimp connectors. And put more heat shrink tube over those.  I have recently used adhesive heat shrink tubing. Which really helps keep things from coming apart and seals to the wires / cable.

Is that also a heating device?  What is the power draw?

Seth
 
Like Seth said, the current over-molded strain relief in combination with the white adhesive has thus far produced a great wire/solder/joint interface considering this is a massager in the first place, best to make the connection outside the plastic housing.

Also, the relatively new heat shrink tubing with an internal adhesive does an excellent job on sealing up the wire penetration in the heat shrink cover. I like to use it for outdoor applications where moisture can be an issue.
https://www.wirecare.com/category/heatshrink-tubing/environmentally-sealed

For most other projects I usually use regular heat shrink tubing. I like the 3:1 ratio as it offers a larger wire size range and also makes for a neater assembly.
https://www.wirecare.com/category/h...eneral-purpose/3-1-polyolefin-general-purpose
 
Cheese has nailed it, this is exactly what I was describing. After seeing the further investigation, I would certainly use the solder method. The shrink tube will be more than adequate to insulate, and with a bit of care the massager will be as good as it’s always been, with just a piece of heat shrink giving the game away.

Do you have a friend that might possibly have the soldering kit, maybe they could do it for you too?
It’s handy to have soldering irons though, and getting comfortable using them. I have a few, the little gas ones are very handy I’ve found.
 
One more thought 💭 on the subject. Milwaukee recently introduced a small battery powered M12 soldering iron that may be of interest. I’ve been thinking about picking one up for outside repairs.
 
WOW! I am amazed so many people are saying to repair the cut. With the cover unzipped and access to the cord connection to the massager as shown, cut the cord at the damaged area, and re-attach it properly to the massager. The strain relief will most likely slide around on the cord and could be slide before cutting it. If not a spike slide around inside the strain relief should free it up. Not only will it not cost anything, but it will be repaired properly with no visible repair. The 6" loss of cord shouldn't be enough of a loss to matter. Either way a soldering iron will be needed although a nail heated with a torch would probably get the job done.

I have the Milwaukee M12 and like it more than my butane soldering irons, but a plug in with variable temps is better for board work. Few do that kind of work, and a soldering iron from Harbor Freight would do the trick.
 
Peter_C said:
WOW! I am amazed so many people are saying to repair the cut. With the cover unzipped and access to the cord connection to the massager as shown, cut the cord at the damaged area, and re-attach it properly to the massager. The strain relief will most likely slide around on the cord and could be slide before cutting it.

The strain relief is the problem, it will probably not slide around because it also acts as pull protection. You must leave the pull protection intact at all times for safety.

You could of course make your own pull protection.

Also, soldering two wires together is quite a bit easier than soldering on a circuit board.
 
Alex said:
Peter_C said:
WOW! I am amazed so many people are saying to repair the cut. With the cover unzipped and access to the cord connection to the massager as shown, cut the cord at the damaged area, and re-attach it properly to the massager. The strain relief will most likely slide around on the cord and could be slide before cutting it.

The strain relief is the problem, it will probably not slide around because it also acts as pull protection. You must leave the pull protection intact at all times for safety.

You could of course make your own pull protection.

Also, soldering two wires together is quite a bit easier than soldering on a circuit board.

  This ^  Plus I am pretty sure that type of strain relief is molded with the cord.

  However I do think that a replacement of this type of cord could be found with a little internet searching. But that still leaves learning to solder for the first time on a circuit board. Soldering on the circuit board is why I would opt for the repair.

Seth
 
You're on the Festool Owner's Group. The only logical repair here is to do a plug-it conversion so that your massage chair is interchangeable with your track saw cord.
 
Back
Top