How could I prevent sanding swirls caused by corning on my painted surface ?

ddudak

Member
Joined
Sep 13, 2017
Messages
7
Hi Everyone,

This is my first post on the forum. Hopefully you guys can give me some ideas as to troubleshooting this sanding issue I'm having -- it's been a real headache.

I work in a studio finishing fine art painting panel surfaces for an artist that uses airbrush. Airbrushes tends to show every imperfection in the panel surface so the task is somewhat tedious. The panels are constructed with gator board sheets inset into a poplar frame and backing support. They look very similar to standard painting stretcher bars but the canvas is permanently affixed to the panel and the canvas stays much more taut than a stretcher.

The Problem
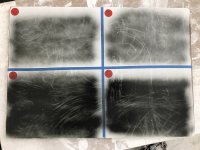
When I'm sanding, I'm getting these ghost embossed type swirl marks all over the panel surface that show up once the artist starts painting. They are not scratches as far as I can tell, more like pressure marks caused by sanded balls of gesso being trapped between the sand paper and the surface which are rubbed or ground into the face of the work piece.

The Process:
The canvas is primed and a rubbery paste is applied to eliminate canvas texture and then gesso'd over using a Graco industrial paint sprayer. We then sand with Festools Granat sandpaper, ETS 150/3 sander (intensity 3-6) with a hard pad and a CT 48 on low setting moving very slowly across the surface (1"/sec) in a linear fashion with little or no pressure on the sander until the surface has been evenly covered. We generally start at 150 grit as the surface is relatively level after the spray layers and 80 / 100 / 120 is a bit aggressive and tends to leave deep scratch marks on the soft gesso layer . Our prep procedure is as follows:

Spray Prime Gesso - 8 - 9 coats
Skim coat  - 3 layers to even out the orange peel surface left by the sprayer, prior to sanding

150 - Sanding the face but avoiding the outer edges to prevent burning through the paint.
220 - Sanding the face but avoiding the outer edges to prevent burning through the paint)
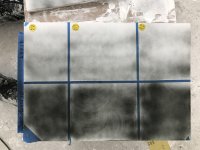
320 - Covering the entire surface. At this point the gesso is very even but ghosting swirls are appearing from the gesso corning on the sanding disks despite diligence and attention to keeping the paper very clean and changing it every 1.5 - 2 min.

Skim coat 2 layers to fill in any scratches created by 150 that haven't been remedied

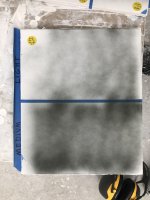
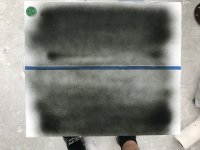
400 - Ghost swirls / pigtails what have you are still apparent and occurring with each pass of the sander. They're more abrasions or emboss marks caused by waste sanded material getting trapped between the paper and the painting surface and being ground into the panel.

500 - "Same"

800 - "Same"

______________________

As soon as the artist starts painting, the swirls start showing up on the surface. I'd really like to eliminate this from happening.

It doesn't seem like going up in grit is lessening the problem, the swirls are just as prominent at 320 as they are at 1200. I've tried moving very slowly , fast, high vacuum , low vacuum, high medium intensity, switching the paper very very frequently.  I never let the gesso waste on the paper accumulate past a couple scattered dots when using the ETS 150 but I guess it's enough to leave marks. Any help with this issue would be amazing as it's causing me a lot of frustration. Thanks for any tips or suggestions!

d

*** For some reason I can't seem to post images to my topics. If you'd like I can DM or PM images of the errors that are occurring. ***
 

Attachments

  • FullSizeRender-4.jpg
    FullSizeRender-4.jpg
    2.5 MB · Views: 478
I'm not experienced with gesso, but if it sounds like it hadn't dried sufficiently. I see the same thing when trying to sand a finish too soon. If a longer drying time doesn't help, you may try doing the final sanding by hand or switching to Mirka Abranet abrasives. Or simply change abrasives sooner.
 
Hi,

    To me that looks like it is being caused by built up lumps on the abrasive.

    I have sent a message to a friend that sands a lot of Gesso to a very fine finish.

Seth
 
And this is why the FOG is so great!

SRSemenza said:
Hi,

    To me that looks like it is being caused by built up lumps on the abrasive.

    I have sent a message to a friend that sands a lot of Gesso to a very fine finish.

Seth
 
Thanks guys,

It seems like it's more of an issue of vacuum suction being too high rather that a poor sanding technique. Seth I agree that the swirls seem to be the result of clumps getting caught and pushed into the gesso by the sander. On another note, what seems to be the general consensus to cleaning off sandpaper with a razor blade , i.e. scraping the clumps off? Sandpaper still good or would it just take the grit off along with all the gummies? 
 
ddudak said:
On another note, what seems to be the general consensus to cleaning off sandpaper with a razor blade , i.e. scraping the clumps off? Sandpaper still good or would it just take the grit off along with all the gummies?

I'd try one of those eraser style cleaning sticks.
 

Attachments

  • Powertec cleaning stick.jpg
    Powertec cleaning stick.jpg
    34.6 KB · Views: 356
"Built up lumps on the abrasive" are often refereed to as "corning". You get corning when bits of abraded finish stick to the abrasive. Once one little bit sticks it will heat up and get stickier and very efficiently gather other particles of finish until the build up is thick enough to literally lift the abrasive pad of the surface so that further "sanding" is actually wiping/burnishing and shearing/smearing of other bits of finish of the finished surface. The surface will then appear to have been burnished/embossed with random lines. The embossed surfaces will be much smoother than the actually sanded surfaces and finish will not adhere well in those lines.

As Chris suggested I think inadequate drying time is part of the problem. Multiple thin coats are good is each coat has time to dry. If you want to sand a finish you really need to wait for it cure rather than simply dry.

What is the composition of the gesso? Is it oil or water based? Contrary to the fingerprint test results, water based finishes take longer to cure than oil based.

I would change your sanding technique. When finishes get warm they get gummy which results in faster corning when sanding. The abrasive itself is going to get warm but that's unavoidable so move across the surface faster to avoid heating up the finish. (I don't agree with moving the sander slowly on bare wood either but in that case it's because a fresh abrasive "breaks-in" quickly then wears mores slowly and if you start in one corner and move the sander slowly when you get to the last corner the surface produced can be very different. I prefer to move the sander across the entire surface very quickly and evenly when breaking in a fresh abrasive and then slow down a bit but I still try to cover a lot of area quickly and keep the work cool.)

When sanding finishes you need abrasives coated with something that resists clogging. I don't have experience with Granat but I do recommend Norton Pro Sand for sanding acrylic paint. I found it corned much less and the corns that did form were much easier to knock off so I could get a lot more use from the abrasive. The Norton pads have a soft backing so often simply peeling the pad off the sander broke a lot of the corns off. With the Norton I didn't have to use a razor blade. A plastic putty knife usually worked but I sometimes ran the sander over a square edged piece of hardwood. (I don't think a little wood dust residue would be a problem with the gesso and it might reduce corning too.)

Oops, forgot you are using a 6" sander Norton Pro Sand 6" disks.

Should also add that when I sanded a lot of paint it killed my ES 125. Cost to repair was almost as much as buy new. Festool let me buy a refurb for about the cost of repair. Waiting for that to arrive I bought a Makita 5" for half the price and now I use that for sanding paint.

 
Have you considered wet sanding? Or hand sanding the last 1 or 2 grits?

Are you vacuuming the canvas as you're changing grits?

Sent from my iPhone using Tapatalk
 
My friend got back to me. Most important thing seems to be ...... dry , dry, dry.

Seth
 
ddudak said:
Thanks guys,
... On another note, what seems to be the general consensus to cleaning off sandpaper with a razor blade , i.e. scraping the clumps off? Sandpaper still good or would it just take the grit off along with all the gummies?

Life is too short...
Try the Mirka screens as suggested by Chris Wong... (He is right).

I have been using a Mirka 3x8 hand sander with the screens on varnish this week.
The papers load up in 1/2 minute. With the screen I sometimes need to take it off the holder every 5-minutes and shake it, but I have an hour on it, and ordered 3x 10-M rolls of the screen.

Then one can go with the grain as opposed to my theme song, which is against the grain.
 
Hi Everyone,

Thank you so much for the detailed and informative responses. Everyone seems to be able to add a different perspective on what could be going on, so this is helping immensely.

@ Chris Wong and Holmz, I'm going to pick up some 320 & 400 grit screens from Mirka, I think thats really going to be the ticket for solving any remaining corning issues.

[member=1619]SRSemenza[/member] , first thanks for the PM about adding pictures to posts, that was very helpful. As for your friend about dry times, thats good to keep in mind. We use humidity gauges, oil heaters and dehumidifiers in an enclosed space to help set the paint faster. I think Michael Kellough and your friend are right that ideally in order to get the best possible finish I should be letting the paint dry at minimum - days. For us it's usually a process of cranking the heat to 90F - 95F and dumping the humidity down to 40 - 45% and then circulating fresh air every 30min for a period of several hours before going through the described sanding process. It works fairly well but I'm sure we could really curb any variables if we just gave it a little more time to cure.

[member=297]Michael Kellough[/member] I actually hadn't realized the cure time was so long for water based gesso, but after confirming what you said, it can take at minimum -  days to fully dry. Also your description of what happening with the super polished lines taking paint differently than the surrounding areas 100% describes the situation that's happening, so thank you. I talked with Festools just prior to posting this inquiry on FOG and they're sending me two different interface pads to try in conjunction with our hard foam pads on the ETS 150 /3. I'm interested to hear what you think about that, beneficial or no? I haven't received them yet but they didn't give much insight into the benefits of adding the pad.

I'm also going to try your sanding technique and let you know how it goes. I'm finding that high intensity 5-6 sanding and moving slow as to remove tooling / corning marks seems to be working but your suggestion of first moving quickly and then slowing down as to attain a more even surface makes a lot of sense. I'm also finding that my vacuum setting was overwhelmingly to blame for the corning issue. I had it set to 50% and it needed to be more in the 10%-15% range --- enough suction to pick up the sanding waste that being produced but not so much that it's creating a seal against the surface. This realization was huge and not something that I'd even considered. How do people without variable suction vacuums do any type of paint / varnish / finishing work without running into this exact issue?

Some of the resources for the products we use

The Technical Data Sheet for the product we use @https://www.goldenpaints.com/technicalinfo_gesso

Golden's suggested (and recommended) guidelines for dry / cure times @https://www.goldenpaints.com/technicalinfo_drying

Golden's R&D experimental paint website discussing cure times @http://www.justpaint.org/suggested-drying-times-between-acrylic-layers/

As for wet sanding - despite the several suggestions on FOG and Golden's I found it just turned the waste into a paint slurry rather than actually sanding it. This is probably a factor of the paint not being fully cured but I think the demand in our shop won't allow us to give it the needed dry time to effectively wet sand.

@ Cheese -- I picked up a couple of those rubber blocks to see if I can keep my paper cleaner, so thanks for the suggestion.

Here's a couple recent test results after everyone's suggestions. As you can see, the marks only showed up in one test and that was more than likely a result of not cleaning the paper. The other two are what we're shooting for -- a nice even surface with hardly any squiggles, a huge improvement. I'll post more as my technique gets tighter so it's a complete resource for the future. Thanks again!


Attachments

  • image1.JPG
    image1.JPG
    2.1 MB · Views: 351
  • image2.JPG
    image2.JPG
    2.2 MB · Views: 418
  • image3.JPG
    image3.JPG
    2.7 MB · Views: 396
ddudak said:
Hi Everyone,

Thank you so much for the detailed and informative responses. Everyone seems to be able to add a different perspective on what could be going on, so this is helping immensely.

@ Chris Wong and Holmz, I'm going to pick up some 320 & 400 grit screens from Mirka, I think thats really going to be the ticket for solving any remaining corning issues.

Are you using 5", 6" rounds, or squares?
 
Turns out that gesso is a thermoplastic and if it's sanded in a conventional way, it balls up and melts to the sandpaper. Thats what causes all of the swirls. In order to eliminate this from happening, gesso should be wet sanded. Problem solved.
 
ddudak said:
Turns out that gesso is a thermoplastic and if it's sanded in a conventional way, it balls up and melts to the sandpaper. Thats what causes all of the swirls. In order to eliminate this from happening, gesso should be wet sanded. Problem solved.

I have no idea when a rational person [eek] would need to know this... However the Holmz-Boss has used gesso before, so I suspect it will useful at some point - for someone else.  8)

Hence it is a pretty interesting thread.
 
Back
Top