How do I trim this window?

traces95z

Member
Joined
May 13, 2019
Messages
4
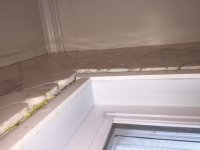
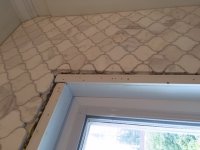
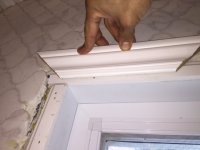
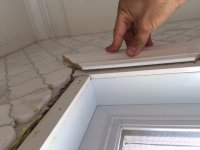
Marble backsplash was installed and now I'm trying to install interior casing around the kitchen window. The marble backsplash has added thickness to the wall so now the trim won't sit flush with the casing. I added a 1/4" strip all around the window jams to get it close to flush but now I notice the backsplash adjacent to the upper right corner of the window next to the jams protrudes 1/4" further than the rest of the window casing. How do I get the trim on this corner to line up with the rest?

Photos are unable to be attached upright for some reason so you'll have to rotate it clockwise once.

Thanks
 

Attachments

  • IMG_4932.JPG
    IMG_4932.JPG
    70.1 KB · Views: 567
  • IMG_4927.JPG
    IMG_4927.JPG
    83.7 KB · Views: 539
  • thumbnail_IMG_4934.jpg
    thumbnail_IMG_4934.jpg
    75.7 KB · Views: 572
  • IMG_4939.JPG
    IMG_4939.JPG
    76.1 KB · Views: 551
I'd be using wood stock of the most thickness and using either a hand plane or power plane to taper it. I'd do this before nailing in so you don't mess up the plane.
 
Is that stop molding nailed to the jamb?

It seems like the problem here is that your backsplash probably isn't parallel to the face of your window.  Even if you get everything flush to the backsplash, I wonder about whether your casing is going to be twisted when you try to install it.

I'd suggest scribing your jamb extensions to the tile to be about 1/16" proud of the tile face, and then see how well it all fits without actually nailing your casing on. When I've run into this in the past, I ended up removing a lot of the material behind some backband and casing in order to accommodate a bulge in a plastered wall. As long as the visible faces aren't being chewed up, it seems to work.

I'm sure someone who has done it hundreds of times will chime in with a smarter approach.

 
Do you have a router? Instal strips all around that are a bit proud of the surface, and make a router sled and rout it all flush. Or probably even easier if you have a Rotex sander or a RAS. Or a sanding disc on a standard angle grinder. So many possibilities. nvalinski's suggestion is also sound.
 
Yes, the backsplash at that upper corner protrudes too far out beyond the casing. Either the drywall was sloped a bit there or the backsplash guy put too much thin set underneathe. And yes, I cut some door stop strips which are MDF. Should i take those out and start from scratch with wood stock and plane it like is suggested or just add some wood stock over thos strips? I glued the door stops in also so it might be difficult taking those out...
 
Is would be easier to remove the stop installed, install thicker and then reduce that down to be flush or a little proud of the backsplash.  Also when finally finished having all the visible trim (not counting the stop as trim) will make things work out better visually.

Peter
 
mrFinpgh said:
Is that stop molding nailed to the jamb?

It seems like the problem here is that your backsplash probably isn't parallel to the face of your window.  Even if you get everything flush to the backsplash, I wonder about whether your casing is going to be twisted when you try to install it.

Yes, that's the situation exactly but specific to that upper corner. Everywhere else lines up fine except at that corner.

After I nail the inside of the casing to the jam, what if anything do I do to secure the outside of the casing to the marble?  Should I use an epoxy or something to secure the outer casing to the marble or just caulk it and be done with it? 
 
Pull that doorstop off (smh) and rip pieces slightly less wide so that you can give yourself a consistent reveal all the way around. We usually will do 1/4” or 1/8” reveal and then install the trim with the same reveal. It gives it a step and detail rather than looking like you slapped a piece of wood on top of it.

Then take measurements at each side of your filler for depth. If one side is 1/4 and the other side is 3/8 then taper it whichever way you want. I’d free hand it on a table saw but to each their own. Do this all the way around and you’ll have a nice flat area from tile to filler for the trim edge to sit. Most of the time when shooting tile like that I’ll shoot the leading edge and then into the grout lines put a few 18 gauge nails. Those look like some pretty tight grout lines though so I wouldn’t chance it. Some silicone on the back side in globs that you can push against to spread would be my choice.
 
Do as Alex said, pad out the jamb and flush trim.

If you have an MFK 700 you can use that to flush trim.


Tom
 
Back
Top