How do YOU spot surface defects before applying a finish?

wow

Honorary Member
Member
Joined
Nov 14, 2013
Messages
3,575
I'm referring to swirls and marks that typically only appear after you apply the first coat of finish, Dang it!

I have for years used the technique where you wet the wood with mineral spirits (paint thinner) as an aid to spotting flaws. I generally buy the cheapest thinner I can find when it's on sale, as I tend to go through it quickly on a big project.

I also know that you can look at the surface in low-angle, raking light. I don't find this method as useful as the 'thinner' one for most of my projects, but it does work better for solid surface materials and anywhere that the thinner won't wet the surface down.

Are there other ways to do this that might be faster and easier? I've done my share of unplanned refinishing and I'd like to learn more or better ways to avoid it?

 
Many layers to this onion...the bigger question is: "How do we develop a better eye?"

The two methods you mentioned - thinner wipe and inspection light - are good habits to have. It is rare that those two methods betray me in final inspection prior to finish.

Additionally, prep process is where the problems should be eliminated. One big thing I found this year is that using Rotex mode instead of orbital or random orbital is much more effective in preventing the little squiggly swirlies. Grit steps, and inspecting at each grit step (no thinner wipe, just light), making sure you are as dust free as possible at the surface, and also making sure when you swap out abrasives that you also throw a quick suck on the base pad to make sure it is clean...all these little things.

There is no real breakthrough in that department that I know of, just good old fashioned habits.
 
Scott B. said:
Many layers to this onion...the bigger question is: "How do we develop a better eye?"

The two methods you mentioned - thinner wipe and inspection light - are good habits to have. It is rare that those two methods betray me in final inspection prior to finish.

Additionally, prep  is where the problems should be eliminated. One big thing I found this year is that using Rotex mode instead of orbital or random orbital is much more effective in preventing the little squiggly swirlies. Grit steps, and inspecting at each grit step (no thinner wipe, just light), making sure you are as dust free as possible at the surface, and also making sure when you swap out abrasives that you also throw a quick suck on the base pad to make sure it is clean...all these little things.

There is no real breakthrough in that department that I know of, just good old fashioned habits.

What Scott said.

Tom
 
One thing I have noticed is that if you bump the edge of your sander against a vertical surface (cabinet edge or door frame) and you get a dent or damaged portion of your sanding disc on the edge this can cause swirl marks on the workpiece. I replace the disc if it gets damaged and use the guard more often for that reason.

Gerry
 
Scott B. said:
One big thing I found this year is that using Rotex mode instead of orbital or random orbital is much more effective in preventing the little squiggly swirlies.

Interesting point that I hadn't considered. In the past I'd always use a RO sander for final finish. I've only recently gotten a Rotex, so I haven't tried this yet...but I will!

I was honestly expecting a response from you when I wrote this, Scott. You didn't disappoint me!

[big grin]
 
I use to use my sense of touch, but after losing that I have started using a light. Going through the grits thou really limits the worry and anyway someone always drops something heavy on my work before I can deliver it.
 
In addition to Scott's comments on the grit steps, I'll sometimes finish with light hand sanding using the highest grit that I used on the RO sander.

 
wow said:
Scott B. said:
One big thing I found this year is that using Rotex mode instead of orbital or random orbital is much more effective in preventing the little squiggly swirlies.

Interesting point that I hadn't considered. In the past I'd always use a RO sander for final finish. I've only recently gotten a Rotex, so I haven't tried this yet...but I will!

I was honestly expecting a response from you when I wrote this, Scott. You didn't disappoint me!

[big grin]

You bet, I haven't been on the forum much, but I do try to at least keep up with the F&P subforum.

 
Pnw painter said:
In addition to Scott's comments on the grit steps, I'll sometimes finish with light hand sanding using the highest grit that I used on the RO sander.

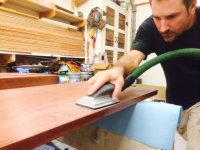
This is a really good point. A final high grit hand scrub down never hurts, the only part I don't like is the dust it makes.

The extractable hsk are great for that:

[attachimg=1]


Attachments

  • hsk1.JPG
    hsk1.JPG
    115.4 KB · Views: 605
I usually use mineral spirits/paint thinner to remove all the dust after sanding.

When wet it's like a finish and using a light and looking at the surface at an angle really brings out the swirl marks.
 
Where can one purchase the extractable hsk?

That is a must have for the collection!
 
Woodhack said:
Where can one purchase the extractable hsk?

That is a must have for the collection!

There are 4 sizes of these sanding blocks w/ dust extraction.

One uses the same paper as the RTS 400 & LS 130. One uses the same paper as the RS 2. the other 2 use special paper that is 80x400 with a perforation down the middle so it can be made into 2 sheets at 80x200.

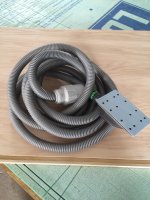
There are also two hoses made for them. One is a 22mm x 3.5m antistatic and the other is a 21.5mm x 5m non-antistatic hose. Most people prefer the non-antistatic version. It's more flexible.

Tom
 
You can use a regular 27mm hose and they come with an adapter.

Tom
 
deepcreek said:
Tom Bellemare said:
There are also two hoses made for them. One is a 22mm x 3.5m antistatic and the other is a 21.5mm x 5m non-antistatic hose. Most people prefer the non-antistatic version. It's more flexible.

Do these actually require the use of a special hose?  Is any kind of adapter available?

Get the hose, well worth the cost.
Justin really liked my 80x130. I got him a sander as a gift for a job well done, I feel the proper hose is so important I gave him the hose also (yes, I had Tom send them to me).

Which ever hose I have is the one you want.

Tom
 
Not to knock on those Festool blocks because I've never tried them, but the asking price is several times beyond what I'd pay.

I have the Mirka block w/ the Abranet paper, the blocks are $20-30 on Amazon, paper is about $1.40-1.60/sheet in the starter packs, less in the larger packs, obviously. Takes the 27mm hose just fine, though not as flexible as the dedicated hose.

Peter Parfitt reviews it here, start around 10:00:

 
deepcreek said:
I'm looking at the 80x130 as I already have a lot of abrasives for a sander that uses it. 

I currently have the Festool sanding block that is used for edge work but it doesn't have a dust port.

https://www.festoolusa.com/power-tool-accessories/sanders/other-accessories/hsk-80x133-rectangular-sanding-block-hard-495967

I'm still not sure of the value of the smaller hose but I'll take Tom's word for it.

It is nice the hose is super flexible. I tried the 27 mm with the supplied adapter, didn't like it.

You can remote trigger the CT by setting it on manual and using the Fast Cap RVC.

Tom
 

Attachments

  • image.jpg
    image.jpg
    687.5 KB · Views: 277
Back
Top