How to accurately transfer parf-guide dogholes from workbench top to front/side?

gearhound

Member
Joined
Oct 12, 2016
Messages
149
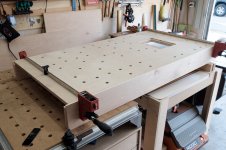
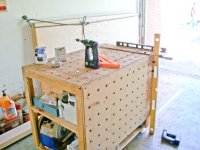
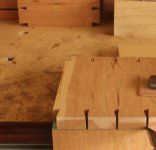
I've got my workbench top currently dry fit and want to cut some dogholes on the fronts/sides for clamping and assembly. I'd love to have these holes perfectly line up with the ones on the top for laying out square joints/etc.

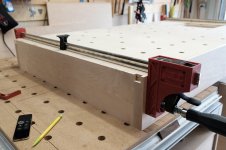
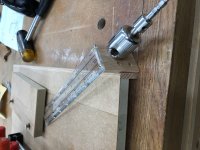
What's the best way to accurately setup my parf-guide on the front/side pieces? [member=11196]Peter Parfitt[/member]?

Thanks for any suggestions.

Cheers,
Matt

[attachimg=1][attachimg=2]


Attachments

  • DSCF3554.jpg
    DSCF3554.jpg
    1.4 MB · Views: 957
  • DSCF3560.jpg
    DSCF3560.jpg
    1.4 MB · Views: 931
Hi Matt [member=62622]gearhound[/member]

I have only tried one way of doing it using a home made gadget. I made part of it on the CNC and the rest by hand.

View attachment 1

I took an old plastic ruler and made some 3 mm slots using the CNC. I took a small piece of hardwood and drilled 4 very accurately spaced 6 mm holes. I attached this to the ruler. The centres of the two lines of 3 mm slots are in line with the centres of the two columns of 6 mm holes.

Use the 3 mm slots to line up with 3 mm holes on the flat table top which then allows a 3 mm hole to be drilled on the vertical surface. If, as it appears, you have no 3 mm holes left on your bench top then use a pair of UJK Parf Locator Dogs to allow you to expand the 3 mm hole pattern.

Good luck.

Peter
 

Attachments

  • IMG_5981.jpg
    IMG_5981.jpg
    751.1 KB · Views: 262
waho6o9 said:
Maybe drill the holes first and then align the two?
Agreed. Holes start the same distance from the edge (tick marks) on both panels. Then align edges (tick marks).
 
waho6o9 said:
Maybe drill the holes first and then align the two?

View attachment 1

Thanks for the reply and picture! I've already cut down the fronts/sides to dimension so I have to start the hole pattern on them at the exact right spot. Not sure how to reference off the outside of a doghole and accurately start a new hole? Maybe there's an easy way to do it that I'm not thinking of?
 
Peter Parfitt said:
Hi Matt [member=62622]gearhound[/member]

I have only tried one way of doing it using a home made gadget. I made part of it on the CNC and the rest by hand.

View attachment 1

I took an old plastic ruler and made some 3 mm slots using the CNC. I took a small piece of hardwood and drilled 4 very accurately spaced 6 mm holes. I attached this to the ruler. The centres of the two lines of 3 mm slots are in line with the centres of the two columns of 6 mm holes.

Use the 3 mm slots to line up with 3 mm holes on the flat table top which then allows a 3 mm hole to be drilled on the vertical surface. If, as it appears, you have no 3 mm holes left on your bench top then use a pair of UJK Parf Locator Dogs to allow you to expand the 3 mm hole pattern.

Good luck.

Peter

Thanks for the reply, Peter! My top has the 3mm holes drilled throughout the entire piece...I'm yet to bore out some holes as I have the original boring bit and it's burred at the top, making it a pain to switch to the right side of the guide (figured I do that once I have the top complete).

Since I have the 3mm holes and my sides aren't glued up yet, I'm wondering if there's a way to lay the sides on top or underneath the top and transfer the marks to the piece that way? Thinking I may be able to get a few of the 3mm holes transferred and then use the parf sticks to reference off those?

Cheers,
Matt
 
What about this.

It looks like you already have your apron or front piece attached so it's not going anywhere relative to the top. So place a pair of Parf dogs in a column of topside dog holes as far apart as you can get them. Why? More distance equals less error.

Use a straight edge and extend a line from both sides of the two dogs down to the edge of the top where it meets the apron. You should now have two marks spaced the diameter of your dog holes at the top edge of the apron.

Square down both lines down to the bottom of the apron. Don't split the difference and just draw one line.

Now draw diagonals from top left to lower right and lower left to top right. Where they intersect will be the center of those two lines and that should be about as close as you can get it to being on center.
 
Ok, I've got all my stock milled for the base of this workbench so it's time to finally finish the top. I'm still debating on the best way to accurately layout the dogholes on the fronts so instead of photos and lots of typing, I decided to just make a quick video:

Let me know if you think this is a good way to accurately transfer the hole locations to the fronts. [member=11196]Peter Parfitt[/member].

Thanks,
Matt

 
My suggestion would be to use a marking knife, not a pencil, to lay out whatever lines you need to put to transfer points and lines.
 
ChuckM said:
My suggestion would be to use a marking knife, not a pencil, to lay out whatever lines you need to put to transfer points and lines.

That's a good suggestion, thanks! I don't own a marking knife, any recommendations on one I should pickup for a guy with a buy it for life mentality?

 
UPDATE: After watching my video back, I'm thinking it is probably best to deal with marking out the locations for the dogholes after I've glued the top...there could be minimal shifting while clamping it up that could easily throw the holes out of perfect alignment. So I'm still kind of up in the air about the best way to transfer and setup the parf sticks...I assume I'm greatly complicating this and just transferring marks of the sticks from the top/sides with the sticks themselves will yield a pretty accurate result.

I really want to get this thing finished and on to actually using it, but I'm planning on adding one of the dashboard guide rail brackets (https://dashboardpws.com/products/guide-rail-brackets-set) to use my tracksaw on it and debating what sort of t-track I should use to mount it and if I should wait to route the grooves for it before gluing it up? I'm going to just have one dedicated cut spot, so I'm thinking I don't really need to have the track run all the way around the table...maybe it would be easiest to just mount a few inches of 8020 or some other track after I have it completed. It shouldn't be too hard to route the groove once assembled and I've got a better feeling for how I'm using the bench. Any suggestions are greatly appreciated!

Cheers,
Matt
 
gearhound said:
ChuckM said:
My suggestion would be to use a marking knife, not a pencil, to lay out whatever lines you need to put to transfer points and lines.

That's a good suggestion, thanks! I don't own a marking knife, any recommendations on one I should pickup for a guy with a buy it for life mentality?

Two of the three most-used marking knives in my shop came from Paul Sellers' suggestions:

1) Stanley 10-049https://www.homedepot.com/p/Stanley-4-1-4-in-Pocket-Knife-with-Rotating-Blade-10-049/203771308 (I think Grainger.com also carries it)

2) Swann-Morton scalpel SM00https://www.amazon.ca/Dovetail-Marking-Handle-Blades-SM00/dp/B01N5JKHBU

3) A Japanese knife (also previously from LV) very close to this one, except that mine is double beveled -https://www.leevalley.com/en-us/shop/tools/hand-tools/knives/110952-japanese-woodworking-knife (this new product is nicer as it has a flat side -- right hand and left hand versions available).

I have more than one marking knife, because I can reach for a sharp one before the next sharpening session. Replacement blades for #1 and #2 are available if you don't want to sharpen them (especially for #2 since it comes in a box of 50 blades).
 

Attachments

  • Japanese knife (Large).JPG
    Japanese knife (Large).JPG
    128.6 KB · Views: 313
I didn't watch the video and I might be oversimplifying things, but why not use a lipped square? Fix the Parf Guide to the top with a little of one end sticking over the edge of your worktop (use the pins for alignment). Slide a square against the Parf Guide and clamp it in position with the long leg along the side of your workbench. Then use that as a reference to position the Parf Guide in the vertical plane. Clamp the Parf Guide and drill the pilot holes. That way they should line up perfectly with the pilot holes in the top. After that use the Parf Guide as you would for a top in the horizontal plane. Or am I missing something?

[Edit] Use 2 Parf Revision Dogs if you have no pilot holes to align to.
 
ChuckM said:
gearhound said:
ChuckM said:
My suggestion would be to use a marking knife, not a pencil, to lay out whatever lines you need to put to transfer points and lines.

That's a good suggestion, thanks! I don't own a marking knife, any recommendations on one I should pickup for a guy with a buy it for life mentality?

Two of the three most-used marking knives in my shop came from Paul Sellers' suggestions:

1) Stanley 10-049https://www.homedepot.com/p/Stanley-4-1-4-in-Pocket-Knife-with-Rotating-Blade-10-049/203771308 (I think Grainger.com also carries it)

2) Swann-Morton scalpel SM00https://www.amazon.ca/Dovetail-Marking-Handle-Blades-SM00/dp/B01N5JKHBU

3) A Japanese knife (also previously from LV) very close to this one, except that mine is double beveled -https://www.leevalley.com/en-us/shop/tools/hand-tools/knives/110952-japanese-woodworking-knife (this new product is nicer as it has a flat side -- right hand and left hand versions available).

I have more than one marking knife, because I can reach for a sharp one before the next sharpening session. Replacement blades for #1 and #2 are available if you don't want to sharpen them (especially for #2 since it comes in a box of 50 blades).

41DSDrHND2L._AC_SL1000_.jpg


I like this Olfa craft knife. You can determine the blade projection. The blade is stiff enough for heavy work although the handle is not thick enough for really forceful gripping. The blade can be removed for sharpening but it projects enough to sharpen as is.
 
Michael Kellough said:
I like this Olfa craft knife. You can determine the blade projection. The blade is stiff enough for heavy work although the handle is not thick enough for really forceful gripping. The blade can be removed for sharpening but it projects enough to sharpen as is.

That's a cute looking knife, Michael. I have an Olfa box cutter with a plastic handle for heavy-duty cutting. For light chores, I use a vintage German knife that uses a razor blade (half) as its blade.

The Swann-Morton scalpel also has a retractable version. For my fixed model, I can store a few blade in the body. I paid about $20 for the fixed handle plus a box of 50 blades.
 

Attachments

  • 20201212_105656 (Large).jpg
    20201212_105656 (Large).jpg
    330.7 KB · Views: 316
  • 20201212_105703 (Large).jpg
    20201212_105703 (Large).jpg
    321.5 KB · Views: 305
  • 20200721_112629 (Large).jpg
    20200721_112629 (Large).jpg
    551.2 KB · Views: 320
I really like the striking knives from Ashley Iles. See here. I have had both the left and the right handed versions for years now.

View attachment 1
 

Attachments

  • striking_knive.jpg
    striking_knive.jpg
    68 KB · Views: 144
Back
Top