How to achieve this kind of finish

sebr023

Member
Joined
May 18, 2022
Messages
154
Hi all!

I don’t know where others than here to ask. But I feel like I’m in the right sub-forum for this.

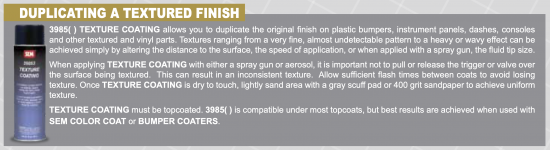
How one would achieve this kind of finish?
Meaning, the overall and unified “roughness” of it while still being durable.

033a2b3a16f08cfbae91266a01aaf527.jpg


Would that be achievable using spray can?
I like painting thing in general, using mostly spray can. Have a compressor and a (cheap cheap, Canadian tire master craft cheap) spray gun.

I rules out rolling because I’m sure it won’t leave a nice finish like that in the “corner”.

Thanks!

Sent from my iPhone using Tapatalk
 
I'm not a finishing expert as evidenced by the fact that I have accidentally achieved a similar finish.

Spray from too far away and have the finish a little too thick and it won't flow out and you end up with a stippled finish like that. I'm not sure if you could get it that consistent across an entire project though.
 
It's a bit rougher than shown (though it's a poor pic)  but

Duratex and Granotone are pretty close to that.  It's what a lot of the DIY speaker guys use.
 
The finish you show is from a part that was molded in plastic. To achieve the finish, they sand-blasted the mold prior to injection molding. If you wanted to achieve a similar finish in wood would be difficult, in other materials, you may consider a similar blasting operation to give the texture you seek, then painting carefully to preserve the texture.

The only other similar finish I am familiar with is spray in truck bed lining. I believe there are DIY kits and textures to suit the specific application. Some are very thick.
https://www.google.com/search?q=rhino+lining

Hoping others will chime in, there must be other options.
 
xedos said:
It's a bit rougher than shown (though it's a poor pic)  but

Duratex and Granotone are pretty close to that.  It's what a lot of the DIY speaker guys use.
I’ve used duratex and like you said, it’s a lot coarser than this. But it was a couple years back. So maybe my memory play tricks on me.

Don’t know granotone, will have to google and research that.

Sorry about the pic quality. It was from a video on YouTube (about video games)

Sent from my iPhone using Tapatalk
 
twistsol1 said:
I'm not a finishing expert as evidenced by the fact that I have accidentally achieved a similar finish.

Spray from too far away and have the finish a little too thick and it won't flow out and you end up with a stippled finish like that. I'm not sure if you could get it that consistent across an entire project though.
I Will have to test that
You achieved this using a spray can? Or spray gun?

Sent from my iPhone using Tapatalk
 
woodwise said:
The finish you show is from a part that was molded in plastic. To achieve the finish, they sand-blasted the mold prior to injection molding. If you wanted to achieve a similar finish in wood would be difficult, in other materials, you may consider a similar blasting operation to give the texture you seek, then painting carefully to preserve the texture.

The only other similar finish I am familiar with is spray in truck bed lining. I believe there are DIY kits and textures to suit the specific application. Some are very thick.
https://www.google.com/search?q=rhino+lining

Hoping others will chime in, there must be other options.
Exactly. That’s what I’m going for. At least, what I aim. I often find that painted project (usually 3d Print but any other project ) loose a bit of “realness” because of the cost of paint.

I find that a little texture gives a more professional and more finished project. Of course, not on ALL project.

Some bed liner are very “coarse” and could scratch your knees. Maybe sanding it down after to reduce the coarseness.

Sent from my iPhone using Tapatalk
 
I think paint is designed to flow and level itself as smooth as it can given different application methods. Anything involving a way to prevent that is going to look inconsistent and not durable.

What I would focus on is texturing your surface then applying paint as thin and as smooth as possible to keep that texture.

Another choice if you want to make it look and feel like plastic, why not apply a layer of laminate?
 
Could use a can of orange peel texture for drywall, then paint and topcoat with polyurethane for durability
 
Dane said:
Could use a can of orange peel texture for drywall, then paint and topcoat with polyurethane for durability
Thanks for your input.didn’t know it was such a thing.

Sent from my iPhone using Tapatalk
 
sebr023 said:
twistsol1 said:
I'm not a finishing expert as evidenced by the fact that I have accidentally achieved a similar finish.

Spray from too far away and have the finish a little too thick and it won't flow out and you end up with a stippled finish like that. I'm not sure if you could get it that consistent across an entire project though.
I Will have to test that
You achieved this using a spray can? Or spray gun?

Sent from my iPhone using Tapatalk

I used a Fuji HVLP spray system. It was my first attempt at painting a cabinet door. What should have been a gloss finish turned out to feel like sandpaper.
 
Paint has to apply “wet” to achieve a smooth finish.  Some paints dry so fast that they dry before any leveling can occur.  Leveling is the product of gravity evening out the finish.

I found that the very fast curing Breakthrough! paint by PPG would often yield a rough finish.  At the opposite end of that spectrum, Benjamin Moore’s Advance dries very slowly, but I get a very smooth finish.

Breakthrough! can be recoated in just a couple of hours.  Advance’s recoat time is 16 hours.  Advance self levels beautifully on horizontal surfaces, but I tend to get runs on vertical surfaces.  More skilled painters are able to spray Advance on vertical surfaces without runs.

Note:  The exclamation point is part of the official name for “Breakthrough!”
 
Could you give more details on what you are trying to apply the finish to?
If this is more of a product prototype (since you mentioned 3D printing) that may have an impact on the suggestions you receive.

If you are talking about finishing a prototype, you may consider having the part prototyped using a material that has that type of surface finish. For example, if you use a desktop 3D printer, you will see layer lines, but if you source parts from a machine that builds parts using powder (SLS or HP MJF) the surface finish will be more subtle but look very similar to what you show.

These parts can also be finished with Cerakote to apply custom colors though they will still retain this type of texture.
Attached are a couple of pictures.
Can't make attachments work but you can find pictures here (no affiliation):https://images.nicindustries.com/ce...-fusion-dt20220805210141294284.pdf?1659733305

View attachment 1
[/quote]
Exactly. That’s what I’m going for. At least, what I aim. I often find that painted project (usually 3d Print but any other project ) loose a bit of “realness” because of the cost of paint.

I find that a little texture gives a more professional and more finished project. Of course, not on ALL project.

Some bed liner are very “coarse” and could scratch your knees. Maybe sanding it down after to reduce the coarseness.

Sent from my iPhone using Tapatalk
[/quote]
 
woodwise said:
Could you give more details on what you are trying to apply the finish to?
If this is more of a product prototype (since you mentioned 3D printing) that may have an impact on the suggestions you receive.

If you are talking about finishing a prototype, you may consider having the part prototyped using a material that has that type of surface finish. For example, if you use a desktop 3D printer, you will see layer lines, but if you source parts from a machine that builds parts using powder (SLS or HP MJF) the surface finish will be more subtle but look very similar to what you show.

These parts can also be finished with Cerakote to apply custom colors though they will still retain this type of texture.
Attached are a couple of pictures.
Can't make attachments work but you can find pictures here (no affiliation):https://images.nicindustries.com/ce...-fusion-dt20220805210141294284.pdf?1659733305

View attachment 1
Exactly. That’s what I’m going for. At least, what I aim. I often find that painted project (usually 3d Print but any other project ) loose a bit of “realness” because of the cost of paint.

I find that a little texture gives a more professional and more finished project. Of course, not on ALL project.

Some bed liner are very “coarse” and could scratch your knees. Maybe sanding it down after to reduce the coarseness.

Sent from my iPhone using Tapatalk
[/quote]
[/quote]
Thanks for this. I knew céramiste for their “paint” for gun coating for exemple. Didn’t know they had something for 3d printed nylon especially. But yeah, the surface finish on these type of printing is really nice in my opinion. Thing is those printer are not very affordable for home use! [emoji23]

I have a desktop fdm 3d printer.
I generally don’t mind the layer line.
But sometimes I sand and paint and would want to achieve a “stippling” or wrinkle finish like this to make the part look more plastic-y or more professional.

It’s not for a prototype that I’ll end up selling. It’s just because I like to make thing, and making them look pretty is part of the fun. I find that finish aesthetically pleasing.

Looking to get those rough finish mainly on wood, metal and plastic I would. Hope that help.

Sent from my iPhone using Tapatalk
 
Packard said:
This is called “wrinkled finish”.  There are special paints to achieve that look.  It is an excellent way to hide a poor substrate.

I’ve never used it, but you will find plenty of info if you google “wrinkled finish”.

I do agree that the example shown is molded plastic.
https://www.google.com/search?q=wrinkled finish&ie=utf-8&oe=utf-8&client=firefox-b-1-m

This is an example of wrinkled paint:

maxresdefault.jpg
From a quick google search, it seems to be tougher than what I would want, but it seems that some company offer different “pattern” which seems to be different roughness or coarseness.

Would have to look more into this, but that could be it.

I was thinking of what type of plastic I like the finish of. And I’m like the OEM car stuff that has a plastic finish. Lower bumper part, sometimes fender flare, stripping on doors and bumper (I’m thinking of the mark 2 golf for exemple)

I know there’s a paint by SEM which is called trim black. But maybe they make a paint for that type of texture too.

Edit: after a quick search, SEM makes a texture spray, and they have a video on how to apply for different effect.

Link:https://www.semproducts.com/product/texture-coating/39853#product-details

(No affiliation) (
 
I suspect that the original wrinkled finish was the result from a paint application error.

I had such an error many years ago.

Spray enamel (rattle can) will carry instructions such as:  Re-coat times:  Within 1 hour or after 24 hours.

I recoated about 3 hours later.  That allowed the original coat to skin over, with the underlying finish remaining un-cured.  The application of a second coat at that time partially dissolved the top layer causing the finish to wrinkle. 

I suspect that someone many years ago did the same on some engine valve cover.  He moaned that he was going to have to sand off all the old finish and start over, but someone else said, “That looks soooo cool!”  And so wrinkled finish was born.

(Note:  The above is strictly a product of my imagination.  I have no idea how the finish came to be.  It is the antithesis of what an “ideal” finish should look like.)
 
sebr023 said:
I know there’s a paint by SEM which is called trim black. But maybe they make a paint for that type of texture too.

Edit: after a quick search, SEM makes a texture spray, and they have a video on how to apply for different effect.

Link:https://www.semproducts.com/product/texture-coating/39853#product-details

This is from the SEM bumper prep brochure.

[attachimg=1]
https://manage.semproducts.com/public/content/techsheets/TEXTC_3985 Texture Coating Flyer_0316.pdf
 

Attachments

  • SEM 39853 Texture Coating 1.png
    SEM 39853 Texture Coating 1.png
    365 KB · Views: 808
Back
Top