How to best glue up a mitered Domino joint?

Topolino

Member
Joined
Sep 6, 2014
Messages
11
Hi,

This is my very first question here about my very first Festool project.

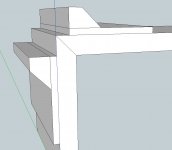
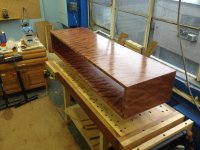
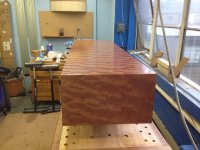
I'm about to build a stereo bench from thick oak boards. It will consist of two horizontal plates with sides made from the same plates. See the attached image (I think I'll have to add vertical dividers to avoid sagging).

I'm going to use a Domino 500 to make mitered joints from the top and bottom plate to the sides . The question is how to glue it all up. The top plate is 220cm (86") long  and 3,6cm (1,4") thick , and I don't have clamps long enough for that stretch.

Does anyone here have a suggestion on how to best make the joint tight and strong without very long clamps across the entire width of the bench?

sterobench.png
 
I'm not going to comment on the glue up - there's much more experienced people on here that'll give better advice. I will comment on dividers - don't do it!!! Consider instead some discrete round matt black metal supports placed at one third and two thirds width. Keep the design impact, I think it'll look great.

Kev.
 
Thank you! I was thinking something along those lines. It probably won't hold if someone tries to sit down on top of it, but it should prevent sagging, and that's what I'm after.
 
You can choose something like this as a clamping aid.  I made a quick sketchup. I can't remember where I got the idea originally.  There is a commercially available one made from aluminum with round bar stock but after a cursory search, I can't seem to find it.

[attachthumb=1]

Good luck, Ed
 

Attachments

  • miter clamping examlpe.jpg
    miter clamping examlpe.jpg
    41.2 KB · Views: 1,006
Hi
Awesome question!  I'm going to building a similar style tv stand, except drawers and doors in middle section for storage. The length of my going to be 72" x 20" tall and 2" live edge walnut. I want to do the joint set up as you and no clamp long enough. 
The only thing i think might work is use a set of large rachet strap truck hold downs.
I though about getting pipe cut fot pipe clamps I have but then what do you do with them after. I feel I'll use the rachets straps more afterward than just for this glue up.
I won't be doing this project until october but I'm hearing up now.  Can't wait to see the comments from guys you know better.
Cheers
 
Thanks Pretzel Logic. I found a link to something that looks exactly like what you're suggesting on Pinterest of all places:

7f1aaa166e49b2439cdbc99577361f08.jpg


Gluing Jig

This may very well be a good solution.
 
I just realized that I can probably just use a pocket hole jig like the Kreg K3 to add a couple of screws from the underside of the top and bottom boards since it's not going to be visible anyway. This would add extra strength as well as holding the glue up together.

Or maybe this won't work because of the miter joint. Hmm.
 
I made an almost identical table and used 10 x 50 dominos in the mitred joints. I even made those little clamps with wedges, but the shellac and wax finish made the surface too slippery and they didn't grip well.

In the end, I forced the joint together with a deadblow mallet, followed by a metal hammer and wooden block. I glued the dominos in both ends of the short side pieces first, then glued each one into the long side which was lying face up on the workbench. When they were just seated slightly I lay the other long side on the top and got that started. Then I could hammer on each corner and the joints would help each other close. (Hope this makes sense as it's hard to explain in words.) The block is important as it prevents denting the workpiece and spreads the pressure of the blow.

I was quite sparing with the glue as I didn't want it to pool at the bottom of the mortises and prevent the joint closing, but it helped lubricate the dominos as they went in.

Just keep pounding till the joints close up! After that you don't need clamps because there is no way the joint can come apart and the weight of the top keeps the joint tight till the glue sets.


Attachments

  • IMG_3990.JPG
    IMG_3990.JPG
    288 KB · Views: 3,113
  • IMG_4002.JPG
    IMG_4002.JPG
    269.8 KB · Views: 1,778
I would use the larger domino like RL suggested and do a test fit to make sure your joints are tight. Clamping across the width should give you the gap closing and holding while the dominos do the alignment you need. I would would also suggest a slow curing 2 part epoxy (45 minute) so you don't have too rush. Using epoxy also doesn't introduce any water into the joint. Gluing mitered end grain has a tendancy to suck in a lot PVA glue quickly, drys faster then expected leading to sticking. Using a rubber faced dead blow mallet would also aid in initial alignment and setting.

John
 
Mitered box glue-ups with Dominoes are quite challenging even on a small scale.  Good suggestions for clamping techniques have already been suggested.  I would add a PSA abrasive paper to the clamping block where it contacts your work piece will help to avoid slippage.  It might be useful to try this glueup on some scrap which will allow you to work out any bugs beforehand.

What works best for me is to assemble opposite corners of the box first and then when glue has cured, assemble the entire assembly.  It also helps to use an adhesive with a very long open time (such as UniBond 800). 

RL - That is one beautiful piece.
 
Thanks, everyone for the great tips. I'm waiting for a CTL Midi to arrive so I can start dominoing indoors without messing up my house too much. I'll keep you posted when I eventually get the thing made. And RL, you sure have set the bar high with that piece. Great work!
 
Thanks, it's a dead simple finish.

I sanded to 220 with my ETS 125. Then I brushed on a few coats of super blond shellac, cut it back with some 0000 steel wool, then used the white Vlies with a rotex 125 on speed 3.

Finally I applied several coats of Antiquax original wax over a few weeks.
 
Richard:
Beautiful piece! As usual I have some questions and wanted to wait till the OP got his answer.

RL said:
I made an almost identical table and used 10 x 50 dominos in the mitred joints. I even made those little clamps with wedges, but the shellac and wax finish made the surface too slippery and they didn't grip well.

I am curious as to why you finished this before you assembled it?

What kind of veneer is that? I really like the look. Did you veneer to MDF?

What kind of legs/feet are/have you put on that unit?
 
Tim, I really can't remember why I partly prefinished it and I may be wrong about waxing it but I definitely laid down a few coats of shellac. Maybe because the whole table was so heavy and it was easier to handle the components that way, particularly on the underside? Also, I may have been worried about excess glue seeping onto places where it was very visible and hard to remove and the prefinish would have made clean-up easier.

The veneer is waterfall bubinga with a plywood substrate- 2 pieces of 3/4" plywood laminated together.

The legs are made from some scraps of avodire that I had lying around and laminated. It's a pale wood with similar characteristics to mahogany. Very nice to work.
 
Richard, thanks for the explanation.

RL said:
Maybe because the whole table was so heavy and it was easier to handle the components that way, particularly on the underside?

That makes sense, I didn't think about that [tongue]

RL said:
he veneer is waterfall bubinga with a plywood substrate- 2 pieces of 3/4" plywood laminated together.

It really looks great, but did you hammer veneer it or vacuum press? That's a large area to hammer veneer.
Tim
 
You're right, vacuum press. The only way I could laminate two 3/4" pieces of plywood wrapped in veneer on both sides at the same time.

And I put my back out whilst making this piece, and it's not fully recovered a year later!
 
Back
Top