How To Build Torsion Box with 20mm holes on Top?

rljatl

Member
Joined
Jan 31, 2013
Messages
1,376
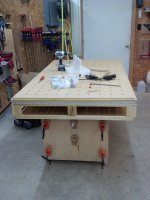
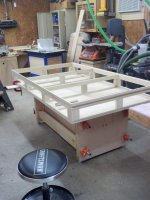
I want to build an assembly/utility cart that has a torsion box top with MFT style holes.

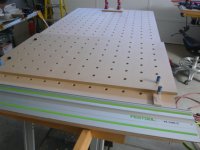
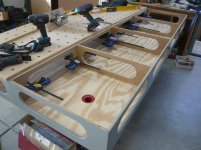
1. Any suggestions on the best way to plan the placement of the internal supports for the torsion box so that they do not interfere with drilling the 20mm holes (on 96mm centers) and using clamps through the holes?

Maybe I should drill the holes in the top first and then layout the internal supports?  What about placing the internal supports so that they do not interfere with clamps when using the holes? 

2. Also, I would like to able to replace the top when necessary, but not sure if that is practical with a torsion box?

Any and all ideas and suggestions appreciated.
 
I’d drill the top first, to lay out tortion grid, so as to not interfere with clamp legs but then you’d need to construct lower section of the box and counter sink screws, to secure the top, deep enough to not hit with a saw blade (I know you said assembly table but...you know how things happen) if you had to have a removable top...of course there’d be no way to attach screw on handles from underneath
 
IMO you need to glue a torsion box. A proper torsion box has a lot of structure between the top and bottom — but the rule that less (divisions) is needed for more (height between top and bottom) applies. That being said the internal structure will always impede the use of clamps in the MFT-way.

Check out Paulk-style workbenches & the MFTC by Tim Wilmotts (BenchWorks). Very clarifying.
 
What are the main priorities that are leading you to use a torsion box?  I would assume flatness?  But what about after that?

Is weight/portability another one?  If it's not, you can get away with using thicker skins (e.g. 1/2") and fewer internal supports, OR even get rid of the torsion box design altogether by using other methods to keep a 3/4" work surface flat.  After all, the torsion box doesn't lend itself to a replaceable top, but I could see using 1/2" thick top skin with a 1/4" skin that could be attached with screws/bolts into threaded inserts and replaced.  The holes in the 1/2" torsion box skin underneath would give you a template to rout out holes in the sacrificial top once it was attached.

As Bert said, if you look at the design of the Paulk bench, which uses 1/2" skins, you find that the internal supports are spaced pretty far apart - not really a "true" torsion box but perfect adequate to keep the bench flat.  With some careful planning, the supports shouldn't get in the way of clamping AND worst case you have a line of holes that aren't the best for elbow clamping, but can still be used for other 20mm accessories.  More likely, you end up with some holes near the support that you just need to be careful which direction you're inserting the clamp.
 
I think that you need a removable sacrificial top so I would actually drill a matched pair of tops; one with 3/4" thickness to be glued to the torsional structure and a second 3/8" thick that can be match pinned to the structure and be replaced as needed.
 
bnaboatbuilder said:
Quick clamps and screw clamps won't fit through the holes if the combined tops get that thick.

jacko9 said:
I think that you need a removable sacrificial top so I would actually drill a matched pair of tops; one with 3/4" thickness to be glued to the torsional structure and a second 3/8" thick that can be match pinned to the structure and be replaced as needed.

I'm confused, aren't a lot of clamps used in workbench trips that are 1 3/4" thick or more?  Perhaps you are restricting your answer to the clamps you own?
 
When I built my 2-piece, 'Paulk' style workbench, I used the tried and true method of using a mft replacement top to create the holes in the new top (48" x 93")
View attachment 1

The top is attached with Grex screws because I wanted to be able to replace the top.  Now the Paulk workbench does not have as many internal dividers as a true torsion box, but I would think once you have the top created, you could 'tweak' your design
View attachment 2
 

Attachments

  • SNAG-382.jpg
    SNAG-382.jpg
    159.5 KB · Views: 1,539
  • SNAG-384.jpg
    SNAG-384.jpg
    186.8 KB · Views: 3,870
J0hn said:
When I built my 2-piece, 'Paulk' style workbench, I used the tried and true method of using a mft replacement top to create the holes in the new top (48" x 93")
View attachment 1

The top is attached with Grex screws because I wanted to be able to replace the top.  Now the Paulk workbench does not have as many internal dividers as a true torsion box, but I would think once you have the top created, you could 'tweak' your design
View attachment 2

Thanks for sharing - I like your application of a removable top.
 
jacko9 said:
I'm confused, aren't a lot of clamps used in workbench trips that are 1 3/4" thick or more?  Perhaps you are restricting your answer to the clamps you own?

I think he’s referring to the Festool quick clamps with the “foot”. You can put the foot end in the hole but because of the top thickness, it can’t make the “turn”.

To use the FT clamps on my 1 1/2” thick top, I had to grind off the retainer nub which now makes it a 2 piece clamp.
 
Well I like the idea of a torsional worktop design with 20mm holes (or 3/4") and having a replaceable top layer seems to be ideal.
 
For many of the reasons mentioned above, I just don't see a practical way to use torsion box construction with dog holes.  What good are the holes if you can't use clamps and you can't use a knob to hold down various accessories?

So, you guys have convinced me to go with a modified Paulk style top.  I do want the top to be replaceable.
 
Mine is a modified JackBench build with a custom MFT top that is replaceable.

Jack
 

Attachments

  • 2013-11-21 20.11.44 resized 75.jpg
    2013-11-21 20.11.44 resized 75.jpg
    368.6 KB · Views: 1,436
  • 2013-11-21 12.39.30.jpg
    2013-11-21 12.39.30.jpg
    1.1 MB · Views: 1,002
Jack,

I installed the Oneida upgrade kit they made available to owners of older units. I live in SW AR and static electricity is not much of an issue but the grounding added with the kit takes care of it. Thanks for noticing though.

Jack

jacko9 said:
Claimdude said:
Mine is a modified JackBench build with a custom MFT top that is replaceable.

Jack

Nice, and Oneida offers a replacement kit to work with your Ultimate Dust Deputy I noticed in your picture that you still have the older non-conductive cyclone top.
https://www.oneida-air.com/inventoryD.asp?item_no=AXD000009&CatId={428A1AFA-E859-459E-8BF9-47817428D9AF}

Jack
 
Back
Top