How to deal with stripped out Blum drawer slide screws

Mark37

Member
Joined
Mar 11, 2022
Messages
31
How time flies.  I built my kitchen cabinets 30 years ago.  Many of the drawer slide screws are loose in their holes, and cant be re-tightened.  I'm looking for a way to restore the fastener holes without losing the precise hole locations.

Your help is greatly appreciated

Mark
Seattle
 
Take out the screw, slice a matchstick in half lengthways, put it into the screwhole. Use a utility knife to cut off the excess length, pop the screw back in, making sure it goes in between the matchstick and the side of the hole. Tighten up. Done.

If the screw's still too loose, use both halves of the matchstick and align the screw so that it goes into the hole with the two matchstick halves either side of the screw.
 
woodbutcherbower said:
Take out the screw, slice a matchstick in half lengthways, put it into the screwhole. Use a utility knife to cut off the excess length, pop the screw back in, making sure it goes in between the matchstick and the side of the hole. Tighten up. Done.

If the screw's still too loose, use both halves of the matchstick and align the screw so that it goes into the hole with the two matchstick halves either side of the screw.

Add a bit of wood glue to that and that screws never coming loose again!
 
Or if they're normal wood screws, re-drill the holes at 5mm and use system screws.
 
I just replaced my entry knob with a passage leverset and my deadbolt with an Ultraloq U-Bolt Pro Wi-Fi Smart Lock deadbolt.  To make it easier for my wife who has vertigo to entry with her arms full.  The lock works with finger print print, wifi and key.  The new latch bolt had smaller screws than the previous so I inserted wooden skewers into the holes and nipped them flush and drove the new screws.  Didn't bother with glue as there will be no direct pull on the screws.  This lock is great as the latchbolt is tapered and drives the door to the weatherstrip.  I had to take my Milwaukee 12v die grinder and a double cut bit to relieve a little so the bolt could drive home. 
 
woodbutcherbower said:
Take out the screw, slice a matchstick in half lengthways, put it into the screwhole. Use a utility knife to cut off the excess length, pop the screw back in, making sure it goes in between the matchstick and the side of the hole. Tighten up. Done.

If the screw's still too loose, use both halves of the matchstick and align the screw so that it goes into the hole with the two matchstick halves either side of the screw.

I'm going to suggest an alternative that I think will keep the hole alignment a bit better.  Take three tapered toothpicks, push them together into the stripped hole that has been filled with glue so that all three go to the same depth.  Tap them in lightly with a hammer.  Let the glue set up overnight, then cut off the excess with a very sharp chisel.  Redrill the pilot hole.  Rinse, repeat...  [smile]
 
Sparktrician said:
woodbutcherbower said:
Take out the screw, slice a matchstick in half lengthways, put it into the screwhole. Use a utility knife to cut off the excess length, pop the screw back in, making sure it goes in between the matchstick and the side of the hole. Tighten up. Done.

If the screw's still too loose, use both halves of the matchstick and align the screw so that it goes into the hole with the two matchstick halves either side of the screw.

I'm going to suggest an alternative that I think will keep the hole alignment a bit better.  Take three tapered toothpicks, push them together into the stripped hole that has been filled with glue so that all three go to the same depth.  Tap them in lightly with a hammer.  Let the glue set up overnight, then cut off the excess with a very sharp chisel.  Redrill the pilot hole.  Rinse, repeat...  [smile]
I like the radial symmetry of three, but if in a hurry you can use thick CA glue and shoot it with accelerator.
 
I use a Fostner bit to drill out a hole encompassing the screw hole. I glue in a dowel plug and trim it flush. I then have fresh wood to place a screw.
 
Blum (undermount) drawer guides have about a hundred mounting holes in them, couldn't you just use alternate holes?
Of course without seeing what you have his is hard anyway.
As suggested, by [member=69760]Lincoln[/member] you could already have "normal" screws in them, where switching to 5mm "dowel screws" (aka Euro screws or system screws) would easily solve it.

Toothpicks or match sticks are a tried and true method too, but might be a bit fiddly with multiple holes per drawer guide.
Drilling over-sized and plugging with a dowel works there too, but could potentially give you realignment issues when reassembling. You would have to be much more careful to get them back where they were, since the original hole is "gone".

Of course this all assumes undermount, which is why most people would call them by the brand name of Blum. If you mean simple white epoxy coated 3/4 extension "kitchen cabinet" guides, some of this will not apply. Mostly my comment about multiple holes, the other plugging solutions still apply, as will the 5mm screws. Even the cheapest models today have holes that will accommodate either style screw, I don't know about 30 years ago though? In the US, maybe not? but Blum, definitely yes.
 
I use Blum hinges with the plastic dowels for just the reason that if the threads get stripped, I can replace the dowel.  They make dozens of sizes of dowels and sell them separately too.  Would they work?
https://www.google.com/search?q=blum+plastic+dowels&client=firefox-b-1-m&source=lnms&tbm=isch&sa=X&ved=2ahUKEwiljKylubP9AhWzLFkFHZ2yBKMQ_AUoAnoECAEQBA&biw=1121&bih=714&dpr=2
 
I'd clean up the bad holes with the correct size drill bit, then glue in the correct size dowel and redrill the pilot hole with the correct size Vix bit.

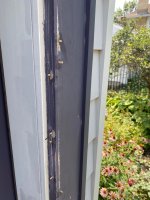
Here's something similar done on an outside door frame that had too many trim screw holes.

[attachimg=1]
 

Attachments

  • 10800.JPG
    10800.JPG
    622.2 KB · Views: 1,617
Cheese said:
I'd clean up the bad holes with the correct size drill bit, then glue in the correct size dowel and redrill the pilot hole with the correct size Vix bit.

Here's something similar done on an outside door frame that had too many trim screw holes.

[attachimg=1]

I’ve done that in the past.  Wood screws seem to hold particularly well in the end grain of dowels, and seemingly better than they do in plywood or particle board.  A very reasonable solution to this problem.
 
As a commercial locksmith, I've some interesting repairs over the years.  After installing an automatic operator on an exterior pair of doors at an assisted living complex, they asked me if I could repair the interior pair of "oak" doors.  The jambs seemed flimsy and the hinge screws would not hold.  I removed the face trim to find that the jamb was not supported by a stub, instead had intermittent blocking only which explained the doors touching at the tops.  Installed studs and was onto the doors themselves.  The "oak" doors were veneered MDF and the edge was only 1/2" oak and the screws were stripped.  I took the doors back to my shop and for each of the 12 hinges screw I drilled a 1/2" hole 4" deep and installed maple dowels.  That was more than 25 years and those doors are still hanging.
 
Wow what a great bunch of replies.  I really appreciate it.
[attachimg=1]
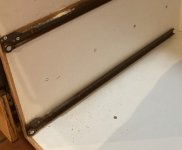
Yes, the slides are old school epoxy coated type.  Not the hippest slides in today's market, but at the time they were a revelation in smoothness compared to the Knapp & Vogt slides I was used to.

Lots of good suggestions.  For most stripped screw situations I sharpen a dowel in my pencil sharpener, and glue that in and re-drill when dry.

But for this application, I decided to try the dowel/euro/system screws, my first time using them, and they were perfect.  My first exposure to Pozidriv,  (just call me Rip Van Winkel).  I know it is sacrilegious, but I was able to drive them in with a P2 bit.  I just did a few, enough to get the drawers workable again.  I promise, I get the Pozi driver bit before I do any more.

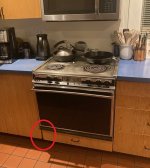
In the near future I have to re-do the range cabinet to accept a slide in range (and fix the circled booboo) so I'll go through all the drawer slide screws then.
[attachimg=2]
 

Attachments

  • old school blum.jpg
    old school blum.jpg
    177.9 KB · Views: 1,606
  • range cabinet.jpg
    range cabinet.jpg
    125.7 KB · Views: 1,520
The correct Pozi-driv bit will bring you joy. Wrestling with a Phillips 2 is generally an exercise in frustration.
They are bad enough with Phillips screws, and don't engage deep enough in PZ screws. If you spin one and round it out, they can be a real pain to remove.
 
I have found that rather than using wooden matchsticks or toothpicks, I use bamboo skewers. I coat the skewer with glue than tamp it in with a small hammer and then break it off.  I've never has this method fail.
 
Back
Top