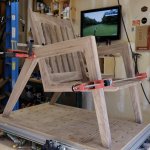
How to mark out domino placement in this angled chair?

nice work [member=12487]duburban[/member]! I'm curious where you sourced your cushions from? Also wondering if you came up with the plans for that yourself or if you found them somewhere? I'm slowly trying to learn sketchup, but my skills are sub-par at best with it and have been just drawing out most my designs on paper. I'd love to find a good resource of printable templates for future projects, but most stuff I've found online is too ornate or 'classic' for my tastes.
 
gearhound said:
nice work [member=12487]duburban[/member]! I'm curious where you sourced your cushions from? Also wondering if you came up with the plans for that yourself or if you found them somewhere? I'm slowly trying to learn sketchup, but my skills are sub-par at best with it and have been just drawing out most my designs on paper. I'd love to find a good resource of printable templates for future projects, but most stuff I've found online is too ornate or 'classic' for my tastes.

I worked through this chair in a furniture design class while in architecture school.

I started with 3d model in Rhino3D then went to a framing lumber mock up which I forced as many different types of people to sit in as possible to approach average comfort zone. Because it was a school project I had a deadline and took a short-cut with the back. The next version will have the leg continue through the back and the cushion will be attached to it.

Cushions I made which you can see are lacking in the photos.
 
It took me awhile to figure it out but the layout process finally clicked for me! I knew I was overthinking it a lot but it turned out to be a lot simpler than I envisioned. If anyone is interested, I'll type out the steps and it even has me thinking about making my 1st woodworking video about it as I think joinery like this can result in some really cool designs.

Cheers,
Matt 

[attachimg=1]
 

Attachments

  • IMG_1083.jpg
    IMG_1083.jpg
    395.9 KB · Views: 2,622
gearhound said:
It took me awhile to figure it out but the layout process finally clicked for me! I knew I was overthinking it a lot but it turned out to be a lot simpler than I envisioned. If anyone is interested, I'll type out the steps and it even has me thinking about making my 1st woodworking video about it as I think joinery like this can result in some really cool designs.

Cheers,
Matt 

[attachimg=1]
  You've done an excellent job. Well done.
 
Finally got finish on it over the weekend and posted photos of it over in the member projects forum.

Just wanted to say thanks again to everyone who helped me out on this forum in case you didn’t end up seeing that post.

It took me a long time and lots of frustration to come up with this mortising method...hope it makes sense! (Still considering making a video on it as I couldn’t find anything about it online):

1st: mark the angle you want the seat on the joint of the back leg/armrest...I've got mine at 98.5 degrees. 2nd: determine mortise placement (I have the bottom mortise at 10mm and the top 2 mortises at 10mm and 30mm from the 98.5 degree angle line). 3rd: use a protractor to draw perpendicular lines from that 98.5 degree angle line through the mortise marks so the machine has something to line up with and cut mortises. 4th: lay the seat piece on the leg/armrest and mark the spacing used in the previous steps on the back. 5th: mortise the seat piece referencing off the lines from step 4 using the fence set at 10mm/30mm. 6th: dryfit the top joint and mark out where the seat hits front legs. 7th: basically repeat steps 2-5 using the angle marked in step 6 to layout the mortises for the lower joint

Using the fence to complete half the mortises really sped up the process and accuracy. My 1st couple attempts I was vertically mortising everything and had to create far too many reference lines to line up the machine.

Hope this helps someone out with how to use the domino for a project with weird angles like this one...and if anyone knows of a simpler process to speed this up even more I’d love to hear it!

Cheers,
Matt

[attachimg=1][attachimg=2][attachimg=3]


Attachments

  • 2829144D-208C-4D7A-9C69-9D943BB04C82.jpeg
    2829144D-208C-4D7A-9C69-9D943BB04C82.jpeg
    1.8 MB · Views: 2,459
  • C8E1456D-6C32-4584-8575-A15DB7E49354.jpeg
    C8E1456D-6C32-4584-8575-A15DB7E49354.jpeg
    2.1 MB · Views: 3,279
  • 9D213F07-EC47-41D3-9712-04BC2AADE3B4.jpeg
    9D213F07-EC47-41D3-9712-04BC2AADE3B4.jpeg
    1.9 MB · Views: 2,550
Good job, Matt. My wife saw the same video and wants me to make a chair like that. As soon as I finish two desks and a coffee table, I will get started. I will be referencing your build for sure.
 
Back
Top