In brief:
I'm after advice on how to cut angles across relatively small parquetry blocks. The angles will form the mitre corner of a row of blocks that run into the corner of a room. The room has a border of two rows of blocks that run parallel to the wall. The room may not be square. I currently have the TS55 with a couple of rails, but no other Festool tools.
[attachimg=1]
In more detail:
Firstly, I'm new here and also new to Festool. I bought a TS55 to achieve a clean cut to form the border of a parquetry floor. I'm delighted with the quality and accuracy of the cut.
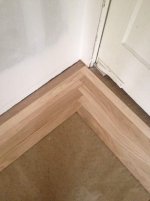
Now I want to lay a border around the room. The border will consist of two rows of parquetry blocks running parallel to the walls.
The blocks are about 65mm along the short edge and 260mm along the long edge (2.5 x 10.2 inches). If the room were perfectly square I could just cut a 45o angle. But of course the room may not be perfectly square and the corners are not quite 90o. So the angle I need to cut may be slightly (but not much) more or less than 45.
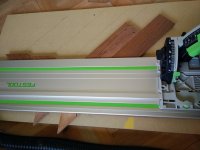
The problem I have is that the blocks are so small that they are completely covered up by the rail. I can put a block under the rail, but not hang onto it after that. In some cases the blocks will be quite small (or short) so that the cut will almost be across a square(ish) block. I can't hang on to one end of the blocks while I cut off the other. The blocks move as soon as the saw blade touches them.
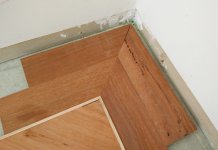
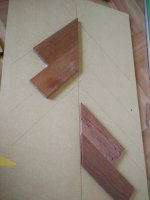
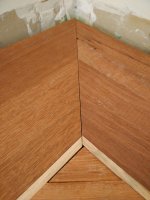
I also need to cut some very small triangles to fill in gaps where the pattern meets the border. You can see in the picture that I've tried to do one but made it too small. Also, my angles are not right on the border, so the whole corner is very sloppy. (I do have ones that I've tried that look better, but I've used this pic as an example of the problems I'm having.)
I had thought about:
Any other suggestions?
I'm not really a woodworker - so the cost of any tools should be justified by this one flooring project and possibly some home maintenance and low level DIY. Some of the stuff I've seen and read here is inspiring, but I'm uncertain as to whether I will really get into woodwork enough to justify a huge investment in multiple Festools (or any tools, for that matter).
I'm after advice on how to cut angles across relatively small parquetry blocks. The angles will form the mitre corner of a row of blocks that run into the corner of a room. The room has a border of two rows of blocks that run parallel to the wall. The room may not be square. I currently have the TS55 with a couple of rails, but no other Festool tools.
[attachimg=1]
In more detail:
Firstly, I'm new here and also new to Festool. I bought a TS55 to achieve a clean cut to form the border of a parquetry floor. I'm delighted with the quality and accuracy of the cut.
Now I want to lay a border around the room. The border will consist of two rows of parquetry blocks running parallel to the walls.
The blocks are about 65mm along the short edge and 260mm along the long edge (2.5 x 10.2 inches). If the room were perfectly square I could just cut a 45o angle. But of course the room may not be perfectly square and the corners are not quite 90o. So the angle I need to cut may be slightly (but not much) more or less than 45.
The problem I have is that the blocks are so small that they are completely covered up by the rail. I can put a block under the rail, but not hang onto it after that. In some cases the blocks will be quite small (or short) so that the cut will almost be across a square(ish) block. I can't hang on to one end of the blocks while I cut off the other. The blocks move as soon as the saw blade touches them.
I also need to cut some very small triangles to fill in gaps where the pattern meets the border. You can see in the picture that I've tried to do one but made it too small. Also, my angles are not right on the border, so the whole corner is very sloppy. (I do have ones that I've tried that look better, but I've used this pic as an example of the problems I'm having.)
I had thought about:
- Mitre saw (Kapex). (A bit expensive for me.)
- MFT3 with the angle and fence attachments and surface clamps to hold the block to the fence.
Any other suggestions?
I'm not really a woodworker - so the cost of any tools should be justified by this one flooring project and possibly some home maintenance and low level DIY. Some of the stuff I've seen and read here is inspiring, but I'm uncertain as to whether I will really get into woodwork enough to justify a huge investment in multiple Festools (or any tools, for that matter).