How to remove a domino connector

ElectricFeet

Member
Joined
Feb 4, 2017
Messages
299
Hi there,
I've just dismantled a cupboard I made a few years ago and want to re-purpose the wood. I knew I was likely to do this, so I used domino connectors, not dominoes.

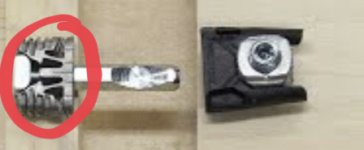
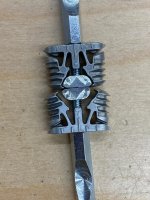
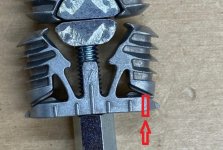
I'm now trying to get the various components out and have drawn a blank on how to get the last bit out. That is, this bit:
[attachimg=1]

I realise that this piece expands to fit the space when assembled, but I'm hoping it has re-contracted now that I've taken the bolts out.

Does anyone have any tips on how to remove these without damaging the wood?
 

Attachments

  • Domino connector.jpeg
    Domino connector.jpeg
    64.7 KB · Views: 1,076
No they will not contract because the 2 arms that support the end actually bend.

The 1st photo is of a tightened and non-tightened connector, notice the difference in width. The 2nd photo shows the tightened connector after the pressure is relieved, there is no difference in connector width. The 2 support arms are permanently bent.

[attachimg=1]

[attachimg=2]

The best thing to do is to reinsert the threaded post so that it's just barely connected to the expanded head. Then wiggle the connector from side to side and maybe you will be able to slightly compress/bend the connector enough to pull it out far enough to put a pair of pliers on it. I'd just keep wiggling it from side to side and it may eventually break free.
 

Attachments

  • 9560.jpg
    9560.jpg
    657.1 KB · Views: 1,116
  • 9561.jpg
    9561.jpg
    423.9 KB · Views: 1,086
Thanks [member=44099]Cheese[/member] , that's good to know. I can see a lot of frustration coming my way  [sad]
 
The frustrating part is that if you take out the post, the keystone isn't necessarily captured well, so you can end up not being able to reinsert it.  I had that happen to a piece and ended up using a pair of sturdy needle nose pliers to pull the connector.  It worked, though is not something I would want to repeat unless it was absolutely necessary.  You will do a bit of damage to the wood and the connector is clearly toast.
 
I've never tried this but wondering if you could drill a hole along each side of the connector then reach in and squeeze it back closed as Cheese suggested. I have a pair of Knipex pliers that have jaws less then 1/4" wide that I think would work.

Once you got the connector out go back with the Domino machine and cut over the original domino mortise plus the width of the two holes you drilled. Use a larger diameter bit if you have to.

Then make a custom width domino plug from the same wood and plug the mortise.
 
I was thinking the along the same lines as Bob.
Maybe use a drill and tap on each side of the connecter under the latching arms so you can thread in a screw to try to push the arm back away from the wall of the mortise?
 
Another technique that has worked for me is to drill an access hole behind the connector and drive it out with a nail set or similar steel rod.
 
I have never seen one of these but looking at the pics I would drill a large hole through the flat the arm is attached to and several small holes directly into the arm where it meets the base to weaken it than lever the arm through the larger hole away from the wood. Ignore me if I misunderstand how it works.
 
8mm drill bit in the stud hole. The connector is soft, drills easily. Depth you need to drill is about 8mm.

Tom
 
Thanks to all. I tried the "wiggling about" approach, but no cigar. I had screwed the bolts in really tight and the grippy edges are very well embedded in the wood. I've decided to leave them there for now, until I know exactly how I'm going to be using the boards in future.

When I do take them out, [member=4105]tjbnwi[/member] 's approach makes a lot of sense: drilling a central hole will effectively destroy the connector's central column, cutting it in two. Sounds like it should work well and most importantly not damage the wood.

Thanks again.
 
If you want to reuse the connector drill a 2-3 mm access hole in both shoulders. Through the hole smack the toothy bit with a nail to bend it back, or drive a small screw into same hole to push and hold it back.
[attachimg=1]
 

Attachments

  • connector2.jpg
    connector2.jpg
    121.3 KB · Views: 848
ElectricFeet said:
I had screwed the bolts in really tight and the grippy edges are very well embedded in the wood.

That's the good news...that's a very good thing. Next thing is to try Tom's AND Svar's ideas and see how things work out.  [smile]
 
Svar's is the best approach (and the most easy to understand because of the image provided).
 
Svar said:
If you want to reuse the connector drill a 2-3 mm access hole in both shoulders.

Thanks [member=15585]Svar[/member] , that’s a great idea. Will give it a go when the time comes.
 
Svar said:
If you want to reuse the connector drill a 2-3 mm access hole in both shoulders. Through the hole smack the toothy bit with a nail to bend it back, or drive a small screw into same hole to push and hold it back.

Great idea, [member=15585]Svar[/member]!  That makes me wonder if it would be a good idea to drill these holes in the connectors BEFORE inserting them (for future work).  One could easily create a drilling jig to be used with a drill press for the sake of consistency in position and accuracy in depth.  (Festool designers, are you listening?) 
 
Sparktrician said:
That makes me wonder if it would be a good idea to drill these holes in the connectors BEFORE inserting them (for future work).  One could easily create a drilling jig to be used with a drill press for the sake of consistency in position and accuracy in depth.  (Festool designers, are you listening?)

That’d be simple, make a nest with the Domino, place 2 material stops on the drill press table and just shuttle the nest back & forth to drill the thru-holes.
 
I wouldn't drill holes by default as the chances of me reusing the boards from a knock-down project are so very slim. My concern is also about any loss of strength if holes are drilled.
 
Back
Top