How to round off a top for a cedar chest?

lshah72414

Member
Joined
Nov 10, 2016
Messages
144
Hi all,
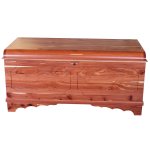
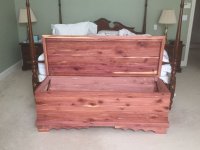
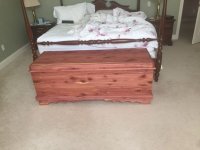
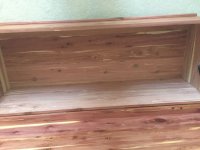
Will be making a cedar chest for the wife. I have figured out everything except the top. On the front, the top has a rounding to it, the chest will be 5 foot long. I am not sure how to make the rounding that long and consistent. I have a 1040 router, but not sure what type of bit to use. Any suggestions would be helpful.  Please see photo down below.
Thank you
 

Attachments

  • SolidCedarChest102255.jpg
    SolidCedarChest102255.jpg
    73.6 KB · Views: 578
It is probably custom-milled 1/4 round stock. 

Maybe you can find a cedar fence post and slice it into quarters.  I don't think you will find 1/4 round stock with a 2" radius or more. 

 
You can see in the photo that the depth has been achieve by laminating pieces of cedar.

I did something similar once. I made it square first, and then used my table saw to make about 6 passes at various angles to get close to a quadrant, and certainly very uniform. Then hand planed using a template made of thin ply to check profile as I went along. Finally hand sanded using a block with the quadrant profile cut in to it.
 
Looks too big for a round over bit. Cut bevel on a table saw, round with hand plane, refine with rounded sanding block.
You could make round over router jig, but it's too involved for a one time job.
Edit: LOL, just now read AstroKeith's post above.
 
[member=15585]Svar[/member] , [member=72891]AstroKeith[/member] ,[member=74278]Packard[/member], Thank you all for your replies. I thought I was going to have to make it square and then do it by hand. I was hoping someone had an easier solution. [smile].
Bevel with table saw and than hand plane or use rotary sanders and eye ball it. Finish with sanding blocks.
Thank you again.
 
If I were doing this, I would cut some angle cuts to get close and use a hand scraper with a custom profile to finish the shape.

(Actually, that is not true. If I were doing this, I would adjust the design to meet my equipment capabilities.)
https://www.woodsmithplans.com/plan/custom-scraper-shaves/

photo-large-hd.jpg


You can get the scraper blanks from Amazon.com: https://www.amazon.com/Crown-Hand-T...ocphy=9004249&hvtargid=pla-570328963610&psc=1

 
Make a cradle that sits over your router table in which you can rotate the piece to get the radius you need.
Make a pass over the whole length, then raise the bit. Rinse and repeat.

Or make a box in which you support the blank inside from each end and your router rides on top. Rotate the blank as you work your way down to the required diameter. Then quarter it on the bandsaw and hollow out the inside on the table saw with a cove cutting jig.

Or build a jig like this.

 
In my experience with antique chests, the way you get that profile is to veneer over the top of a bent piece of plywood.

Most chests of that style have a hollow lid; if that lid was solid, it would be too heavy to open without spring-assisted hinges, at best.
 
squall_line said:
In my experience with antique chests, the way you get that profile is to veneer over the top of a bent piece of plywood.
Most chests of that style have a hollow lid; if that lid was solid, it would be too heavy to open without spring-assisted hinges, at best.
The lid is hollow like a box. It is laminated with thicker (vertical) pieces on front an back, then rounded.
On the second thought I'd be worried about expansion/contraction if it's built solid and same as on the picture. There it is flanked by two pieces on left and right, "breadboards" of sorts.
 
squall_line said:
In my experience with antique chests, the way you get that profile is to veneer over the top of a bent piece of plywood.

Most chests of that style have a hollow lid; if that lid was solid, it would be too heavy to open without spring-assisted hinges, at best.

I agree the veneer method could work (and potentially much simpler than what I proposed) but I didn't know they had plywood back in the day which would qualify as antique today.

You could glue up a rough blank of segmented pieces, round off the OD to the desired radius, then use a core box plane (Stanley #56 or 57) to shape the inside radius.

What is the radius of the corner in question by the way. I don't think that information was given which would help determine an efficient method of reproducing the profile.
 
Thank you all for your help. Unfortunately, all I have is the picture I uploaded. I have been searching online, and found some side views and with the top open. It is hollow, and it is pieced together. I think I will probably do the same and use  the suggestions from Svar, and Astrokeith, and finish by hand.
Thank you all again.
 
I'm surprised that I did not think of this earlier.  Canoe builders use cedar strips to clad the framework.  They usually buy the strips with the edges routered as shown in the illustrations below.  You can contact a few of the strip suppliers to see if they have any short scrap that they can sell you.  Or you can buy the router bits and make them yourself. 

You probably don't want to buy a large quantity of strips, so I think the scrap route or the router bit route would work better.

For more acute curves I saw instructions for running the router bit off-center.  It allowed for sharper curves.

I do see it for sale at $0.60 per foot.  Here is the google search for these: https://www.google.com/search?q=cedar+bead+and+cove+strips+for+sale&client=firefox-b-1-d&ei=Pu2cYd_BKOqPwbkP8aiG8Ao&ved=0ahUKEwjf2MWYzK70AhXqRzABHXGUAa4Q4dUDCA0&uact=5&oq=cedar+bead+and+cove+strips+for+sale&gs_lcp=Cgdnd3Mtd2l6EAMyBggAEBYQHjIGCAAQFhAeMgkIABDJAxAWEB46BwgAEEcQsAM6FAgAEOoCELQCEIoDELcDENQDEOUCOgQIABBDOgUIABCRAjoECC4QQzoICAAQgAQQsQM6EQguEIAEELEDEIMBEMcBENEDOhEILhCABBCxAxCDARDHARCjAjoFCAAQgAQ6CgguEMcBENEDEEM6BwgAEMkDEEM6CAgAEMkDEJECOgUILhCABDoLCC4QgAQQxwEQrwE6CAgAEIAEEMkDSgQIQRgAUOMHWIpNYMBPaAJwAngAgAH2AYgB7hySAQYyNi42LjOYAQCgAQGwAQrIAQjAAQE&sclient=gws-wiz
 

See the illustrations below.  The edges are all glued.

flutebd_01.jpg


cedar-strip-effective-width-diagram.jpg


dsc02556-2000x1130.jpg
 
Please excuse my thread drift:

Packard - I wish you wouldn’t have posted that link, now I’m sitting here shopping boat building kits on Chesapeake Light Craft website that showed up in the link. Lots of kits there and I’ve had vague inkling to attempt a boat for years.  A kit would make accessible for someone with skills but no boatbuilder experience.
LOL - kayak, sail boat, SUP??  One of each?

Now back to cedar chest discussion, my apologies to OP…..
 
I am not a boater, but I confess that I have long harbored (joke) a desire to build a small boat.  A kayak or canoe would be the best choice.  (No heavy lifting involved). 

Lots of kits out there and lots of instructional videos.

The canoe strips do seem like a viable option for making that curve.  Once the glue has dried and the strips are taken off the forms, it will be a nice structure.
 
Vtshopdog said:
Please excuse my thread drift:

Packard - I wish you wouldn’t have posted that link, now I’m sitting here shopping boat building kits on Chesapeake Light Craft website that showed up in the link. Lots of kits there and I’ve had vague inkling to attempt a boat for years.  A kit would make accessible for someone with skills but no boatbuilder experience.
LOL - kayak, sail boat, SUP??  One of each?

Now back to cedar chest discussion, my apologies to OP…..

The strip-built small craft appeal to me more.  See: https://newfound.com/boat/voyager/

If you haven’t built a stripper before and aren’t sure about the process, you may want to get a Pre-Kit first. This includes “Cedar Strip Building” DVD, “Applying Fiberglassing” DVD, and Susan Van Leuven’s book, “The Illustrated Guide to Wood Strip Canoe Building“.

 
Well, I finished the cedar chest.
Overall, I am happy how it came out, even though I made some errors.  Some I could have fixed, but was running out of cedar. I figured 70 board feet, I bought 102 board feet, lots of waste, due to knots and cracks in the wood. I hand picked the 4/4 cedar and still had a lot of waste. Also need to learn how to finish better.
60"wide X 24" high x 21" depth.(Wife supplied the dimensions).
Didn't have a plan only 4 or 5 different views of the cabinet.
On the top I cheated, I used a round over bit, showed it to the wife and she was OK with that. For the lid handle I layed a piece horizontally, it juts out 3/4" and rounded it over.
Held together by dominoes, 6x 40mm and 5 x30 mm.
Used GRK finish nails for the trim and the side pieces on the top.
Finished with three coats of Poly Osmo clear.
Sorry about the unmade bed in the pictures. [sad]
 

Attachments

  • IMG_2860.jpg
    IMG_2860.jpg
    86.3 KB · Views: 503
  • 66067280686__0DF9DAE4-887F-45EF-9CDB-76FCFAE07BF0.jpg
    66067280686__0DF9DAE4-887F-45EF-9CDB-76FCFAE07BF0.jpg
    88.4 KB · Views: 489
  • IMG_2864.jpg
    IMG_2864.jpg
    97.2 KB · Views: 474
Packard said:
Vtshopdog said:
Please excuse my thread drift:

Packard - I wish you wouldn’t have posted that link, now I’m sitting here shopping boat building kits on Chesapeake Light Craft website that showed up in the link. Lots of kits there and Ive had vague inkling to attempt a boat for years.  A kit would make accessible for someone with skills but no boatbuilder experience.
LOL - kayak, sail boat, SUP??  One of each?

Now back to cedar chest discussion, my apologies to OP…..
 

The strip-built small craft appeal to me more.  See: https://newfound.com/boat/voyager/

If you haven’t built a stripper before and aren’t sure about the process, you may want to get a Pre-Kit first. This includes “Cedar Strip Building” DVD, “Applying Fiberglassing” DVD, and Susan Van Leuven’s book, “The Illustrated Guide to Wood Strip Canoe Building“.

Apparently this is the same technique (cove and bead strips) as what I linked.
 
lshah72414 said:
Well, I finished the cedar chest.
Overall, I am happy how it came out, even though I made some errors.  Some I could have fixed, but was running out of cedar. I figured 70 board feet, I bought 102 board feet, lots of waste, due to knots and cracks in the wood. I hand picked the 4/4 cedar and still had a lot of waste. Also need to learn how to finish better.
60"wide X 24" high x 21" depth.(Wife supplied the dimensions).
Didn't have a plan only 4 or 5 different views of the cabinet.
On the top I cheated, I used a round over bit, showed it to the wife and she was OK with that. For the lid handle I layed a piece horizontally, it juts out 3/4" and rounded it over.
Held together by dominoes, 6x 40mm and 5 x30 mm.
Used GRK finish nails for the trim and the side pieces on the top.
Finished  [ [big grin]big grin]with three coats of Poly Osmo clear.
Sorry about the unmade bed in the pictures. [sad]

Looks great.  I routinely modify plans to suit the equipment I have.  I would have done similarly.

If that chest was in my house I would also be using it as a bench.  Is it strong enough for that?  Otherwise mount sharp spikes or broken pieces of glass to keep it safe. [wink] [big grin]
 
[member=74278]Packard[/member] , Thank you.
Yes, it is strong, I have already sat on it, However, I am only 160 Lbs. 3/4" cedar throughout, very solid.
 
Back
Top