[attachimg=1]
Hello, have been reading here since I got my first Festool(s) about 5 years ago but never had reason to post. Thanks to many for much great information, I've read and learned a lot.
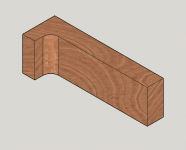
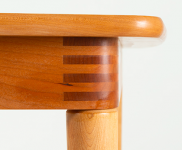
I'm hobbyist about to start a coffee table project and for the skirt I want to copy this nice looking rounded-corner box joint from a Thos. Moser catalog. I'm just fine building the box joints, but a bit concerned about rounding off a corner with end grain facing two directions. Build will be in Lacewood which I've used a fair amount - it tends to machine very well and is forgiving - but the table will have a glass top and be in my living room. I'm going to look at it every day so want good results.
I have thought of a few options:
Router:
Having at it with a router (either a corner template with pattern bit or even a simple round over bit) seems like an invite to blow out some of the endgrain. Or maybe not?? I wouldn't find out until trying on a sub assembly that will take a day to build, seems risky.
Bench Sander:
Seems likely to work ok, maybe a bit slow (but only have to do four corners, right?) (Also faster that blowing it apart on router and starting over). Issue here is the table on my Rigid sander is about 12x18 and the table skirt will be about 30x30. Clumsy to handle, have considered building some sort of table extension or support device tho.
Rough cut corners 45 degrees on miter saw before rounding:
Would speed up either method and maybe reduce blowout.
Run away!!
Final option is to just live with good old 90 degree corners that I know how to make
Thinking I can build a couple sample corner joints from the off cuts from my stock and mess around on those, but if anyone has input would very welcome.
Thanks
Hello, have been reading here since I got my first Festool(s) about 5 years ago but never had reason to post. Thanks to many for much great information, I've read and learned a lot.
I'm hobbyist about to start a coffee table project and for the skirt I want to copy this nice looking rounded-corner box joint from a Thos. Moser catalog. I'm just fine building the box joints, but a bit concerned about rounding off a corner with end grain facing two directions. Build will be in Lacewood which I've used a fair amount - it tends to machine very well and is forgiving - but the table will have a glass top and be in my living room. I'm going to look at it every day so want good results.
I have thought of a few options:
Router:
Having at it with a router (either a corner template with pattern bit or even a simple round over bit) seems like an invite to blow out some of the endgrain. Or maybe not?? I wouldn't find out until trying on a sub assembly that will take a day to build, seems risky.
Bench Sander:
Seems likely to work ok, maybe a bit slow (but only have to do four corners, right?) (Also faster that blowing it apart on router and starting over). Issue here is the table on my Rigid sander is about 12x18 and the table skirt will be about 30x30. Clumsy to handle, have considered building some sort of table extension or support device tho.
Rough cut corners 45 degrees on miter saw before rounding:
Would speed up either method and maybe reduce blowout.
Run away!!
Final option is to just live with good old 90 degree corners that I know how to make
Thinking I can build a couple sample corner joints from the off cuts from my stock and mess around on those, but if anyone has input would very welcome.
Thanks


")