woodbutcherbower
Member
Posted earlier than expected - the buddy who I was supposed to be going out with tonight for beers? His wife got sick so he stayed home, leaving me with the choice of a) sit all night watching trash on TV, or b) post this. You're reading this, so you know which option I chose.
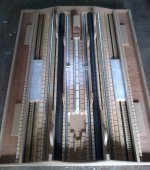
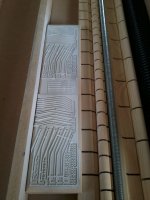
So anyway - having reached the stage where the basic frame and layout were done, the cutting and application of numerous regularly-slit mouldings continued. I also attached various flat plates to the base to accomodate other stuff which you'll see later. Most of these were covered with more brass photo-etchings;
[attachimg=1]
[attachimg=2]
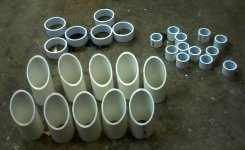
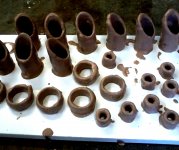
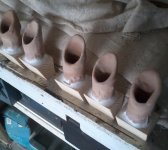
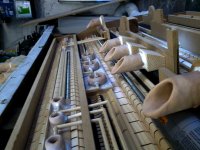
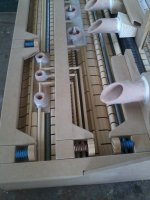
It was now time to get out the plastic, the plywood, and the plaster. Various sizes of PE tube were cut into various shapes, and dipped into wet plaster to give them an organic texture. When set, the larger tubular pieces were then fixed to blocks of timber with grab adhesive, so these could be screwed to the rest of the structure;
[attachimg=3]
[attachimg=4]
[attachimg=5]
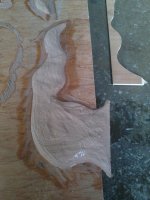
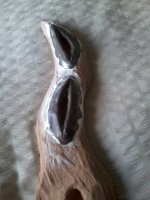
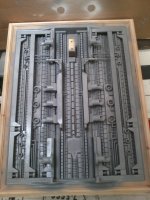
Another requirement stipulated by the customer was a set of objects lifted from another painting by Giger. I'm not going to mention the specific title in case anyone gets curious and searches it - the subject matter is extreme, and is likely to be extremely offensive to many. These consisted of a fretted-out piece of 12mm ply, rough-coated with plaster. Once set, the raised shapes were made using air-drying clay, with the whole assembly then being coated in 2-pack fibreglass resin so it would take paint evenly. Mindful of the next stage (and having some staircase newel and spindle parts to make for another customer) I also used a little leftover lathe time to turn some bolt-like objects, using these small turnings with electrical wire wraps to represent tension springs;
[attachimg=6]
[attachimg=7]
[attachimg=8]
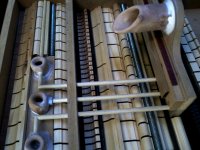
The next stage was to attach these recent fabrications. To replicate the 'pipework' present on the original painting, these were connected together using a little network of small-diameter dowels, fixed directly to the PE/plasterwork using 2-pack cyanoacrylate, with the joints disguised using metal nuts. Various other details were also added at this stage from various bits I had lying around - the sharp, spiral-shaped objects in the middle of the circles are Fischer drywall/plasterboard fixings;
[attachimg=9]
[attachimg=10]
[attachimg=11]
Yeah - I know. The middle piece of dowel at the bottom of the picture slid down and set rigid before I noticed. Trying to prise it apart would have wrecked the plaster part, so I left it. No-one's perfect [sad] Always conscious of the fact that I was supposed to be replicating the general appearance of the original painting, the next stage was to cut and add the overlays to the tops of the frame supports I'd made earlier. With these attached, the whole thing suddenly came alive and started to look much more like the original artwork;
[attachimg=12]
So - around 100 hours in, the basic shape was complete. I added timber blocks to the outside of the frame, and covered these with a set of heavy frame mouldings made on my 50-year-old Wadkin BER2 3-phase spindle moulder - I've owned and used this machine for over a decade, and it still absolutely terrifies me - but that's another story for another day. With all of this done, it was time to start getting some paint on - beginning with flat grey primer from an auto-shop rattlecan;
[attachimg=13]
The next (and perhaps last) post will show the final detailing, assembly and extensive paintjob. Thanks to all those still interested enough to be hanging in there [big grin]
So anyway - having reached the stage where the basic frame and layout were done, the cutting and application of numerous regularly-slit mouldings continued. I also attached various flat plates to the base to accomodate other stuff which you'll see later. Most of these were covered with more brass photo-etchings;
[attachimg=1]
[attachimg=2]
It was now time to get out the plastic, the plywood, and the plaster. Various sizes of PE tube were cut into various shapes, and dipped into wet plaster to give them an organic texture. When set, the larger tubular pieces were then fixed to blocks of timber with grab adhesive, so these could be screwed to the rest of the structure;
[attachimg=3]
[attachimg=4]
[attachimg=5]
Another requirement stipulated by the customer was a set of objects lifted from another painting by Giger. I'm not going to mention the specific title in case anyone gets curious and searches it - the subject matter is extreme, and is likely to be extremely offensive to many. These consisted of a fretted-out piece of 12mm ply, rough-coated with plaster. Once set, the raised shapes were made using air-drying clay, with the whole assembly then being coated in 2-pack fibreglass resin so it would take paint evenly. Mindful of the next stage (and having some staircase newel and spindle parts to make for another customer) I also used a little leftover lathe time to turn some bolt-like objects, using these small turnings with electrical wire wraps to represent tension springs;
[attachimg=6]
[attachimg=7]
[attachimg=8]
The next stage was to attach these recent fabrications. To replicate the 'pipework' present on the original painting, these were connected together using a little network of small-diameter dowels, fixed directly to the PE/plasterwork using 2-pack cyanoacrylate, with the joints disguised using metal nuts. Various other details were also added at this stage from various bits I had lying around - the sharp, spiral-shaped objects in the middle of the circles are Fischer drywall/plasterboard fixings;
[attachimg=9]
[attachimg=10]
[attachimg=11]
Yeah - I know. The middle piece of dowel at the bottom of the picture slid down and set rigid before I noticed. Trying to prise it apart would have wrecked the plaster part, so I left it. No-one's perfect [sad] Always conscious of the fact that I was supposed to be replicating the general appearance of the original painting, the next stage was to cut and add the overlays to the tops of the frame supports I'd made earlier. With these attached, the whole thing suddenly came alive and started to look much more like the original artwork;
[attachimg=12]
So - around 100 hours in, the basic shape was complete. I added timber blocks to the outside of the frame, and covered these with a set of heavy frame mouldings made on my 50-year-old Wadkin BER2 3-phase spindle moulder - I've owned and used this machine for over a decade, and it still absolutely terrifies me - but that's another story for another day. With all of this done, it was time to start getting some paint on - beginning with flat grey primer from an auto-shop rattlecan;
[attachimg=13]
The next (and perhaps last) post will show the final detailing, assembly and extensive paintjob. Thanks to all those still interested enough to be hanging in there [big grin]
Attachments
-
 1.jpg517.4 KB · Views: 298
 -
 1B.jpg549.9 KB · Views: 301
 -
 2.jpg249.5 KB · Views: 289
 -
 3.jpg364.8 KB · Views: 288
 -
 3B.jpg374.5 KB · Views: 284
 -
 4.jpg654 KB · Views: 280
 -
 5.jpg590.2 KB · Views: 285
 -
 5B.jpg689.3 KB · Views: 291
 -
 6.jpg586.3 KB · Views: 271
 -
 7.jpg603.4 KB · Views: 287
 -
 8.jpg555.6 KB · Views: 271
 -
 9.jpg545.8 KB · Views: 282
 -
 11.jpg709.8 KB · Views: 282