For spraying in a shop environment the gx-19 is a clear winner. For spraying trim that is already installed and easily moving from room to room with no hoses or cords makes it more appealing to me in that situation. The gun does get heavy after awhile since all the weight is on the gun.
You are using an out of date browser. It may not display this or other websites correctly.
You should upgrade or use an alternative browser.
You should upgrade or use an alternative browser.
HVLP guns
- Thread starter HowardH
- Start date
Thank you for sharing your opinions. Besides paint can this spray water based polyurethanes. If so which brands of polyurethane are good.
As usual one can hope for the proverbial unicorn that does all things.
As usual one can hope for the proverbial unicorn that does all things.
afish said:You adjust the Graco by switching tips. Airless tips come in all different sizes and have a 3 digit # for example 315 the first # 3 is half the width of the fan at 12inches so a #3 tip is supposed to be 6 inches wide at 12 inches from the gun. the second pair of numbers "15" is the orifice size. you very this based on the viscosity of the paint. Thicker paint needs bigger orifice. .015-.018 is generally suited for latex. I have sprayed all kinds of Latex and have never found one that I couldnt spray with it. Its an amazing little gun for latex IMO
Other than the swapping out tips which is very easy and tool less you just twist and pull. There is a pressure dial on the gun to fine tune it further. You always try to adjust the tip to what you are spraying and adjust the pressure down to minimize over spray.
The gun works fantastic for small jobs like trim and doors. You just have to remember its not a full size rig and not meant to be. Dont go trying to spray full walls or ceilings with it. I do sometimes spray the ceiling to wall corners first with ceiling white, then roll out the ceiling. It makes it fast and easy. Then I just cut in the wall to the ceiling.
As far as the naming goes yes its a little confusing but Im pretty sure Dynaglide is right all the different names is mostly depending on the retailer and most of the big retailers require exclusivity. So they change the names slightly. Dewalt does some similar things for Lowes/HD. Im not sure who sells which and there are corded/cordless versions too. This is the version I have. They also make the pro plus for spraying thinner based paint but I spray that with a HVLP plus it requires a goofy grounding cord to be worn by the sprayer which kind of defeats the cordless aspect. So, really I dont see the need for the pro plus but some might. The TC pro will spray anything that you can clean with water or mineral spirits. If it needs Lacquer or acetone to clean then you cannot use the TC pro.
The only thing I wish is they offered it in a bare tool not just a kit for those who already own a bunch of dewalt stuff, but I would buy it again either way.
It will spray just about anything that can be cleaned up with water or mineral spirits. ANYTHING that needs thinner, acetone etc. cannot be sprayed without risking an explosion. Otherwise both the handheld tc pro and gx-19 will handle it. The Gx-19 might be able to spray thinner based paint but you would need to double check that. I have never sprayed the water based poly with it but I did spray some Lenmar water based lacquer with the TC pro and it worked beyond my expectations.
Packard
Member
I have both an airless (Graco Magnum X7) and a HVLP sprayer (stage 4), which I got for spraying cabinets. The airless feels like a runaway freight train to me. I will use it for painting an entire room, but not for cabinets.
The HVLP seems better suited for that application (but sucks for painting a room--too many gun refills).
The HVLP seems better suited for that application (but sucks for painting a room--too many gun refills).
A HVLP is more refined for sure. The airless will lay down a lot of paint fast. It does have a dial to adjust the pressure and it should be dialed back as far as possible but still give a good pattern you can try and step down a size or two tip to help reduce the flow.
tjbnwi
Member
- Joined
- May 12, 2008
- Messages
- 7,400
Packard said:I have both an airless (Graco Magnum X7) and a HVLP sprayer (stage 4), which I got for spraying cabinets. The airless feels like a runaway freight train to me. I will use it for painting an entire room, but not for cabinets.
The HVLP seems better suited for that application (but sucks for painting a room--too many gun refills).
Try the FFLP tips to solve the runaway train issue. They are designed for finish work. They work at lower pressures (about 50% decrease) yet can lay down a really nice finish.
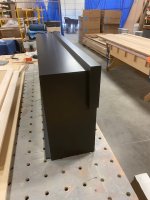
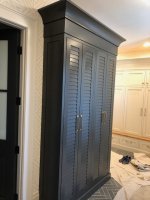
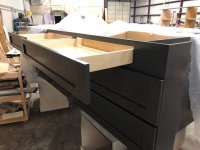
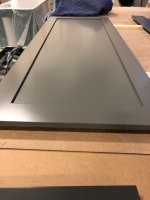
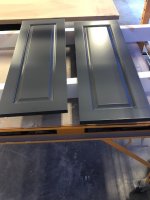
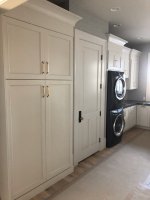
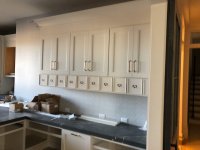
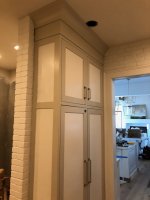
All of the below were sprayed with air assisted airless. I choose dark colors (had to add one white one at the end...) with higher view angles. All the finishes are waterborne, either KA+ or Hydro Plus, cured at least 8 hours at ambient temps.
I'm currently training a young lady to be the finisher for the shop, if she's as good as the first young lady I trained about 5 years ago, she will be a great finisher.
I do have a Q4 and a Q5, even connected to a pressure pot they're to slow for the volume we spray. I do use them for spraying away from the shop.
Tom
Attachments
-
 IMG_2147.jpeg110.2 KB · Views: 481
 -
 IMG_3542.jpeg73.7 KB · Views: 452
 -
 IMG_4185.jpeg92.3 KB · Views: 456
 -
 IMG_4249.jpeg88.7 KB · Views: 442
 -
 IMG_1068.jpeg101.7 KB · Views: 459
 -
 IMG_1079.jpeg74.7 KB · Views: 457
 -
 IMG_2509.jpeg60.8 KB · Views: 446
 -
 61056890303__6D016155-AABB-41EC-9EA4-7D0AC1785A0C.jpeg69.5 KB · Views: 470
[member=4105]tjbnwi[/member] those photos make me want to try more waterborne finishes. Fantastic job, I love that plantation style wall unit in photo #5 Im a sucker for those wide coves instead of crown. Nice job. Is there a air assist rig that you recommend that wont require a kidney sale
tjbnwi
Member
- Joined
- May 12, 2008
- Messages
- 7,400
afish said:[member=4105]tjbnwi[/member] those photos make me want to try more waterborne finishes. Fantastic job, I love that plantation style wall unit in photo #5 Im a sucker for those wide coves instead of crown. Nice job. Is there a air assist rig that you recommend that wont require a kidney sale
If you have an airless sprayer and an air compressor with some volume you can turn the airless into a AAA. The magic is in the gun. Look around Ebay or other sources for a used AAA gun. A G40 or equivalent to start, this will handle up to 4000 PSI pump pressure. This will get you into a AAA set up the cheapest.
We run Graco Merkurs and FF 395 AAA PC's. The Merkur is limited by the gun to 1500 PSI, I purchased it used for a really good price. I also have a Graco Triton, it is similar to an HVLP connected to a pressure pot.
I've been shooting waterborne finishes for over 20 years, started using them due to high risks involed with solvent based finishes.
The thing you need to know with waterbonres is it takes awhile for the finish to tighten. Unlike solvents which look their best right off the gun, the waterbornes cn take up to 30 days to look their best.
Tom
tjbnwi
Member
- Joined
- May 12, 2008
- Messages
- 7,400
afish said:My biggest issue with the WB is the dry times and being tight on space. I also live in a very humid environment too. So, that doesnt help either.
The dry to move time is not bad. A little air flow and you’re down to 5 minutes.
Pack in 8 hours.
I used to live in the Chicagoland area, I know what humid is like.
I have not used a Wagner gun.
Tom
HowardH
Member
so I went ahead an purchased a gravity feed Fuji from Roger Phelps. My bottom feed gun will be used for applying paint and the new one for lacquers, etc. One can never have too many tools. Even with a 1.3 tip, it sprays latex nicely as long as the paint is thinned a bit.
[attachimg=1]
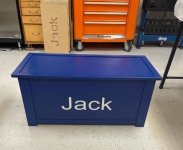
I used the Shaper Origin to inlay the lettering. It was perfect for the job.
[attachimg=1]
I used the Shaper Origin to inlay the lettering. It was perfect for the job.
Attachments
HowardH
Member
Thanks, Tom. However, it looks like a 6 year old finger painting compared to your work. Magnificent.
HowardH
Member
tjbnwi said:Looks great Howard.
Tom
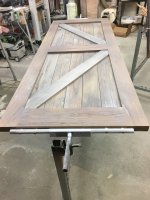
I decided I didn't like the way the top turned out so I rebuilt it using a higher grade material. I plan on spraying it again but this time, should I add a little Floetrol to the paint so it will dry smoother and less prone to orange peel?
tjbnwi
Member
- Joined
- May 12, 2008
- Messages
- 7,400
HowardH said:tjbnwi said:Looks great Howard.
Tom
I decided I didn't like the way the top turned out so I rebuilt it using a higher grade material. I plan on spraying it again but this time, should I add a little Floetrol to the paint so it will dry smoother and less prone to orange peel?
If you shot a true latex two things;
It will take awhile for the finsih to coalese and things may stick to it. The orange peel should go away as it coleeses.
You can thin it a touch more and add Floetrol. Both will slow down the curing process.
I highly recommend in the future an acrylic or a urethane.
Tom
HowardH
Member
I would but I'm already way too far down that road on this project! ;D. Thanks for the tips!
tjbnwi
Member
- Joined
- May 12, 2008
- Messages
- 7,400
afish said:My biggest issue with the WB is the dry times and being tight on space. I also live in a very humid environment too. So, that doesnt help either.
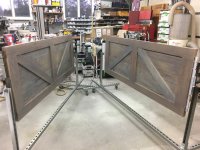
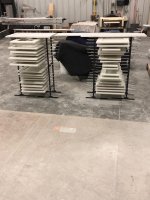
These are the drying racks we use.
The black ones (Door RackPainter) allow you to shoot 2 sides the set aside to dry.
The wood ones we made for larger panels.
They may help with your tight space.
Last pics is how we rack and spray large doors. The rotators are an adaptation from my automotive restoration days.
Tom
Attachments


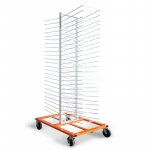
Those are some cool racks. I was always hesitant on the double sided door one it seems like it would still leave marks. Its kind of funny I use similar type to the others you pictured. I have some 2x4's drilled to accept 1/2" emt. Mine arnt as fancy, I clamp mine to some existing storage shelving when needed. Then store them away when not in use. I like how yours has the adjustable width.
The door rotator is nice too I actually made one similar out of wood that I was considering trying to sell but then RB went to 200 a sheet and figured that would have killed a lot of the sales. So I put it on the back burner. Mine was more portable so it can be taken to a jobsite if needed. All the components could be stored or transported in a Plastic tote.
The rack (pictured) is probably my next purchase but even it is pushing my storage limits. Have you used one like this? any input? It seems to hold the most doors in the least space.
Oh, and as far as humidity Chicago aint got nothin compared to South Florida. Some days you need a squeegee.
Attachments
Similar threads
- Replies
- 0
- Views
- 365
- Replies
- 0
- Views
- 327