I am trying to build this...

Toolinator

Member
Joined
Dec 22, 2014
Messages
48
I am trying to build a larger and better built shoe cabinet than this Target version. Any suggestions on wood choice? My Festools are all brand new, I need a project to de-virginize them.

Cabinet will be painted white too

- poplar hardwood for frame, or plywood?
- if plywood, then birch or Baltic birch? (Which would look okay sanded and painted?)
- for the dividers would you recommend 1/4" MDF?

I am trying to get a hang of skechup. Did you all buy the "pro" version after 30 days? Just curious. Seems like an excellent design assistant.

P.s. For anyone in Seattle (Bellevue), I am looking for a Festool tutor to give me some advanced tips to fast-track the learning curve on furniture making. I understand the basics.  Let me know if you have a recommendation :)
 

Attachments

  • image.jpg
    image.jpg
    768.7 KB · Views: 1,002
  • image.jpg
    image.jpg
    768.7 KB · Views: 605
It doesn't really matter which one of the materials you mentioned, they will all suffice.

I wouldn't make the dividers out of 1/4'', that's a bit thin, but rather 1/2'' or bigger.
 
I built something similar and I went with pine hardwood. I don't like the mess with the splintering of plywood with all those cuts even with awesome Festool splinter guard tools. So, it doesn't really matter which material you go with (regular birch if it's ply) but I prefer hardwood.

and at least 1/2" for the shelves. Much more support and the overall look of it will be better as well.
 
I agree with Alex re the 1/2 inch material. While it may look bulkier it will also last longer.

For the shelf construction i would  make stopped dado's in the top/underneath of the shelf. About 1/8'' deep, that would still enough meat in the material for strength. The vertical dividers could have a corresponding notch at the front to allow the dividers to be flush with the front of the shelves/ carcass. Giving it a nice clean look.  [smile]

If you want to go further. To create the look of thinner shelves/dividers, you could taper the top/ bottom or both of the shelves/ dividers  [wink]
 
If you choose 1/4 inch, make sure it's a wood plywood.  MDF won'r hold up under those conditions.  MANY drawer bottoms are made of 1/4 plywood.  I would not do a dado in the horizontal it takes away half the strength.  If you used 1/2 inch then i say go for that!
 
What Festools do you have?

For the notches/dadoing, it will be helpful if you can set up some sort of repeatable/production type process (if you have an MFT, you can use the fence flag stop for this purpose -- or you could do the dados on both boards at the same time), that way they can be exact for every shelf.  You go notch by notch, dado by dado, cycling through the whole run of boards, rather than trying to do all the dado's and/or notches on one board at a time.
 
Welcome to FOG and your first Festools!

I'd do the main exterior frame out of 3/4 poplar.  Route the grooves on the interior for the dividers.

Use 1/4 in masonite that is finished both sides.  Most good quality lumber yards either stock it or can order it in in 4x8 sheets.  You want finished both sides for the best paint finish.  Masonite paints and sands very well and for shoes it will be strong enough.  I'd do half laps on the masonite with the horizontal pieces running solid side to side across the front and the verticals running solid top to bottom on the back side.  That will give you good horizontal strength at the front of the shoe cubbies.  You could easily create a router sled with a 1/4 bit to cut the half laps, index over and cut the next one for consistency of fit.

Since you will have full support horizontally across the front at each cubby, if you find you want support on the rear horizontally, just cut masonite rectangles to fit into the cubbies and slide to the rear to support the rear portion of the shelves from deflecting, but I think they will be OK with just shoes on them.

As for Sketchup, I use the free version.  Works great.  The paid version gives you more print and layout flexibility for printed drawings, but in terms of the core program, the free works great for me for all woodworking drawings I need.

Attached is a drawing to explain my thinking.  I also uploaded the full model to Sketchup 3D Warehouse.  You can download it within Sketchup.  Just search for Shoe Caddy in the warehouse!

[attachimg#]

Hope this all makes sense.  Good luck and share pics as you progress!

neil
 

Attachments

  • Shoe Caddy.jpg
    Shoe Caddy.jpg
    287.4 KB · Views: 1,686
Nice job neilc.  That is a very well thought out plan and an excellent sketch up! 
 
Neil - this is awesome! Thank you very much. Your drawing is almost exactly what I was envisioning.

I downloaded the drawing and was playing around with it. Clearly I need more Skechup practice, but is there an easy way for me to: (a) edit your dimensions and, (b) how do you display the measurements on the screen to create a cut list? I'll go watch a couple more YouTube videos :)

I'll send pics when done! It might be awhile.
 
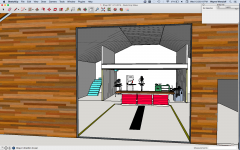
Within sketchup, you can resize a drawing with the scale tool - Unfortunately, It will also change dimensions of the wood as well.

That model has six components, so if you change one, you will change all others that are linked to it.  BTW, You can see all components in the window / components menu of Sketchup.  So a place to start is just grab a component out of there and drag to the drawing space.  If you then edit that component in an open space, all other components that are copies are also edited.  So you can quickly explore edits with more room to maneuver.  Any elements of the model can be hidden with right click - hide so you can get a more detailed view with no obstruction.
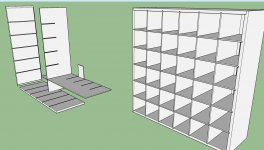
Components include:
Top and Bottom (one is a mirror of the other)  You draw one, copy it, then flip vertically on an axis to reverse the orientation.
Left and Right (Make a copy of the top, rotate 90 degrees, make unique, then duplicate and make one a mirror of the other again)
Back (simple rectangle pulled out to 1/4 inch thick once the four outside pieces are in place)
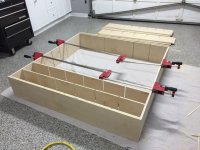
Horizontal separator (I drew this first then duplicated it six times with a spacing of 6 inches.)
  (to do this you draw, and make a component, select the component, then option drag to copy in the direction you want to duplicate and type in 6 (the spacing) press enter, then *5 (the copies plus the one to make six) and press enter.
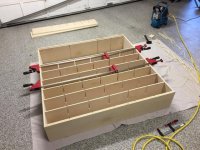
Vertical separator (I grouped the horizontal spacers and rotated them 90 degrees and made them unique so they are a new component and no longer tied to horizontal spacer)
Insert block for back shelf support (a duplicate of the back that was sized down to a pocket size rather than the full size with the push/pull tool on the edges)

To edit the dimensions...  You can start with the top and double click on it and then use the push/pull tool to lengthen, shorten or change the width or length.  You then use the move tool to move the other pieces into place.  Lower right of the window shows you how much you are changing dimensions.  You can start the shorten move on an open component and then plug in 5" and it will shorten 5" as an example. 

I'd suggest you play around with a copy and see what you can do.  It's pretty easy to learn.  That model took me about 20-30 mins to create.

There is a dimension tool in sketchup.  Click at a starting point and drag to the end point, click again, then pull the dimension up from the piece.  If you want to delete a dimension, use the arrow tool to select and then delete it.  You can also use the tape measure tool to measure a distance if you don't want a dimension shown.  But on that simple of a model, the tape measure tool might be all you need to get general dimensions.

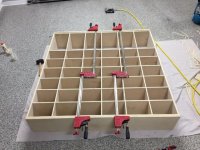
The hard part if creating the interior dividers and cutouts.  You do that by drawing them in place with the grid as individual components and then using a right click or control click and 'intersect with model' to mark one intersection with another piece, then edit that intersection to be half cut, rather than a full line.

Hope this helps - Sketchup has a learning curve but has a lot of power.  www.skectchupforwoodworkers.com is one place to start.  You can also watch Sketchup's youtube channel, or pick up a Sketchup for dummies book at your local bookstore or amazon.

Good luck!
 
www.skectchupforwoodworkers.com is a GREAT resource. I know a little bit about CAD, but tried multiple times and just couldn't get the hang of Sketch-Up. I couldn't even draw a box.

I watched the first three videos in the 'sketchup for woodworkers' series and 12 hours later had drawn this:

[attachimg=1]

The HUMMER was a 3D model I imported to show scale. I didn't do anything except resize it to fit my drawing.
 

Attachments

  • Screen Shot 2015-01-11 at 5.26.37 AM.png
    Screen Shot 2015-01-11 at 5.26.37 AM.png
    320.2 KB · Views: 1,322
If you are comfortable making your squares 7 1/2 inches, or 192mm, you could use the holes in the MFT with a dog for indexing your slots in the Sketchup drawing Neil made above, just use every other hole in the table. It seems to me 7.5591 inches on center for your cubbies would be a pretty good size for shoes. Once you figured your start and stop lengths on each end it would be pretty easy and would eliminate measuring errors. Think shel-pin holes.

This assumes you have an MFT or gives you a great excuse to get one.
 
greg mann said:
If you are comfortable making your squares 7 1/2 inches, or 192mm, you could use the holes in the MFT with a dog for indexing your slots in the Sketchup drawing Neil made above, just use every other hole in the table. It seems to me 7.5591 inches on center for your cubbies would be a pretty good size for shoes. Once you figured your start and stop lengths on each end it would be pretty easy and would eliminate measuring errors. Think shel-pin holes.

This assumes you have an MFT or gives you a great excuse to get one.

That's a great idea, Greg, and a simple way to keep things aligned!

 
Sal LiVecchi said:
Wayne was the Hummer added for the effect or are you a H-1 owner. I miss my 1 and 2.

Found it in the 3D warehouse and added it to show scale.
 
OMG - Skechupforwoodworkers.com is exactly what I needed! My eyes are bloodshot and my fingers are twitching after watching the first 4 videos repeatedly

Thank you. Super super helpful. I feel like I'm on the fast-track now!
 
Glad I found this. I needed motivation to learn Sketchup.

Just a thought on Reply #6. Any concerns over strength ought to be fulfilled by using an MDF backer sheet.  You did want an excuse to buy a brad gun --- or use the one you have!
 
Toolinator said:
OMG - Skechupforwoodworkers.com is exactly what I needed! My eyes are bloodshot and my fingers are twitching after watching the first 4 videos repeatedly

Thank you. Super super helpful. I feel like I'm on the fast-track now!

It's amazing how much it helps, isn't it? I had tried SketchUp multiple times - over at least a 2 year timeframe - and I just couldn't make it do ANYTHING I wanted. I *did* try several of the skechupforwoodworkers tutorials, but in the end I might as well have thrown 40-50 hours of my time in the trash.

I have been using it a LOT since doing the tutorial about a week ago, learning to do things the SketchUp way. I also have been correcting mistakes in my first drawing. Here's a couple of view of how it looks now:

[attachimg=1]

[attachimg=2]
 

Attachments

  • Screen Shot 2015-01-21 at 12.55.14 PM.png
    Screen Shot 2015-01-21 at 12.55.14 PM.png
    1.1 MB · Views: 1,054
  • Screen Shot 2015-01-21 at 12.50.18 PM.png
    Screen Shot 2015-01-21 at 12.50.18 PM.png
    1.1 MB · Views: 1,045
...And I finally got around to building it. Thank you everyone for your suggestions and help.

It took longer than I thought, particularly because I cut out all the components w/ the track saw and not a table saw and I had to make an exact width dado jig for the slats in the shelves and walls. This sucker is way over engineered, it feels more solid than my house.

Top and bottom have 2 pieces of 3/4 plywood laminated together, sides are 3/4 ply and the back and shelves are 1/2 plywood. The sides are connected with pocket holes, the rest is glue in dados. I have to say the domino would have been easier/quicker for all the cross-pieces if I had a table saw. I pounded on the shelves with a 22oz rubber mallet with all my strength to get them to slide into place. The exact width dado jib was overkill and made everything way too tight on assembly.

Not quite done, but the fun part is over. Now paint and mounting to wall.


Attachments

  • IMG_9037.JPG
    IMG_9037.JPG
    49 KB · Views: 507
  • IMG_9038.JPG
    IMG_9038.JPG
    58.1 KB · Views: 492
  • IMG_9040.JPG
    IMG_9040.JPG
    55.6 KB · Views: 488
  • IMG_9041.JPG
    IMG_9041.JPG
    56.1 KB · Views: 532
Great job! Looks like she's gonna be a well appreciated project. I like the idea of using the parallel clamps like you did to extend there reach.
 
Back
Top