I built some cabinets that would not fit down the stairway

Frank Pellow

Member
Joined
Jan 16, 2007
Messages
2,743
:-[  :-[  :-[

(part 1 of 5)

The cabinets were a Christmas gift for my daughter Kathleen and family, so this was quite an embarrassment.

As usual, I will extract the material for this thread from my weekly journal.

2009, Nov 22:

This week I started a couple of Christmas projects. One of them is some cabinets for the Harris family to be used in the play room in their basement. The trickiest part are the units that have to fit into the corner. I bought a neat set of revolving shelves from Lee Valley that will do the job quite nicely. Here, I am trying everything for size using cardboard cutouts:
[attachthumb=#1]

The photo was taken on the floor at my woodworking shed, but I also tried them in Kathleen?s basement when no one was around to observe me.

Here are the cutting diagrams for the corner cabinets:
[attachthumb=#2]

I am making two of them, each with two rotating shelves.

Here are the main construction steps:

(1) Most of the panels were cut to size in the garage:
[attachthumb=#3]

The notches were then cut out of the top and bottom corner cabinet panels with a jig saw.

(2) Rabbets were routed on several edges.  
[attachthumb=#4]

All the joints in the corner cabinets were glued and screwed rabbeted butt joints. I did not attempt to hide the screws.

(3) All the panels were sanded with 80 through 220 grit paper:
[attachthumb=#5]

(4) Before assembling the cabinets, two coats of wipe-on polyurethane were applied to the insides:
[attachthumb=#6]

(5) I glued up each cabinet in several steps. Here is the first:
[attachthumb=#7]

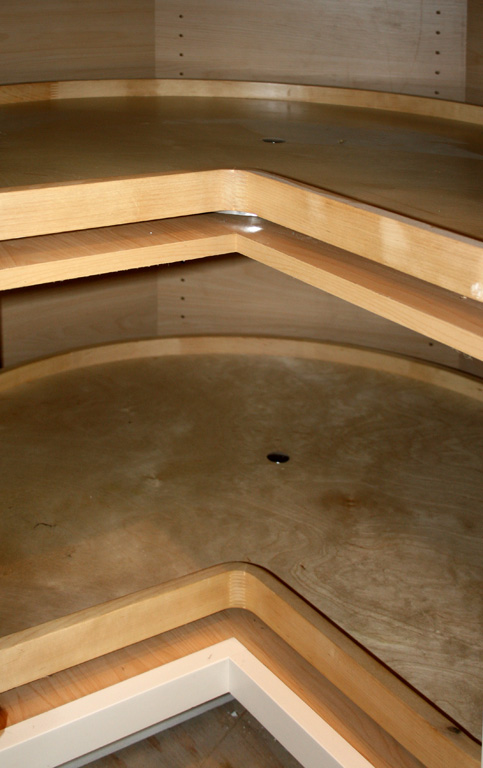
(6) Here is a finished corner cabinet:
[attachthumb=#8]

I decided (at least for now) not to put doors on the cabinets because I think that the children might find that they just get in the way. I can always add doors later.

(7) I am proud of the way I was able to best utilize the wood.  Here is all the scrap that is left over from 3 5 foot by 5 foot panels of 15mm thick baltic birch plywood building two corner cabinets:
[attachthumb=#9]

(8) I thought that I would need to open the double doors in order to get the corner cabinets out but, being just under 30 inches in width (76 cm), a cabinet clears the single door by about 3mm.
[attachthumb=#10]

I'm storing the corner cabinets in the garage for the time being. The only way that I can get them to Kathleen's place is in my trailer and I certainly don't want to drive to her place towing a trailer on Christmas day. I think that what I will do is take them down there some day when no one is home and store them under a tarp on her deck with a note saying "don't uncover until Christmas"

 
(part 2 of 5)

2009, Dec 13:

On Saturday late afternoon and early evening we spent time at Kathleen's house helping them decorate their tree. I took along the corner cabinets:
[attachthumb=#1]

and stored them under a tarp on their deck.

Dec 20, 2009:

I built another cabinet for the Harris basement this week. This one is going to have 10 drawers as well as one open shelf. The drawers are being made using the Veritas Mini Sides/Slides from Lee Valley. One buys these as 3 foot long sections of aluminium formed as shown below:
[attachthumb=#2]

The drawer bottoms slide into grove on the felt bottom of the picture and the protrusion on the right bottom slides along a groove that one cuts into the case using a ?regular? table saw blade. I made these before and described the process in my notes of March 12, 2006 so I won?t talk much about drawer building here.

When building similar cabinets in the past, I have cut the groves for the drawers to slide in using my Festool MFT and guided circular saw. This time, I decided to use an Incra sled with my table saw:
[attachthumb=#3]

I would say that the time, effort, and results are about the same using the two methods.

I did still use a guided router to cut shelf dados:
[attachthumb=#4]

The picture below shows part of the glue-up:
[attachthumb=#5]

To make for easier access, I painted the inside of the cabinet before attaching the top and the bottom:
[attachthumb=#6]  [attachthumb=#7]

The aluminium sides were cut in half:
[attachthumb=#8]

thus the drawers will be 18 inches deep.

Jan 3, 2010:

On Tuesday, I went down to Kathleen?s place intending to take the corner cabinets from her deck down to the basement and to start the installation task. Much to my surprise and embarrassment, the shelves would not fit down the stairs. I had checked the various doorways at her house before making the cabinets, but I never thought to check the stairs. The picture below taken with a piece of cardboard with the same footprint of one of the cabinets illustrates the problem.

[attachimg=#9]

:-[  :-[  :-[  

I went home, got my trailer, returned to Kathleen?s, then brought the cabinets back to our house and took them down to our basement (they fit). I will somehow make use of them and build something else for Kathleen?s place.

 
(part 3 of 5)

aside: Before I came up with the method that I used for "knock down" connections of adjacenet panels at 180 degrees, I spent quite a bit of time in an attempt to find commercialy available connectors and came up with nothing.  If anyone can tell me of something that I could have used to do the job, please let me know.

Jan 10, 2010:

On Friday, I got some hardware that I had been waiting for from Lee Valley.  My hope was that I would be able to utilize the hardware to connect Kathleen's corner cabinet pieces after I had sawn them apart.  Yes, my thinking had evolved to utilizing the cabinets that I had already made rather than make new ones.  The hardware consisted of some treaded nuts can be inserted into the cabinet sides without going all the way through and some bolts with a big head that can be threaded into these nuts.  I conducted a small experiment:
[attachthumb=#1]
   
and was happy with the results.  The small piece of joining plywood does protrude quite a bit, but I will be placing these parallel joiner thingys on the inside of the cabinets and, because of the nature of these cabinets, they will not get in the way.  I will refer to the wooden part of a parallel joiner thingy as a wooden spanner.

Somewhat nervously, I cut into one of the cabinets, and, soon, the cabinet was in two pieces:
[attachthumb=#2]  [attachthumb=#3]
     
I used spare wooden spanner and some centre punches to mark the positions where holes were to be drilled.
[attachthumb=#4]
   
The collar on the shaft of the drill bit coupled with the wooden block with the hole in the middle assured that the holes were not too deep.

Flanged nuts were screwed into the holes, a wooden spanner was placed in position, and the bolts were screwed into the holes:
[attachthumb=#5]  [attachthumb=#6]
     
Two parallel joiner thingys were used on each of the top and bottom sides and one on the back side.
[attachthumb=#7]
   
Exactly when I thought things were going well and that I could coast to completion, I goofed!
[attachthumb=#8]
   
The cut shown above is obviously not straight.  That's because, at one end, I measured it 522 millimetres from the edge rather than 502 millimetres.  I made the correct cut, taped the kerf open at

1/8 inch and filled the gap with Bondo.  Once sanded, this did not look too bad:
[attachthumb=#9]  [attachthumb=#10]
   
I'm lucky that the bad cut was on the back panel of the cabinet.

 
(part 4 of 5)

Jan 17, 2010:

On Monday, I took the cabinets to Kathleen's place.  Of course, this time they fit down the stairs.  I also made a frame to be used to level the cabinets and took it with me.  

But, I did not immediately install the cabinets because they had taken somewhat of a beating with all the trips that they took in my trailer.  So, I sanded the outsides of the cabinets lightly and put another coat of wipe on poly on them and left them to dry overnight.
[attachthumb=#1]    [attachthumb=#2]
 
This meant that, for a while, the mess in the Harris basement was even worse.

I didn't get back to the job until Wednesday.  I first put down the bases that I had made and leveled them using cedar shims.  The floor is very very uneven but, after some trial and error, the bases were leveled.  I did not permanently attach anything.
[attachthumb=#3]

Here the cabinets are in place and I have started to install the lazy susans:
[attachthumb=#4]
   
And, this picture shows that everything that I have built so far has been installed:
[attachthumb=#5]
   
I will build the drawers within the next week or so and put them into the cabinet with the black interior.  By the time of Kathleen's birthday in May, or perhaps earlier, I will build two more cabinets to sit on the unused portion of the base.

Jan 24, 2010:

Two of the drawers have now been completed and I will install them tomorrow when we go early to the party to celebrate Isla's 10th birthday.  I asked Isla what colour she wanted the drawers to be thinking that she would pick something like green.  But she replied that she wanted lots of colours like a rainbow.  I went her one better and purchased 10 different colours of spray paint to use on the 10 different false fronts.  In the picture below, the fronts and handles have just been sprayed with the first coat of paint:
[attachthumb=#6]
     
I applied two coats with a light sanding between:
[attachthumb=#7]
   
The two completed drawers are shown below:
[attachthumb=#8]
   
 
(part 5 of 5)

2010, Jan 31:

I started to make the two remaining cabinets for Kathleen's basement.  I will give them to her as an early birthday present.

One thing that I tried that I will not try again was to route dados using my Veritas straight edge rather than with a Festool guide rail.
[attachthumb=#1]
   
The bit was already set in the router to the correct depth, so it was faster to cut the dados this way.  But, I found that I had problems holding the router absolutely tight to the rail, so there was a bit of wobble that I had to clean up afterwards with hand tools.

Most of the parts have now been cut but nothing has been assembled.
[attachthumb=#2]
   
Notice the four filled holes in the part on the bottom right of the photo.  They cover up pocket hole screws used to join two sections of the part.  I goofed and cut the part too narrow.  Since, I am almost out of plywood of that thickness, I glued and screwed on a piece of scrap.  This part will be on the bottom of the cabinet and will not be seen.

2010, Feb 7:

The cabinets and drawers for Kathleen's early birthday present have been built.  All that remains is to apply a finish and to install the drawers.  I checked and a cabinet will fit into our new Subaru Forrester with the seats down.  I plan to take one of them down to Kathleen?s place on Wednesday next week and surprise her.  Having the Subaru for this type of task is going to be a big help.  I expect that the trailer will get less than half as much use as it used to get.  

I used a shop-built jig to drill holes for shelf supports.  The type of supports that I am using the same type of supports (Lee Valley brass sleeves (63Z06.06) and paddle supports (63Z06.04)) that I have been very happy with in the past.
[attachthumb=#3]  

Unfortunately, I got a little sloppy and did not notice that the stop collar on the drill had slipped up the drill bit until after I had drilled tree holes right through the plywood.  Here the holes are being patched with wood filler:
[attachthumb=#4]

Another thing that I did not notice until after partial glue-up was that the sheets of Baltic Birch that I used to for the cabinet sides were slightly longer than 5 feet.  The sheet that I used for the backs was exactly 5 feet long.  Thus, I had to trim a bit off the sides with this tricky operation:
[attachthumb=#5]
   
I have two 5 foot + long Gros Stabil clamps that I don?t use often but when I do make use of them I am very happy that they are in my repertoire:
[attachthumb=#6]

2010, Feb 14::

I installed one of the cabinets additional at Kathleen's place.  They are an early birthday present and are much appreciated I am sure.  It was great to be able to take the cabinet down in the back of the Subaru, where it, just fit.
[attachthumb=#9]

I expect that the use of my trailer and/or roof rack will be very much reduced in the future.  Probably 75% of the stuff that I had to use that trailer for will now fit into the vehicle.  I did use the roof rack on the Subaru to transport my dolly on the way down to Kathleen's.  It fit in the back coming home.

Here is a photo of the cabinet in place:
[attachthumb=#7]    

2010, Feb 21:

The remaining cabinet was installed at Kathleen's place this week:
[attachimg=#8]
   
There is certainly lots of colour there.   [big grin]

Before putting the cabinet in place, I had to move a couple of electrical boxes and moved some wires.  There were a couple of glitches so that job took about three hours instead of the 45 minutes that I had expected it to take.

Now, I need to start thinking about installing a drop ceiling, improving the lighting, and putting something on the walls (probably plywood covered with cork wall tiles).

 
Looks like you found out the hard way that corner cabinets don't fit through doorways  [wink]

Had this experience before too... since then I only use screws to hold my cabinets together. Just in case... [eek]
 
EcoFurniture said:
Looks like you found out the hard way that corner cabinets don't fit through doorways  [wink]

Had this experience before too... since then I only use screws to hold my cabinets together. Just in case... [eek]
The doorways were not the problem.  I had the foresite to measure those.  It was the weird combination of wall projections on the basement stairs that caused me problems.
 
Frank,

It looks like the counter will go on after, and since this is a corner piece and the sides will not be seen.........

So, slice, dice & reassemble.......

Scribe a line effectively cutting it in half from the mid side section to side section,
cut it with your ts55, bring it thru the stairs,
domino the cut sides & reassemble???
[eek]
.
 
Usually corner cabinets are built with a truncated corner.

corner-base-easy-reach_36.png


Like so.

Kitchen-Cabinets-Accessories-5L-base-corner-cabinet-lazy-susan-shelves.jpg


From the inside it looks like this.

Since you wisely made your cabinet flat on both top and bottom you can could
easily cut off the useless (wasted space) bulky corner with you guided circular saw.

Figure out where you want to cut and set the saw to make a 45* bevel to cut the backsides.
Then reset to 90* to cut the top and bottom. With the aid of the guide rail you should have
been able to get all the freshly cut edges pretty flush so all you had to do was cut a panel to
fasten to the back. I hope you chose to atach the panel after the cabinet was moved downstairs.
That opening would make a great carry handhold for carrying downstairs.
 
Michael Kellough said:
Usually corner cabinets are built with a truncated corner.....

And Frank now knows why. ;D I won't offer any advice since it sounds like Frank already found a way to fix his mistake improve upon his earlier design.

As always Frank thanks for sharing, your projects are always a lot of fun.   
 
Thanks Roger, Michael and Brice.

Brice, you are correct that I have already come up with a solution.  You say that my projects are always a lot of fun.  But, I think the things that folks find the most fun with in my projects are my screw-ups.  Of course, that's what I find to be the least fun.

Roger, I did cut the cabinets in much the way you suggest.  But, I don't have a Domino, so that's not the way that I stuck them together again.  Also, they will probably need to be moved back out of the basement sometime within the next 10 years, so the method that used to put them together needs to be "knock-down".  

Michael, your advice about the truncated corner is good and I will do that in the future.  But I doubt that, even with a truncated back corner, these particular cabinets would have fit down this particular stairway.
 
Frank,

What I really like about your projects are that they are real.  You are a very family focused man and you use your skills to better the lives of those around you.  You inspire us here with your skills and in my opinion, your thoughtfulness.

You post your projects - the reasons behind, the build, the completed.  You show and tell about difficulties and oops - s.  Others might cut out the oops.  You are comfortable in your woodworking skin. If you were a teacher - you would expect much from your students - but you would be adored.

We learn from your postings.

Peter
 
Frank,

In the spirit of knock-down,
what about using Kreg pocket screws for the whole shebang?
You could then make the whole thing in your shop,
Knock it down,
Carry it under your arm - up the stairs,
Then knock Kreg it up.

And if you don't have a simple Kreg system, ,,,,,,,,,,,,,,,, it's time to get one. [wink]

(and because of the angle of the cabinet, you'd never see the pockets.)

.
 
Roger, I never thought of pocket hole screws as knock down.  Probably that is because I always use glue as well as screws. 

I guess you are correct that they could be knock-down and knock-up for woodworkers but I doubt that most lay people wold see pocket hole joints that way.  So, what I used to connect the parts of the cabinet is something that anyone could mange.

And, yes, I do have and use a good Kreg pocket hole jig.
 
Frank Pellow said:
Roger, I never thought of pocket hole screws as knock down.  Probably that is because I always use glue as well as screws. 

I guess you are correct that they could be knock-down and knock-up for woodworkers but I doubt that most lay people wold see pocket hole joints that way.  So, what I used to connect the parts of the cabinet is something that anyone could mange.

And, yes, I do have and use a good Kreg pocket hole jig.

Then use the kreg plugs after you assemble it.
And about the needing to knock down part after 10 yeeeeeeeeeears,
could this be a little over-design?
I mean after that amount so of use, together with......
what's the chance of them having a kitchen with the same configuration?
At that time a saws-all would probably be the knock-down tool of choice.
[eek]

.
 
I still don`t think it could easily be taken apart and put together by a novice.

And, as you will se when I complete the thread, these are not for a kitchen but for a children`s play room.
 
I'm  a cabinet builder and always use pocket screws alone...and they've rescued me more times than I care to admit to...having a domino is changing my building procedures but this lurking issue is always there. A buddy and I once had to install a full sized lazy susan (called a supersusan) and the only way it fit into the tiny 60's kitchen was by taking out a picture windw and reinstalling it!
 
I have added a description of my solution to the problem.  See (part 3 of 5) near the begining of this thread.

Note that I have also requested information from anyone who can tell me of hardware that could have done the job better.
 
Frank Pellow said:
I have added a description of my solution to the problem.  See (part 3 of 5) near the begining of this thread.

Note that I have also requested information from anyone who can tell me of hardware that could have done the job better.

hmmm...........................Zip Bolts.

Zip Bolt Counter Top Joint Fastener
 
Back
Top