Hello Foggers
First post, been lurking for a very long time, and have seen so many great ideas and taken away so much advice and information from all the people sharing on this board.
I mostly due cabinetry work and have came up with a portable workbench, after reading about so many people's great ideas and creative solutions. I borrowed and stole many great aspects of lots of different designs I have seen over the last few years. I've purchased more then a few plans along the way, to either study the design and ideas closer, while giving credit to those that made the effort to share, and to build in the future as they all seem to have their best fit or application and are wonderful in their own ways.
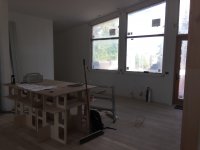
I first caught the bug for the concept of the MFT worktop several years ago and has proved invaluable for me in my line of work. It seemed to solve so many problems I had with certain situations, and gave me an open canvas to explore changing my work flow and how I process my work.
I have spent a few bucks along the way getting a few tools that work best with the work top, like a track saw, but the MFT table was a little to bulky and expensive for my workflow, and did not solve all of my site issues.
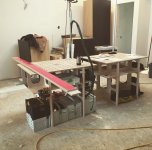
So I decided to use some of the ideas I have seen before from other contributors and come up with my own solution. I created it first in sketch up, and made a cut list and models. Once I was sure the scale and usability was there, I made it for real, actually 2, because it's always better to have 2! Lol. Actually, it works best with the cut list and is most efficient using material.
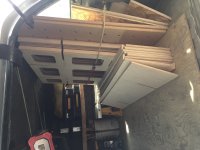
My goal was to be able to get it into the back of my PU with a cab height topper. I wanted it to be able to be brought into the job in 2 trips or less. I wanted it together in 1 minute or less, same with taking it apart. I wanted the parts to be universal so they can be mixed and matched without thinking about it. I wanted it to be scaleable so i could use it bare bones for quick work, or fit it out if it's going to be there a while. I wanted it to store tools, boxes, vacumes, whatever at different heights, especially just below the work surface. I wanted limitless clamping options.
I think I made my goal, and it has proved to be one of those tools to me that's like " how did I do it before?"
I also purchase the UKJ Parf guide system as it seemed like the best solution for long term as I can infinitely recreate the top whenever I want.
Hopefully I can get the photos and the video to upload and share with you all what I came up with and look forward to hearing your comments.
Of course anybody crafty can make this piece just by looking at the pictures and video, but if anyone wants to buy the plans and cut list in PDF, send me a message and let me know if you want a copy.
View attachment 1
First post, been lurking for a very long time, and have seen so many great ideas and taken away so much advice and information from all the people sharing on this board.
I mostly due cabinetry work and have came up with a portable workbench, after reading about so many people's great ideas and creative solutions. I borrowed and stole many great aspects of lots of different designs I have seen over the last few years. I've purchased more then a few plans along the way, to either study the design and ideas closer, while giving credit to those that made the effort to share, and to build in the future as they all seem to have their best fit or application and are wonderful in their own ways.
I first caught the bug for the concept of the MFT worktop several years ago and has proved invaluable for me in my line of work. It seemed to solve so many problems I had with certain situations, and gave me an open canvas to explore changing my work flow and how I process my work.
I have spent a few bucks along the way getting a few tools that work best with the work top, like a track saw, but the MFT table was a little to bulky and expensive for my workflow, and did not solve all of my site issues.
So I decided to use some of the ideas I have seen before from other contributors and come up with my own solution. I created it first in sketch up, and made a cut list and models. Once I was sure the scale and usability was there, I made it for real, actually 2, because it's always better to have 2! Lol. Actually, it works best with the cut list and is most efficient using material.
My goal was to be able to get it into the back of my PU with a cab height topper. I wanted it to be able to be brought into the job in 2 trips or less. I wanted it together in 1 minute or less, same with taking it apart. I wanted the parts to be universal so they can be mixed and matched without thinking about it. I wanted it to be scaleable so i could use it bare bones for quick work, or fit it out if it's going to be there a while. I wanted it to store tools, boxes, vacumes, whatever at different heights, especially just below the work surface. I wanted limitless clamping options.
I think I made my goal, and it has proved to be one of those tools to me that's like " how did I do it before?"
I also purchase the UKJ Parf guide system as it seemed like the best solution for long term as I can infinitely recreate the top whenever I want.
Hopefully I can get the photos and the video to upload and share with you all what I came up with and look forward to hearing your comments.
Of course anybody crafty can make this piece just by looking at the pictures and video, but if anyone wants to buy the plans and cut list in PDF, send me a message and let me know if you want a copy.
View attachment 1