ryanjg117
Member
- Joined
- May 18, 2015
- Messages
- 328
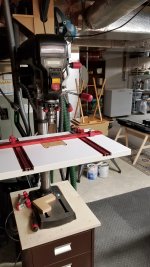
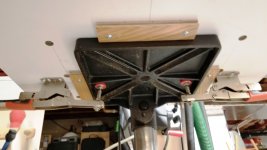
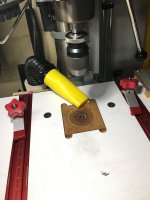
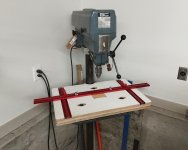
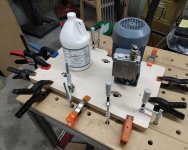
I acquired an old Boice-Crane drill press a few months back, which has served me well working with both metal and wood. However, rather than a typical table with t-slots, this drill press has a "production table" which is essentially a solid milled metal slab:
[attachimg=1]
I'm going to predominantly use this tool for woodworking, but I do like the flexibility to occasionally drill metal as well. I researched some of the commercially available drill press tables out there and settled on a fairly blatant ripoff of the Woodpeckers design. I already had a few MagSwitch MagJig 95 magnetic clamps lying around, so I decided that is how I would affix this auxiliary table to the original metal production table. The magnetic switches are nice, but they are designed to be mounted into 3/4" plywood. Plus, I wanted them recessed under the top of the new table, and out of the way so that I could utilize the full size of the table. Ultimately, this meant I needed a really thick base.
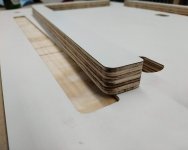
I ended up laminating three boards together - each cut on the Shaper Origin - and then glued them together. Here you can see a spiffy animation of the "sandwich" along with some of the hardware:
[attachimg=2]
Cut the bottom layer first. Upside down since I wanted to countersink the holes for the t-tracks:
[attachimg=3]
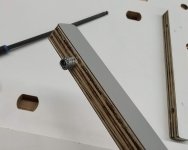
Here can see my "cleats," which fit a bit too tight and required some sanding even though I included a .01" offset when I cut it on the Shaper:
[attachimg=4]
With cleats dry fitted:
[attachimg=5]
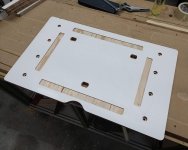
Second layer cut, this one was just 3/8" thick to provide the necessary cubbie depth for the MagSwitches:
[attachimg=6]
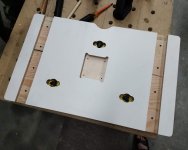
Top layer cut:
[attachimg=7]
Here you can see a close-up of the MagSwitch recess. Kudos to MagSwitch for providing their 3D STL files on their website.
[attachimg=8]
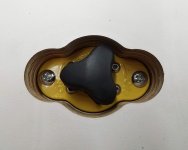
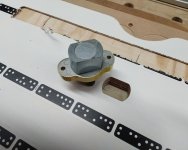
And here you can see the MagSwitches in their recesses. Ended up being a very tight fit.
[attachimg=9]
[attachimg=10]
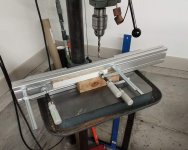
The easiest way to make a drill press table is with another drill press table. Here's the proof:
[attachimg=11]
Inserting the threaded fasteners. My plan here was to use machine screws to "kiss" the production table on all edges, so that it could be removed and re-installed in the extact same X and Y location relative to the drill press head. I ended up applying some Loctite to those screws once they were in the perfect position.
[attachimg=12]
Glue-up of the bottom two layers:
[attachimg=13]
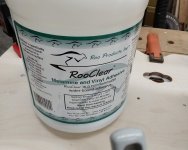
By the way, this RooClear stuff is incredible. Using it because my top and bottom layers are laminate-faced. Won this glue at an auction for a woodshop that closed down (along with a lifetime supply of Titebond). Glued together a couple test pieces before hand, and wow, I could not break them apart by hand even without any mechanical fastener.
[attachimg=14]
Glue-up of the final layer, completing the sandwhich:
[attachimg=15]
Here's where I got a bit lazy. I was about to purchase the Incra T-Track Plus and a bunch of sliding rule tape, but I discovered that Woodpeckers sells the drill press tracks standalone (without the table). Opted for that kit even though it has some deficiencies:
[attachimg=16]
The laser engraved t-tracks are nice, but I didn't even think about their location relative to my drill press head, which was a mistake. Of course my drill head doesn't register at the "0" position on these tracks. So, I'll likely have to get some Incra tape and CA glue it on top later. Not critical.
Anyway, there you go. Perhaps the most complicated woodworking drill press table conceived?
[attachimg=1]
I'm going to predominantly use this tool for woodworking, but I do like the flexibility to occasionally drill metal as well. I researched some of the commercially available drill press tables out there and settled on a fairly blatant ripoff of the Woodpeckers design. I already had a few MagSwitch MagJig 95 magnetic clamps lying around, so I decided that is how I would affix this auxiliary table to the original metal production table. The magnetic switches are nice, but they are designed to be mounted into 3/4" plywood. Plus, I wanted them recessed under the top of the new table, and out of the way so that I could utilize the full size of the table. Ultimately, this meant I needed a really thick base.
I ended up laminating three boards together - each cut on the Shaper Origin - and then glued them together. Here you can see a spiffy animation of the "sandwich" along with some of the hardware:
[attachimg=2]
Cut the bottom layer first. Upside down since I wanted to countersink the holes for the t-tracks:
[attachimg=3]
Here can see my "cleats," which fit a bit too tight and required some sanding even though I included a .01" offset when I cut it on the Shaper:
[attachimg=4]
With cleats dry fitted:
[attachimg=5]
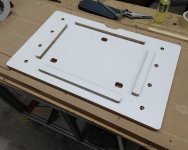
Second layer cut, this one was just 3/8" thick to provide the necessary cubbie depth for the MagSwitches:
[attachimg=6]
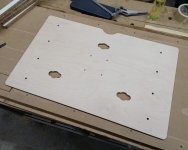
Top layer cut:
[attachimg=7]
Here you can see a close-up of the MagSwitch recess. Kudos to MagSwitch for providing their 3D STL files on their website.
[attachimg=8]
And here you can see the MagSwitches in their recesses. Ended up being a very tight fit.
[attachimg=9]
[attachimg=10]
The easiest way to make a drill press table is with another drill press table. Here's the proof:
[attachimg=11]
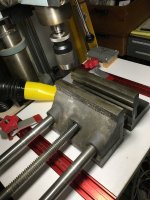
Inserting the threaded fasteners. My plan here was to use machine screws to "kiss" the production table on all edges, so that it could be removed and re-installed in the extact same X and Y location relative to the drill press head. I ended up applying some Loctite to those screws once they were in the perfect position.
[attachimg=12]
Glue-up of the bottom two layers:
[attachimg=13]
By the way, this RooClear stuff is incredible. Using it because my top and bottom layers are laminate-faced. Won this glue at an auction for a woodshop that closed down (along with a lifetime supply of Titebond). Glued together a couple test pieces before hand, and wow, I could not break them apart by hand even without any mechanical fastener.
[attachimg=14]
Glue-up of the final layer, completing the sandwhich:
[attachimg=15]
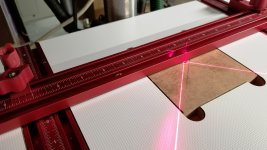
Here's where I got a bit lazy. I was about to purchase the Incra T-Track Plus and a bunch of sliding rule tape, but I discovered that Woodpeckers sells the drill press tracks standalone (without the table). Opted for that kit even though it has some deficiencies:
[attachimg=16]
The laser engraved t-tracks are nice, but I didn't even think about their location relative to my drill press head, which was a mistake. Of course my drill head doesn't register at the "0" position on these tracks. So, I'll likely have to get some Incra tape and CA glue it on top later. Not critical.
Anyway, there you go. Perhaps the most complicated woodworking drill press table conceived?
Attachments
-
 01.jpg221.7 KB · Views: 2,922
 -
 14.jpg252.3 KB · Views: 3,048
 -
 13.jpg266.6 KB · Views: 2,649
 -
 12.jpg231.9 KB · Views: 2,649
 -
 11.jpg272.8 KB · Views: 2,659
 -
 10.jpg141.2 KB · Views: 2,660
 -
 09.jpg286 KB · Views: 3,339
 -
 08.jpg169.6 KB · Views: 2,670
 -
 07.jpg151.3 KB · Views: 2,698
 -
 06.jpg209.8 KB · Views: 2,678
 -
 Drill-Press-Magnetic-Table-Animation.gif4.5 MB · Views: 3,040
 -
 01.jpg191.4 KB · Views: 2,726
 -
 02.jpg127.2 KB · Views: 2,692
 -
 03.jpg202.8 KB · Views: 2,710
 -
 04.jpg195.9 KB · Views: 2,682
 -
 05.jpg196.8 KB · Views: 2,696
 )
)