I need help with 1/2 blind dovetails in 12mm Baltic birch plywood

android

Member
Joined
Dec 16, 2017
Messages
35
The lumber dealer where I live stocks 12mm and 18mm but not the 15mm Baltic birch plywood.

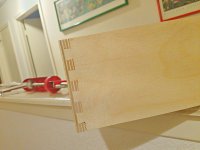
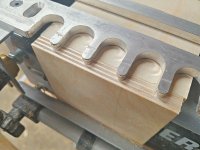
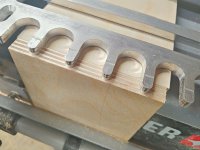
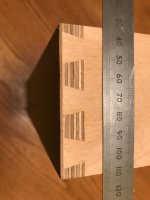
I have been experimenting with making drawer boxes out of the 12mm and putting them together with 1/2 blind dovetails using my Porter Cable dovetail jig. I'm using the 1" pitch sized 1/2 blind jig with the 17/32" 7 degree router bit.

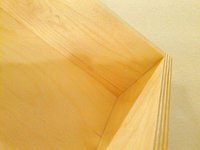
I've produced a pretty nice looking joint on the outside, BUT there is a small bit of the slot that shows on the inside of the joint. I think that is because 12mm is a bit less than the 1/2" that is expected.

Has anyone been successful using 1/2 blind dovetails on 12mm and if so, how did you get it set up?

Thanks for any help or suggestions.

 
OK, I actually did some measurements and some maths and some drawings and figured this out so I will share if anybody else ever wants to do it.

It IS possible to do this on the Porter Cable jig, but you cannot cut the tails and the sockets in a single pass as normal because the jig fingers have has to be move a bit between the sockets and the tails. Since you have to do this for most other types of dovetails, I don't think it's a huge inconvenience.

The correct tail length according to the 1/3 rule is 8mm. So, I measured the jig plate thickness as 6.6mm and added 8 to come up with a bit depth of 14.6mm. The bit stays at this depth for both cuts.

You set up like normal, but you move the fingers about 1mm forward so that the socket is not cut to a full 1/2" depth. Use the tail board to set up the cut, but remove it before routing. The sockets cut cleaning without tearing..

After you've cut all of the socket sides, you move the jig backwards just enough that the tail is fully cut in and rounded at the bottom of the slope. You need a sacrificial board on the top to prevent to tails from tearing out.

A tiny bit of adjusting on test boards may be needed, but it comes out nicely on the outside and inside corners. I'll get some pictures and put them up in the next day or so.

 
charley1968 said:
Thanx for the write-up,mate!

You're welcome. I'm posting this here for safe keeping so when I lose my notes and have to figure it out again, I can look here!

Alright, here's the completed result and a few pictures to explain what's going on.

Half blind inside and outside corners. There's a tiny bit of tear out on my test box, but I'm getting an Amana router bit which is supposed to cut this plywood much more cleanly. But most important, no slot divots showing on the inside corners.
View attachment 1
View attachment 2

This recipe only works for 12mm Baltic plywood, but you can probably adjust it as needed for other thicknesses.

I used my small combination square to check the finger setback and make sure it was even.

View attachment 3

This is the larger setback for for cutting the tails. I put the head of the combination square right between the 3-1/2mm and 4mm mark.  You need to use a sacrificial board on the top or it will tear, but you can use the same one for all of them and line it up straight behind since it won't be the real mating side anyway.
View attachment 4

This is the smaller setback for cutting the slots. I set 1mm on my combination square for this one. Even though I was able to cut this without a sacrificial board, it helps to hold it all square, so I ended up using a common trash board for all of the slots.
View attachment 5
 

Attachments

  • 20180107_153321_HDR.jpg
    20180107_153321_HDR.jpg
    87.4 KB · Views: 1,291
  • 20180107_153330_HDR.jpg
    20180107_153330_HDR.jpg
    107 KB · Views: 478
  • 20180107_154334_HDR.jpg
    20180107_154334_HDR.jpg
    128.1 KB · Views: 437
  • 20180107_154342_HDR.jpg
    20180107_154342_HDR.jpg
    117.2 KB · Views: 518
  • 20180107_154504_HDR.jpg
    20180107_154504_HDR.jpg
    114.5 KB · Views: 402
I’ve been having the exact same issue. Something that I was thinking of trying is to set the stop further back creating a deeper slot and at the same time will round the pins so they fit perfectly. Once it’s completed just trim off the part that extends past the sides? Any thoughts on this?

Also, another question. My lumber supplier sells 12 I’m wide by 5 ft prices of prefinished 12mm B.B. plywood. It also has an edge that is slightly rounded and predinished which would become the top of the drawer. I’m trying to figure out how to lay my peices out so the prefinished side is always at the top.

Could someone do a diagram for me of the 4 drawer peices and the orientation on the pc jig. It would be very helpful. Thanks
 
I think the key is to get a cutter with a 104° angle.  I used a Wealden T1020B cutter, which is almost exactly 14.9mm across the base.

This is in 12mm ply, and it works well.

Andrew
 

Attachments

  • IMG_0561.jpg
    IMG_0561.jpg
    97.9 KB · Views: 1,463
Did you use this with the porter cable jig and it was deep enough to round the backs of the pins ?
 
Back
Top