Installing LED strips and other LED issues

So, last evening was beautiful and as I was sitting outside just enjoying the lighting, I started to think about a tutorial on LED lighting issues, specifically when it comes to garden lighting.

I initially installed a commercially sold solar lighting system in the garden 15-16 years ago.  It was comprised of 30 stainless bollards, each with a small solar panel for a cover, 2 rechargeable batteries inside and using 2 each 5 mm LED's. It was neat at the time because it was a self sustaining system, however one soon realized that this was a system from hell if you were serious about maintaining a back yard that was illuminated for longer than 2 hours per day.  [eek]

The solar approach at the time was a great idea, but because of the then available rechargeable batteries, the low efficiency of the available solar panels, the low efficiency of the LED's and the Minnesota winter temperature extremes, the concept just wasn't feasible.

This led me to convert the luminaries from solar to 12V DC. The 12 VDC system has worked extremely well over the last 13 years and it's still working tonight.  [smile]  I have it connected to a photoelectric cell so it turns on at dusk and turns off at dawn.
The system in the back yard consists of:
30 ground lights
20 downward projecting fence lights
4 spotlights
2 stainless in-stair lights
And 2 lit butterfly baths

This runs dusk to dawn, 24/7 and costs around $1 per month.

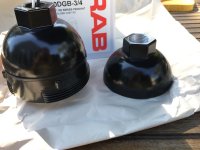
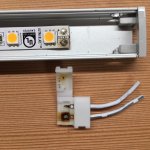
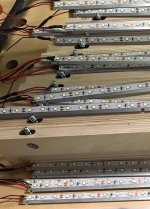
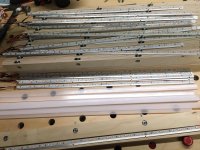
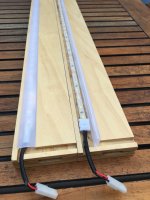
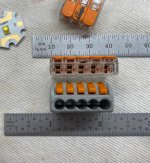
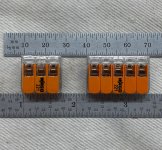
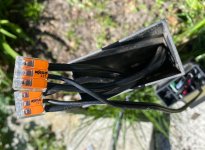
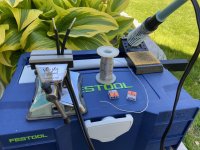
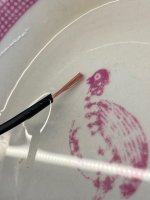
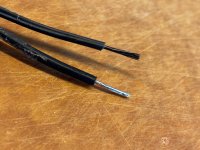
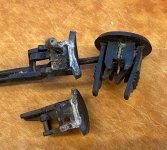
The first aspect of this conversation was converting the stainless solar bollards to 12 VDC LEDs and the second aspect, 2 years ago was converting RAB 120 volt dome-down fixtures to 12 VDC dome-up fixtures. Out with the old...in with the new. The RAB vapor proof luminaires are sweet and I use them as they were designed dome-down on the house for general outside lighting. However, adapting them for dome-up fixtures in the garden was an interesting challenge because of the rain and the snow.

If there's some Iinterest in the RAB conversion process let me know.

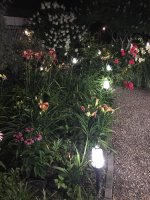
Here are some interesting snippets from the garden last night.

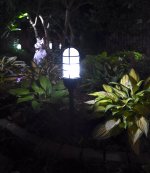
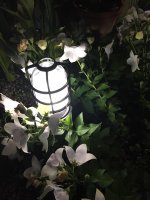
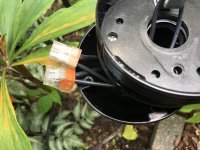
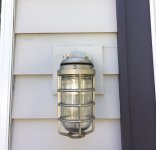
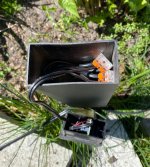
The RAB vapor proof light converted to 12 VDC LED's in a dome-up configuration.

[attachimg=1]

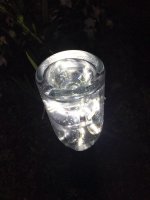
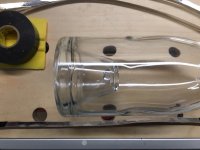
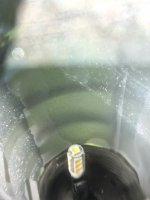
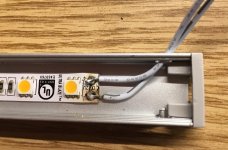
One of the butterfly baths. An inverted wine bottle with a very deep punt and filled with LED tape.

[attachimg=2]

[attachimg=3]

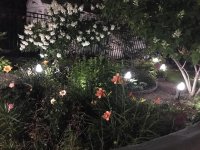
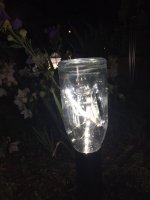
General ground lighting

[attachimg=4]

[attachimg=5]

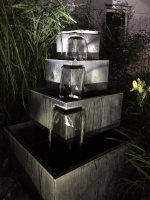
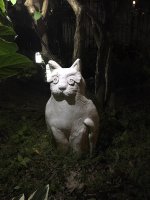
Spotlights on the cat & on the fountain

[attachimg=6]

[attachimg=7]

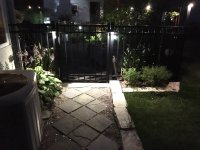
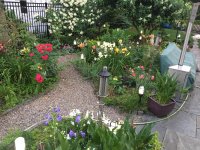
The gate entrance with downward projecting LEDs lighting the pathway while the fence also has downward projecting LEDs at a higher level to highlight some of the taller plantings. You can also see the fountain in the background on the LH side.

[attachimg=8]
 

Attachments

  • 7001.JPG
    7001.JPG
    261.7 KB · Views: 999
  • 7517.JPG
    7517.JPG
    1.1 MB · Views: 983
  • 7509.JPG
    7509.JPG
    1.1 MB · Views: 967
  • 7510.JPG
    7510.JPG
    1 MB · Views: 949
  • 7515.JPG
    7515.JPG
    552.8 KB · Views: 958
  • 7004.JPG
    7004.JPG
    317.7 KB · Views: 960
  • 7003.JPG
    7003.JPG
    335.3 KB · Views: 1,012
  • 7002.JPG
    7002.JPG
    273.6 KB · Views: 995
[member=44099]Cheese[/member] I cannot let the boss see any of these photos or I'll spend the rest of my free time natural lifespan installing lighting. She's a stage lighting pro from her prior life, while for me lighting is either "enough" or "too dim".

Anyway, beautiful spaces, I can understand your enjoyment. Thanks for sharing.

RMW

PS - love the "butterfly bath".

 
Your yard looks amazing.  Really cool to see the impact of light and shadows on a space!

Thanks for sharing!
 
The lighting is pretty dramatic at night however, what's missing are the colors so I snapped this photo just as the sensor kicked the lighting on. In photography parlance, it's known as the "Golden Hour". Here's a comparison of the same basic area just taken at different times.

[attachimg=1]

[attachimg=2]

And [member=8712]Richard/RMW[/member] here's the butterfly bath taken at the Golden Hour. I placed it in front of the purple Echinacea which Monarch butterflies love.

[attachimg=3]

What can't be seen are the Liatris cylindracea just behind the Echinacea. The Monarchs love the Liatris even more.  [big grin]

[attachimg=4]
 

Attachments

  • 0477.JPG
    0477.JPG
    641.2 KB · Views: 832
  • 7520.JPG
    7520.JPG
    551.5 KB · Views: 858
  • 7513.JPG
    7513.JPG
    544.1 KB · Views: 843
  • 7519.JPG
    7519.JPG
    707.5 KB · Views: 853
That is really cool landscape lighting you have there.  I’m always trying to come up with a creative functional design to light the fifty stairs that lead to my house.  Years ago I put some of the original Malibu tiered lights using ABS pipe to raise them up a bit and set them in concrete.  I live in a rain forest so the height helps since the vines tend to take over pretty quickly.  This setup worked really well for quite awhile until feral pigs moved through and dug up the set in concrete lights, cutting the wire and rolling many down the hill.  They also undermined my 4’ wide concrete stairs about 2’.  I ended up with cheap solar lights from Costco which maybe last 3-4 hours, which have also been dug up by the pigs.  They last a couple of years.  The latest ones have a long LED bulb which produce lighting from the lower portion of fixture that causes one to be looking directly at the light source which means it’s actually hard to see the stairs in the dark.  I like your industrial dome lights.  I have some near my shower.  I was wondering...  Don’t you get a lot of glare from those two designs since the tops are clear?  Do you need to nestle them down in the foliage to avoid that?  Maybe from a distance it works better?

My place is basically in a jungle with the house looking at a huge tree which I’m able to light up with floods mounted on the house.

I really like your wine bottle light idea.  I need to give that some thought.  They would stay full of water at my place but the mosquitoes have so many sources of water it probably wouldn't make any difference.  I certainly produce enough empty wine bottles!
 
Koamolly said:
That is really cool landscape lighting you have there. 

Don’t you get a lot of glare from those two designs since the tops are clear?  Do you need to nestle them down in the foliage to avoid that?  Maybe from a distance it works better?

I really like your wine bottle light idea.  I need to give that some thought.  They would stay full of water at my place but the mosquitoes have so many sources of water it probably wouldn't make any difference.  I certainly produce enough empty wine bottles!

Thanks [member=66704]Koamolly[/member] ...no there's no glare at all. Most of the light is transmitted side ways. The LED bulb is comprised of 12 side emitting LEDs and only 1 top emitter. I actually line the inside of the globe with a piece of frosted vinyl film to prevent glare and also to change the LED from a point-source to a line-source.

[attachimg=1]

[attachimg=2]

This is how the RAB's are supposed to be installed.

[attachimg=3]

When you turn them upside down, water/snow melt collects at the light base and it wants to get past the rubber gasket and enter the light.

I was able to drill 2 holes 180º apart that channels the water into and through the light base, then into the bottom bowl and finally it runs down the inside of the 3/4" MNPT galvanized post into the ground. 

[attachimg=4]

Here's a shot of the light base attached to the bottom bowl (LH) and the bottom bowl by itself.

[attachimg=5]

Probably the most important part of having maintenance free garden lighting is to come up with a robust wiring method. The typical solutions used for home owners, center around using this style of lighting connector. CAUTION...this solution is a total  abomination and will only work for a very limited time.

[attachimg=6]

My experience is that this style of connector lasts maybe 2-3 years before you start to have lighting issues. Lights that don't come on, lights that flicker, lights that flash on & off. It's all in the connector. Moisture enters the wire "wound" and oxidizes the individual wires and also the wire connector. The oxidation interrupts the electrical path and it'll only get worse.

I tin all electrical wire connections and use Wago wire nuts The tinned wires will not corrode because of the lead in the solder. In the last 12-13 years that I've used this methodology, I've not had a single light issue with almost 60 lights and 70 light & wire connections.  [smile]

[attachimg=7]

Here's a shot of the punt inside the bottle. It's pretty deep so the water stays in the bottle for at least 4-5 days.  [big grin]

[attachimg=8]
 

Attachments

  • 7275.jpg
    7275.jpg
    630.1 KB · Views: 738
  • 5778.jpg
    5778.jpg
    843.3 KB · Views: 742
  • Malibu Connector.jpg
    Malibu Connector.jpg
    64.1 KB · Views: 747
  • 5960.JPG
    5960.JPG
    471 KB · Views: 738
  • 5764.JPG
    5764.JPG
    568.6 KB · Views: 732
  • 7521.jpg
    7521.jpg
    468.1 KB · Views: 736
  • 7544.jpg
    7544.jpg
    293.7 KB · Views: 748
  • 7543.JPG
    7543.JPG
    590.3 KB · Views: 754
When I fabricated the LED light bars for a built-in cabinet, I decided to solder each connection to the LED bar instead of using the slip-on connectors that are supplied. Here's the slip-on connector attached to the LED tape.

[attachimg=1]

My thought was that the drawers will be opened and closed thousands of times over the life of the LED bar and the drawers are also equipped with Blumotion slides that produce a small shock when they fully close. I figured that the vibration would eventually compromise the slip-on connector integrity. So I soldered the leads to all 20 light bars. Not a big deal...just a PITA. [smile]

[attachimg=2]

[attachimg=3]

Now, moving on to the under counter LED lighting in the kitchen. It's an aluminum channel that conceals 12' of LED tape from Diode LED. It's their UltraBlaze line of LEDs. It draws 4.3 watts per foot.
I decided that because the under counter lighting is permanent, it doesn't move and its not subject to vibration, I'd use the standard Diode LED slip-on connector.

Well after 18 months of the LEDs working, the factory slip-on connector died. It was a slow death and happened in fits & starts.

I think the large current draw coupled with the frequent use of the LED lighting compromised the connection and over time it was all down hill. These under counter LEDs get turned on & off at least 8-10 times per day.

The plastic connection was actually burned as was the copper connection on the LED tape.

[attachimg=4]

From here on out, I'll be soldering every connection to LED tape.

[attachimg=5]


Attachments

  • 7575.jpg
    7575.jpg
    286 KB · Views: 710
  • 7574.JPG
    7574.JPG
    775.1 KB · Views: 682
  • 6824A.JPG
    6824A.JPG
    225.1 KB · Views: 696
  • 6824.JPG
    6824.JPG
    436.4 KB · Views: 692
  • 4503.JPG
    4503.JPG
    672.4 KB · Views: 697
[member=44099]Cheese[/member] - I'm looking to add some strips of LED under open shelves. If I'm read your comments correctly would it be a enough to mount them to these channels?

The way my brain works I'm envisioning the AL channel acting as the heat sink and prevent the LED from burning?

Thanks,

RMW
 
Those profiles look fine Richard, unless you're using some ultra high output LED's.

As an example [member=8712]Richard/RMW[/member] I've been running Diode LED Ultra Blaze strips in a channel that's .820" wide x .375" deep. The Ultra Blaze draws 4.32 amps per foot and produces 360 lumen per foot.

You can compare those specs with the specs of the LED's you're using versus the size channels you've identified.
 
Cheese said:
Scorpion said:
Keep it simple...lever nuts.  Rated voltage - 400, rated current 32A.  They’re all I use now b/c they enable  easy unit serviceability in the future and the wires won’t shake loose.

44c6bb7671a997ce4605815e12d2fb9d.jpg

Having used these larger/older 222 style Wago connectors before I was pleasantly surprised with the release of the new 221 style. These are quite a bit smaller than the original 222 style. They are also only 8 mm thick. Perfect for those smaller spaces.

I'm adding some additional outdoor luminaries to the yard and will be using these inside the 2 1/2" square fence posts and also inside the luminaries themselves. This gets all of the electrical connections into a protected environment and eliminates the typical issues that are common with DIY landscape lighting.

[attachimg=1]

[attachimg=2]

[attachimg=3]

This is a photo the original style of connection that will be eliminated. These are truly horrendous and they only last for 1-2 years before you start having issues with the lights. The connections are open to the elements, the wire oxidizes and the lights fail.

[attachimg=4]
 

Attachments

  • Malibu Connector.jpg
    Malibu Connector.jpg
    64.1 KB · Views: 371
  • 8900.jpg
    8900.jpg
    260.8 KB · Views: 375
  • 8899.jpg
    8899.jpg
    402.2 KB · Views: 388
  • 8898.jpg
    8898.jpg
    415.6 KB · Views: 408
I use  the new Wago 221 connectors on my outdoor landscape lighting.  Before I inserted any wires in the connectors, I fill the body with this dielectric grease. It keeps the connections protected from any moisture and thus extends the life of the connectors.  I have a few “test” connections that were done this way and then left exposed to the elements. It has been 3 long-wet Oregon-winters and no issues yet. The rest of the connections are protected from the elements.
 

Attachments

  • 1C7BA814-FECC-4246-BDA7-D62F1F0A96CF.jpeg
    1C7BA814-FECC-4246-BDA7-D62F1F0A96CF.jpeg
    289.6 KB · Views: 358
Cheese said:
Cheese said:
Scorpion said:
Keep it simple...lever nuts.  Rated voltage - 400, rated current 32A.  They’re all I use now b/c they enable  easy unit serviceability in the future and the wires won’t shake loose.

44c6bb7671a997ce4605815e12d2fb9d.jpg

Having used these larger/older 222 style Wago connectors before I was pleasantly surprised with the release of the new 221 style. These are quite a bit smaller than the original 222 style. They are also only 8 mm thick. Perfect for those smaller spaces.

I'm adding some additional outdoor luminaries to the yard and will be using these inside the 2 1/2" square fence posts and also inside the luminaries themselves. This gets all of the electrical connections into a protected environment and eliminates the typical issues that are common with DIY landscape lighting.

[attachimg=1]

[attachimg=2]

[attachimg=3]

This is a photo the original style of connection that will be eliminated. These are truly horrendous and they only last for 1-2 years before you start having issues with the lights. The connections are open to the elements, the wire oxidizes and the lights fail.

[attachimg=4]

Oh sweet, I’m checking them out.  Like they’re a little slimmer.  Thanks for the heads up.

Sent from my iPhone using Tapatalk Pro
 
Scorpion said:
Oh sweet, I’m checking them out.  Like they’re a little slimmer.  Thanks for the heads up.

Ya, I started this project today and they are pretty nice for stuffing multiple wire connections into difficult locations.
 
Scorpion said:
Cheese said:
Cheese said:
Scorpion said:
Keep it simple...lever nuts.  Rated voltage - 400, rated current 32A.  They’re all I use now b/c they enable  easy unit serviceability in the future and the wires won’t shake loose.

44c6bb7671a997ce4605815e12d2fb9d.jpg

Having used these larger/older 222 style Wago connectors before I was pleasantly surprised with the release of the new 221 style. These are quite a bit smaller than the original 222 style. They are also only 8 mm thick. Perfect for those smaller spaces.

I'm adding some additional outdoor luminaries to the yard and will be using these inside the 2 1/2" square fence posts and also inside the luminaries themselves. This gets all of the electrical connections into a protected environment and eliminates the typical issues that are common with DIY landscape lighting.

[attachimg=1]

[attachimg=2]

[attachimg=3]

This is a photo the original style of connection that will be eliminated. These are truly horrendous and they only last for 1-2 years before you start having issues with the lights. The connections are open to the elements, the wire oxidizes and the lights fail.

[attachimg=4]

Oh sweet, I’m checking them out.  Like they’re a little slimmer.  Thanks for the heads up.

Sent from my iPhone using Tapatalk Pro

I too use Wago connectors for all my electrics - but note in the UK at least they have to be installed into a junction box unless they are in some alternative sealed container. Wago sell neat boxes of course!
 
AstroKeith said:
I too use Wago connectors for all my electrics - but note in the UK at least they have to be installed into a junction box unless they are in some alternative sealed container. Wago sell neat boxes of course!

In the States we would also have to place the Wago connectors in a "box" for any voltage over 30-50v depending upon the jurisdiction. Low voltage wiring would not require boxes per se. 

On the original garden lighting I installed in the back yard, I placed the wire connections inside each luminary so they were not exposed to the elements. This method has been bullet proof for the last 14-15 years, not a single failure.

However, when I decided to wire the garden lighting in the front of the house, I used the typical DYI plastic compression/squeeze connection because it was easier & faster.

[attachimg=1]

Well, pay me now or pay me later.  [mad] [mad]  I knew better...I really did but I really wanted to believe the manufacturers claims. So, after 2-3 years of watching LED's on, LED's off and LED's flashing I decided to fix the problem so it would be as maintenance free as the back yard lighting.

This is one of the connectors I removed. A broken housing with corroded contacts.

[attachimg=2]

Because these cheap DIY clamp-on connectors just pierce the wire insulation, they allow water/air into the insulation jacket which can & does oxidize the wiring. As a result, if you need to tin the wire, the oxidation prevents that from happening. Impossible, you'll melt the insulation before you'll be able to tin the wire.

[attachimg=3]

The only way around that is to take the wire and soak it in a vinegar & salt solution for 30-60 minutes.

[attachimg=4]

After that, it's a clean water rinse and dry and then the wire can be tinned. Here's some outdoor 12/2 awg being tinned.

[attachimg=5]

And this is the final product, 2 each 12/2 tinned main power wires along with the LED 18/2 wire connected together with a Wago 221 connector.
Then the wires will all be folded into the housing and the LED light head installed. All connections are now protected from the elements.  [cool]  This is what I should have done 2-3 years ago.  [crying]

[attachimg=6]

[attachimg=7]
 

Attachments

  • 8916.jpg
    8916.jpg
    243.7 KB · Views: 251
  • 8914.JPG
    8914.JPG
    411.4 KB · Views: 269
  • 8913.JPG
    8913.JPG
    251.5 KB · Views: 259
  • 8911.JPG
    8911.JPG
    372.1 KB · Views: 241
  • 8919.jpg
    8919.jpg
    426.4 KB · Views: 239
  • Malibu Connector.jpg
    Malibu Connector.jpg
    64.1 KB · Views: 237
  • 8917.jpg
    8917.jpg
    249.9 KB · Views: 232
Back
Top