ear3
Member
- Joined
- Jul 24, 2014
- Messages
- 4,341
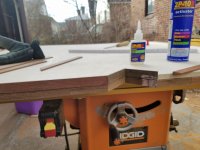
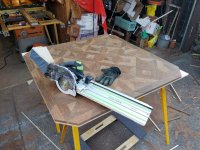
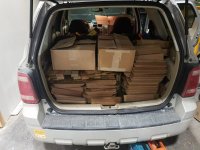
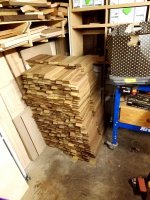
Working on a commission to do a series of table tops for a downtown restaurant. The design and materials make use of the fortuitous circumstance that an acquaintance recently finished a large outdoor furniture project using a ton of Ipe, and so I was able to recycle all the 12" offcuts he had leftover from the project. If you've handled Ipe before, you can empathize with what a scary low-riding trek I had getting the materials in my SUV back to my shop, which in the end amounted to well over 1000 individual pieces:
View attachment 1
View attachment 2
View attachment 3
One of the few times I was grateful for the traffic on the Brooklyn Queens and Long Island Expressways, so I wouldn't have to speed over the rough roads and bend or break an axle carrying that much weight.
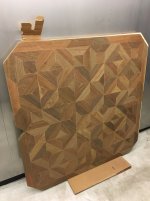
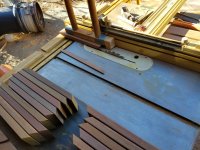
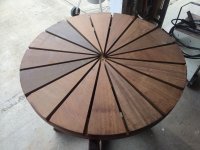
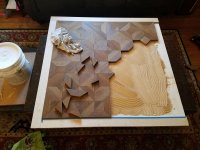
The basic design was as simple as could be, using only two shapes -- a right isosceles triangle and a 45 degree angled trapezoid whose short edge matched the shorter sides of the triangle -- to build out the main interior pattern:
View attachment 4
I'm building a dozen or so table tops in total, mostly in the 2'x2' range, but I also had to build two large 49"x49" ones, so I decided to start with those (note that the pictures below are mixed from the assembly of both tables).
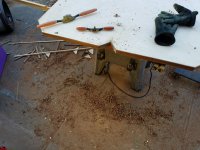
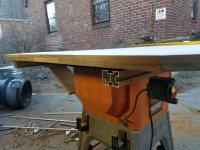
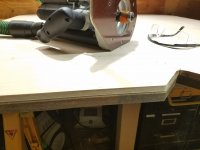
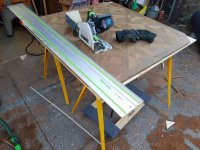
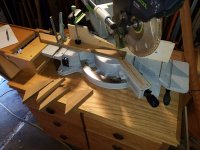
The only fixed measurement I had to make was the width at which I would rip the pieces. Everything else was determined by sneaking up on the cuts to set the stops on the Kapex just so to get the proper fit:
View attachment 5
View attachment 6
You'll observe that I had to make a zero clearance insert and fence for this project, which obviously required as much precision as I could engineer. The sliding action of the Kapex was also absolutely essential to get as clean a cut as possible. A non-slider with a fresh blade might have been able to do some initial cuts, but Ipe has a way of wreaking havoc on blades, and so as soon as there was any dulling I imagine a straight chopsaw would have problems producing a decent cut (I swapped in a fresh blade at the start of the project, and have already had to change out for a new one after doing all the pieces for the large tables, though fortunately I'm expensing a new set of blades).
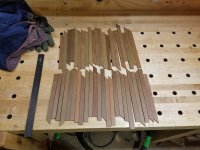
Here's a little OCD action of the pieces for one table set up in my downtime (each large table has about 220 individual pieces):
View attachment 7
I used some decent wood flooring adhesive to bond the pieces to the plywood substrate:
View attachment 8
This adhesive had the best combination of open time and strong initial tack so that I could finagle the pieces into place without too much gapping.
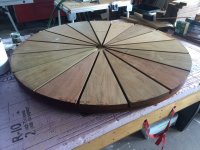
I had never worked with Ipe before, and so was pleasantly surprised to find so much color variation between the pieces.
I tried to use this to my advantage when setting the pattern, avoiding placing similarly colored pieces contiguously.
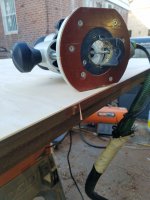
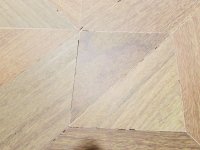
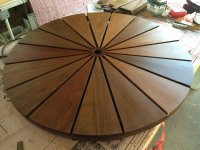
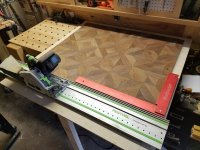
Once the interior pattern was established and dry, I trimmed the edges of the square ever so slightly with the tracksaw to get a smooth, straight edge:
View attachment 11
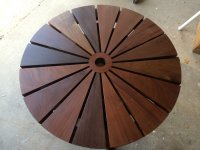
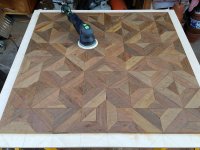
Some slight variations in the thickness of some of the pieces, combined with the occasional uneveness created when using this sort of mastic adhesive, meant that I got a vigorous workout with the RO150 and some 80 grit granat operating in gear driven mode to get a truly flat surface.
View attachment 12
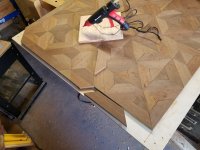
Then applied the outer border, though this time just using Pamtite in my Fastenmaster glue gun:
View attachment 9
Next up, the finishing touches...
View attachment 1
View attachment 2
View attachment 3
One of the few times I was grateful for the traffic on the Brooklyn Queens and Long Island Expressways, so I wouldn't have to speed over the rough roads and bend or break an axle carrying that much weight.
The basic design was as simple as could be, using only two shapes -- a right isosceles triangle and a 45 degree angled trapezoid whose short edge matched the shorter sides of the triangle -- to build out the main interior pattern:
View attachment 4
I'm building a dozen or so table tops in total, mostly in the 2'x2' range, but I also had to build two large 49"x49" ones, so I decided to start with those (note that the pictures below are mixed from the assembly of both tables).
The only fixed measurement I had to make was the width at which I would rip the pieces. Everything else was determined by sneaking up on the cuts to set the stops on the Kapex just so to get the proper fit:
View attachment 5
View attachment 6
You'll observe that I had to make a zero clearance insert and fence for this project, which obviously required as much precision as I could engineer. The sliding action of the Kapex was also absolutely essential to get as clean a cut as possible. A non-slider with a fresh blade might have been able to do some initial cuts, but Ipe has a way of wreaking havoc on blades, and so as soon as there was any dulling I imagine a straight chopsaw would have problems producing a decent cut (I swapped in a fresh blade at the start of the project, and have already had to change out for a new one after doing all the pieces for the large tables, though fortunately I'm expensing a new set of blades).
Here's a little OCD action of the pieces for one table set up in my downtime (each large table has about 220 individual pieces):
View attachment 7
I used some decent wood flooring adhesive to bond the pieces to the plywood substrate:
View attachment 8
This adhesive had the best combination of open time and strong initial tack so that I could finagle the pieces into place without too much gapping.
I had never worked with Ipe before, and so was pleasantly surprised to find so much color variation between the pieces.
I tried to use this to my advantage when setting the pattern, avoiding placing similarly colored pieces contiguously.
Once the interior pattern was established and dry, I trimmed the edges of the square ever so slightly with the tracksaw to get a smooth, straight edge:
View attachment 11
Some slight variations in the thickness of some of the pieces, combined with the occasional uneveness created when using this sort of mastic adhesive, meant that I got a vigorous workout with the RO150 and some 80 grit granat operating in gear driven mode to get a truly flat surface.
View attachment 12
Then applied the outer border, though this time just using Pamtite in my Fastenmaster glue gun:
View attachment 9
Next up, the finishing touches...
Attachments
-
 20180110_183021.jpg825.2 KB · Views: 463
 -
 20180109_153804.jpg1.1 MB · Views: 434
 -
 20180112_105755.jpg926.8 KB · Views: 323
 -
 20180109_110755.jpg620.3 KB · Views: 508
 -
 20180113_103322.jpg950.5 KB · Views: 478
 -
 20180109_121552.jpg1,002.3 KB · Views: 583
 -
 20180108_192601.jpg907 KB · Views: 502
 -
 20180107_095847.jpg823.4 KB · Views: 356
 -
 20180103_094617.jpg745.8 KB · Views: 400
 -
 Screenshot_20171220-151853.png417.5 KB · Views: 406
 -
 20180110_232552.jpg1.4 MB · Views: 422
 -
 20180110_183028.jpg1.1 MB · Views: 392