Is there a guide to laminate out there using Festool?

DynaGlide

Member
Joined
May 16, 2017
Messages
1,697
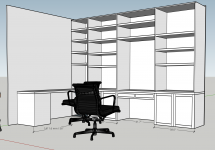
As the title implies I need to make my first countertop in a few weeks. It's an L shape (see attached).

At my disposal: MFK 700, Domino, OF 1010, track saw along with most of the other usual suspects. I've watched videos using general laminate trimmers to get an idea of the process but wondering if there's a video out there specific to the MFK 700 that I haven't come across. In my head I would make the first section run the 8' on the short side of the L and the second section about 10' to butt into the first section and secure the two together using Domino for alignment and rout in some countertop fasteners freehand on the underside. The joint between these two would largely be hidden by the bookshelves when they're built.

Here's my plan:

1) Make a scribe template out of 1/4" MDF.
2) Cut (2) 3/4" PB core into two sections 26" x length needed to allow a 1" overhang on 24" deep cabinets and a 1" scribe for back wall. Reinforce core with 3/4" PB strips where it finds support on cabinet sides.
3) Attach MDF template and flush trim to wall facing side of PB cores.
4) Attach 3/4" PB edging to tops.
5) Laminate the edges first? Unsure on this step. Then trim with 1.5 offset base for MFK?
6) Laminate the tops and trim again using 1.5 offset base?
7) Fit and join the two sections together in place and secure with screws underneath.

I'm very much a visual learner so if there's a video out there I haven't found yet that would be great. I'm also all ears on advice on approach and which order to what and what tool to use. If I need something like the angle attachment for the 1010 or the 0 degree base for the MFK I'd have to order that in before starting.

Thanks,
Matt
 

Attachments

  • Screen Shot 2020-05-25 at 8.09.17 AM.png
    Screen Shot 2020-05-25 at 8.09.17 AM.png
    292.1 KB · Views: 288
Matt, we should have a chat some evening.  There are two bits you'd do well add to your tool room; first, the Amana No-File bit and second, the Amana Flush Trim bit.  You'd also do well to pick up a small J-roller for edging, and a wide J-roller for wider flat surfaces.  A laminate slitter would also be a very good tool to have since you'll be doing some long, narrow cuts for edging.  Good laminate files are necessary, along with file cards to clean them. 
 
Depending on how your cabinetry is finished you might consider putting a 1x2 on the front of the count top and then laminating it. Once dry you can come back with a chamfer bit to ease the edge and expose the wood then stain (if necessary) and clear. In my opinion it looks good and is a lot easier on the forearms and is saver a 90 degree edge.

Depending on the size of the "L" I would also consider making the unit a single piece. It will be sturdier though less manageable prior to installation. Your reinforcement can run the length of "L" to reinforce the top or you could just go with a solid bottom versus strips. The only issue with a single piece with an "L" is the inside corner where the chamfered edge will vary. With some careful work you could deepen the chamfer to make it less obvious. I have done this on numerous countertops where granite is not a possibility financially and in commercial environments where it may not make sense.

I will try and stop by an installation I did to today for some photos.
 
Not an "L", but an idea what it will look like. The front of the countertop is a 1x2 maple strip so that is the wood that shows through.
 

Attachments

  • Beveled edge.png
    Beveled edge.png
    940.5 KB · Views: 362
JimH2 said:
Depending on how your cabinetry is finished you might consider putting a 1x2 on the front of the count top and then laminating it. Once dry you can come back with a chamfer bit to ease the edge and expose the wood then stain (if necessary) and clear. In my opinion it looks good and is a lot easier on the forearms and is saver a 90 degree edge.

Another option is to use a wooden edge as suggested by [member=652]JimH2[/member], but use a thumbnail round-over bit held high to eliminate the step, making it very easy on the wrists and forearms.
 
I don’t have any videos of the process I use. I’m home in Indiana and the tools are at the shop in Colorado. Pictures aren’t a great option either. If this gets confusing, let me know, I’ll have the guys shoot some videos.

Preparing the blank assumes no back splash.

I use drywall shim to make templates. Easy to do with a hot glue gun and a pair of scissors. Along the front of the shim 1" from the front edge of the face frame. I prefer 1/2" overhang at the sides, your call. Tack this in place with a few dabs of glue. Cut stretchers front to back, glue these onto the front piece. Glue shim to the front to rear pieces along the back wall, get close to the wall, don’t worry about "dips". To fill into the dips, cut small pieces of shim, glue them onto the rear shim following the wall. Add some diagonal shim braces. At the L, add a piece so you can cut the template at this location. Put a lot of witnesses marks where your going to cut the template.When you’re done you should have a perfect pattern of the wall. Go ahead, cut the template now.

Prepare your blank. Make sure you get counter or furniture grade OSB. Rip some 3" strips of OSB. Add these as build up to the front edge of the blank. Add your intermediate and edge supports, edge support, front to rear, intermediate supports leave 4" short of the rear. Glue and staples work well for this. Trim the front edges with your track saw. This will match the pieces. You’ll need extra build up at the seam for the joiners.

Place one of your template pieces on a blank. Along the front edge of the template to the front edge of the blank. Tape the template in place. Place the second template, tape in place aligning witnesses marks. Make sure there are no gaps where the two pieces come together. If there are, you have to take care of this now.

Carefully trace the wall edge of the template onto the blanks. Carefully cut/sand to the line. You should now have perfectly fitting blanks. Test fit them seeing as it’s your house. Add the rear build up, holding it slightly in from the back edge. the reason you didn’t put it on before is, you didn’t have to cut/sand the build up also.

Make sure you plan for joiner access in your cabinet fabrication.

These are probably the easiest joiners to use.
https://www.rockler.com/tite-joint-...ANVFjQ4OOxXj2egaTSU5jTRgML1ObyWcaAkH7EALw_wcB

I avoid using Dominos in this application. By not using them you can nudge the edges vertically for alignment as you tighten the joiners.

I normally do the edges first. With the new color through HPL’s there is no dark line. For the edges I use spray contact. Rip the pieces a little wide with the track saw. While your at it rough cut the top surfaces, 1/4" over size works. Decide which way you want the front edges to lap. Glue and roll them on with a j-roller. Be careful not to over run an vertical edge, you’ll crack the laminate. While you’re glueing up the edges, glue a piece of 150 to a block that fits comfortably in your hand. Trim the edges up with the 700 using the 1.5° base. I use the Festool 19mm bit made for the MFK. Adjust the height so the bit does not mar the blank. Do not tilt the MFK at all, try it on a test piece, you’ll find out why. Once you trimmed the edges up, take the sandpaper block, hold it about 5° from horizontal, toe the block about 45°. Make a couple of swipes, the edge should clean now.

Tape off the edges. Apply a coat of contact cement to the OSB. Allow this to dry, seeing as your using OSB, apply a second coat of contact cement. Apply a coat of contact cement to the back of the laminate. Allow this to dry. Place stickers on the top about 6" apart. Carefully place the laminate on the stickers. Visually align the laminate to the blank. Remove the stickers one at a time, carefully roll the laminate onto the blank, do not get to close to the next sticker. Remove the next sticker, roll, continue. Do the second blank.

If you have a pattern you want to match, work that out prior to cutting the laminate.

Use the 700 to trim up the top. You’ll need to hand fit where the bare edge and laminated edge meet.

Carefully check the seam area, you don’t want the laminates to crash into each other.

Install the tops. 

Tom

 
[member=652]JimH2[/member] I do want a wooden edging. However what I want and what the boss want don't always line up and I sometimes I have to give in  ::) Thank you for the ideas and the picture. If I can be persuasive I will use it as a guide.

[member=7493]Sparktrician[/member] Yes I do think a call is in order. Once I have the house to myself I think I'll set one up.

[member=4105]tjbnwi[/member] I'm going to have to re-read that post a few times. I am as I said a visual person but if I go through it a few more times I might just get it. Thank you for contributing. Those drywall shims looks great. I didn't even know those were a thing that you could buy  [cool]

 
Back
Top