ISO - plans for a mft style work surface with drawer

sebr023

Member
Joined
May 18, 2022
Messages
187
Location
Montreal, Canada
Hi all!

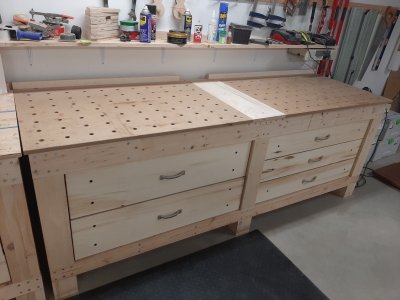
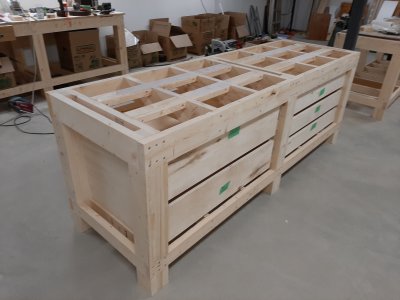
I searching the web for plans to do something like this for my workshop IMG_7615.jpeg
IMG_7616.jpegIMG_7617.jpegIMG_7618.jpeg

Don’t wanna spend god knows how long to design and develop one. If I could buy plans I would appreciate it.

Any pointer would on where I can find plans for this?

If the build is in Aluminium’s extrusion, that’s a plus.

Thanks!
 
I built this bench a while back.
If this is similar to what you are looking for, I can give more details. I did a 3D design but only made a handful of basic drawings of some of the components.
It's 8 ft long, and uses two standard Festool MFT tops. The center portion is replaceable if putting a swing-down rail, but I never did put the swing down rail.
You don't have bottom access to the MFT top with this type of design, but I have not found that to be a problem.
If you want to use aluminum extrusion, Fazstore.ca near Montreal is a good source, but be warned that aluminum extrusion and connectors gets expensive rather quickly.
 

Attachments

  • MFT Bench.jpg
    MFT Bench.jpg
    1.3 MB · Views: 30
  • With End Plates and Blocking.jpg
    With End Plates and Blocking.jpg
    1.2 MB · Views: 30
  • Leg.jpg
    Leg.jpg
    23 KB · Views: 26
Last edited:
I built this bench a while back.
If this is similar to what you are looking for, I can give more details. I did a 3D design but only made a handful of basic drawings of some of the components.
It's 8 ft long, and uses two standard Festool MFT tops. The center portion is replaceable if putting a swing-down rail, but I never did put the swing down rail.
You don't have bottom access to the MFT top with this type of design, but I have not found that to be a problem.
If you want to use aluminum extrusion, Fazstore.ca near Montreal is a good source, but be warned that aluminum extrusion and connectors gets expensive rather quickly.
Looking great!

The only thing I’d change/want is space to store my systainer under. Where do you store yours?
 
Looking great!

The only thing I’d change/want is space to store my systainer under. Where do you store yours?

In the first image you can see them on the far right --- stacked up on the floor.
Drawer space is too valuable to give up just to stack systainers.
If you look at the second last or third last image that you posted, that is really the same as stacking them on the floor, except harder to retrieve because you can't lift one straight up.
If you put each systainer on a pull-out shelf, that is reasonable, but I would still prefer not to lose the drawer space - systainers can be put anywhere.
 
Hi all!

Don’t wanna spend god knows how long to design and develop one. If I could buy plans I would appreciate it.

Any pointer would on where I can find plans for this?

If the build is in Aluminium’s extrusion, that’s a plus.

Thanks!

I built a MFT-style workbench for my basement shop using extruded aluminum that has lots of Systainer and drawer storage.

Worktable-1a.jpg


Worktable-2a.jpg

Worktable-4a.jpg

Worktable-3a.jpg

Here is the link to my detailed build thread on a UK forum that includes the SketchUp SKP plans and the assembly plans from the company where I bought the extrusion.

 
I built a MFT-style workbench for my basement shop using extruded aluminum that has lots of Systainer and drawer storage.

View attachment 378811


View attachment 378812

View attachment 378814

View attachment 378813

Here is the link to my detailed build thread on a UK forum that includes the SketchUp SKP plans and the assembly plans from the company where I bought the extrusion.

Oh wow! That’s what I had in mind! What’s the format? How much did it cost you? I’ll go check your build thread! 😍
 
On an MFT bench, don't forget this important feature.
All sorts of chips and assorted "stuff" will fall through the holes in the top.
(I have some slide-out trays below my top)
 

Attachments

  • MFT Debris.jpg
    MFT Debris.jpg
    93.2 KB · Views: 14
I have this 30x60 workbench already. The dogs are not complete and it’s only on legs without any type of storage IMG_7649.jpeg

But is has a way for me to clean the dust and chip inside.
 
I'm on the road at the moment, so I don't have pics - but pics of my modified workbench are in a thread here about workbenches.

I built mine in the 90s with two layers of 3/4" plywood and 2x and 4x pine lumber. Modified in modern times with a layout for dog holes, miter track and t-track for a router insert (still haven't inserted the router). Drilled 96 dog holes in that bench - and about to add more.

I don't have plans and, truthfully, you really don't need plans. You can simply figure out the size bench you want and build it from pine lumber. Or you can order extrusions from 8020.net and assemble it that way. I think some guys have used certain extrusions to fit MFT type of accessories either from Festool or companies like Dashboard.

Once you've determined the length and width of the workbench, then it's about the height. I have the worktop at to 920mm or 36" and then match everything else to the same height (jointer outfeed, tablesaw, planer outfeed, etc) so I can use the bench as in/out feed, if necessary. The dog holes should be 20mm in diameter and set in a grid that is 96mm x 96mm. They make jugs for this but I did it The Hard Way and plotted it out with a pencil and ruler. The more time you take, the more precise you can be. Or spend the $300 on the jig and it's a lot easier (evidently, I have more time than money or sense).

To fit systainers under the worktop, you will need to set a width of 427mm for each stack of systainers with a minimum depth of 350mm. As you calculate this, you'll also need to include the width of whatever you are mounting the slides or drawers. If that's from 18mm plywood, then you'll add in an additional 36mm of width for every stack you intend to install. How many can you fit? That will depend on how much height you end up with, how you intend to stack them (simply stacked, on SYS RAIL slides or SYS-AZ (or similar) drawers? Theoretically, you'll fit more just simply stacking them without using slides or drawers, but it may not be as convenient for accessibility.
Make sense! Thanks for the help!

I already have a 30x60 torsion box style with dog in it. I did the dogs holes using my shaper origin. Tho, I think I might have made a mistake about spacing.

I did 20mm dog holes diameter. But they’re 81mm apart. :/ I used a 3/4in birch plywood and a 1/4 or 1/2 on top.

IMG_7655.jpeg
 
I added several 35mm holes in-between to aid with faster clamping.

When you're trying to manhandle really awkward stuff, manoeuvring the clamps into the tight holes can be problematic.
 
I added several 35mm holes in-between to aid with faster clamping.

When you're trying to manhandle really awkward stuff, manoeuvring the clamps into the tight holes can be problematic.
*Insert Mickael Scott’s that’s what she said obligatory joke*

What type of clamp do you use in 35mm holes.

That’s good news tho. I won’t need to make the table top over. I can keep this one!
 
*Insert Mickael Scott’s that’s what she said obligatory joke*

What type of clamp do you use in 35mm holes.

That’s good news tho. I won’t need to make the table top over. I can keep this one!
The ratchet type version of the Festool std rail clamps. It drove me up the wall getting the clamps in "just the exact right" position to get them in the holes. Some larger holes around the board are incredibly handy. I also put a large hole dead centre so I can use the really large F clamps for bigger projects.
 
The ratchet type version of the Festool std rail clamps. It drove me up the wall getting the clamps in "just the exact right" position to get them in the holes. Some larger holes around the board are incredibly handy. I also put a large hole dead centre so I can use the really large F clamps for bigger projects.
Great idea! I’ll keep that in mind! Thanks!
 
Back
Top