Issue with connecting guide rails

ear3

Member
Joined
Jul 24, 2014
Messages
4,342
So I'm doing my first job since getting the TS 75.  Creating a faux oak paneled library (though with 1/4" oak veneer ply and real oak moulding) for an art installation.  Because we're trying to minimize cost, we've opted just to join the panels flush and have large squares of astragal moulding in the center of each panel, rather than run battens down the seams where the plywood joins, which would start to get expensive since it is a 20x20 room.  Doing it this way was predicated on having something like the TS, where I could make extremely clean and straight cuts so that there is no gap between the plywood panels.

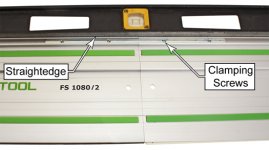
Well, the first few cuts were disappointing.  They were clean and 100% tear out free of course, but the cut was slightly concave (between 1/16 and 1/32) -- ironically, it was a result similar to the old clamping guide method I previously used.  I soon realized that it was probably due to the fact that I was using two rails joined by connectors, rather than a single long rail.  I reset the connectors and measured to verify that the rail was at the imaginary scribe line in the middle, in addition to either end.  But every time I moved the setup to do a new panel, it would again develop a slight concavity.  Fortunately there was a Festool dealer 5 blocks from the gallery, so I went over and got the 3000mm rail, with which I was finally able to get perfectly straight cuts and no gap between the panels once they were mounted on the wall.

I was just wondering if anyone else has experienced a similar problem when trying to use two connected guiderails in lieu of a single, long one, and if it is even possible to get a completely straight cut using the connector method?
 
Edward,

I think you solved your problem by purchasing that longer rail.

However, wrt the concave issue, a couple of points.  First, you cannot butt the ends of the rails together, that won't make them align.  You need to align the two rails against a straight object, such as a level.  Then tighten the connectors.  Or, you can buy the Betterley Rail Connector, which helps with the alignment.
Lastly, Makita sells their version of the rail connectors that perhaps is a better solution for a connector.  I bought a set, along with the Betterley, and haven't had any issues keeping my rails aligned.
 

Attachments

  • image.jpg
    image.jpg
    29.6 KB · Views: 448
Baremeg55 said:
Edward,

I think you solved your problem by purchasing that longer rail.

However, wrt the concave issue, a couple of points.  First, you cannot butt the ends of the rails together, that won't make them align.  You need to align the two rails against a straight object, such as a level.  Then tighten the connectors.  Or, you can buy the Betterley Rail Connector, which helps with the alignment.
Lastly, Makita sells their version of the rail connectors that perhaps is a better solution for a connector.  I bought a set, along with the Betterley, and haven't had any issues keeping my rails aligned.

Oops -- I apparently skipped that part in the manual.  Fortunately I'm good for the moment with the longer rail.  My bank account is hoping, however, that I won't have to cut anything over 9 ft.  Thanks for the tips.
 
The rails appear to be cut while moving down the production line, so with a fixed saw moving over a moving length of material one does not get square edges. Some use a Kapex to square the ends. But since the ends can be bent or dented, even with square ends, the space is a good idea.
 
The reason why simply butting the ends does not always produce a straight joining, is because you are using an approximately 6" wide joint to control the linearity of a 109" edge. Even the most trivial of errors at the 6" joint will get multiplied 18-times over the total length of the joined rail. In other words, if you had a joint-gap that was only 0.001", the end of your 109" rail would be 0.018" deflected away from true.

I have heard of several methods for allegedly joining the rails straight, but the only one I support, and the only one listed in the manual is to use a straightedge of sufficient length across the back of the rails. For non-critical cuts, I know that most of my rails are so close to perfect that I can comfortably butt the ends, but for a critical cut, I always use a straightedge.

[attachimg=1]
 

Attachments

  • TS55R-08.jpg
    TS55R-08.jpg
    129.3 KB · Views: 690
Using the above method with my six ft level as a straight edge gives tremendous results,
in use, once finally set up correctly my two joined rails perform perfectly.
Still amazed and totally impressed with how accurate my TS55 and rails work together, for those of us not able to
afford a dedicated panel saw the Festool solution really is the answer.
 
skimming through the responses I see some very good advice and suggestions. One thing I see missing is like one person said dont but the rails up to each other, I leave a small 32nd or 64th inch gap between the 2 rails
 
jobsworth said:
One thing I see missing is like one person said dont but the rails up to each other, I leave a small 32nd or 64th inch gap between the 2 rails

There is no reason to deliberately leave a gap between the rails. The source of that suggestion is that it is simply easier to explain with the fewest words than it is to say that there might be a tiny angled gap between two touching rail ends. It is more of a communication thing than a physical thing.
 
Rick,

The reason I dont but the ends up is because the ends are not always cut exactly straight. So I chose to leave a small gap. I find it works for me.

In reality if it works for you to butt the ends up thats all that matters.

Most of this is personal preference and what method one perfers to get things done the way they want to achieve the outcome they desire.
 
Please forgive me if I didn't communicate that very well. I wasn't suggesting that leaving a gap was wrong. I was only trying to address the source of that idea as being due to simpler communications. Many woodworkers took the past description to be literal, and that a gap was required for proper joining.
 
Rick Christopherson said:
I have heard of several methods for allegedly joining the rails straight, but the only one I support, and the only one listed in the manual is to use a straightedge of sufficient length across the back of the rails. For non-critical cuts, I know that most of my rails are so close to perfect that I can comfortably butt the ends, but for a critical cut, I always use a straightedge.

I don't disagree with using a straightedge, but find that I get results as reliable with the 4' level or the Betterley Straightline Connector.  I always have a level in the vehicle, and when I take the rails on the road, the Betterley is in the rail bag's pocket.  I seldom have a reason to carry the straightedge outside of the shop. 

 
I ran into this issue last year when using two connected rails in conjunction with the parallel guides. While using a straight edge aligned the two rails for the first cut, the rails did not stay true for subsequent cuts and required recalibrating for each cut.  I wasn't ever able to get the rail connectors to hold their place for multiple cuts so I had to resort to buying a longer rail. I'm not sure what the solution should be if multiple cuts are required.

karl
 
Back
Top