Japanese style walnut slab coffee table

ear3

Member
Joined
Jul 24, 2014
Messages
4,341
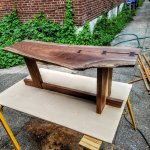
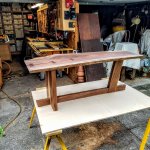
Recently FOG member [member=66813]rmhinden[/member] posted pictures of some bonsai stands that he made.  I really liked how they came out so I decided to cop the design for a coffee table I was making

[attachimg=1]

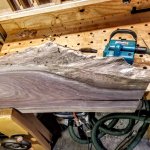
The one design modification is the angled front support (done at 11 degrees), a detail which I saw in a similarly styled table later on.

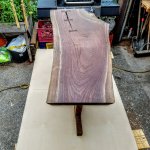
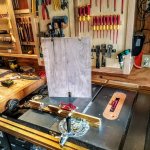
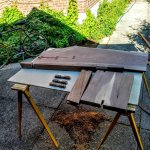
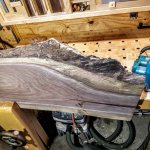
Got the slab from Boards and Beams in NJ

[attachimg=2]

Had to sort through a bunch before finding this one -- most were either too wide or too long, and since I only planned on doing this table at the moment, I didn't want to have too large of an offcut lying around.  It's a bit in excess of 7 ft. in length, and 21" at it's widest.

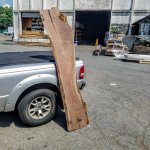
I ended up with about a 3' offcut, which I'll use at some point in the future for an even smaller table

[attachimg=3]

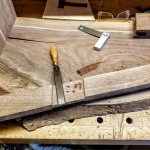
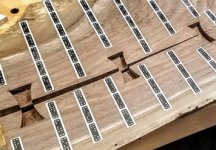
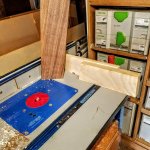
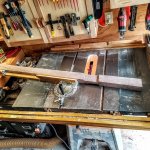
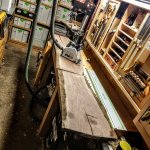
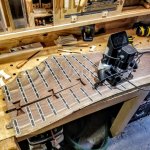
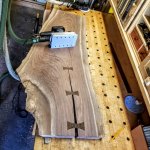
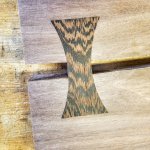
Surfaced the slab with the Woodpeckers slabbing mill, then stabilized the crack with wenge butterfly inlays, cut out and mortised with the Shaper Origin

[attachimg=4]
[attachimg=5]
[attachimg=6]

The Makita brush sander did its thing cleaning the live edge via the nylon wheel without excessive degradation to the softer wood

[attachimg=7]
'
[attachimg=8]

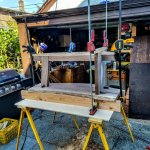
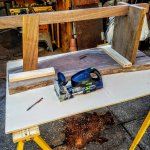
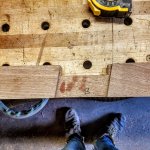
For the base, made from 8/4 walnut, I fortunately had all the wood on hand in my shop leftover from previous projects.  The only downside was that one of the boards had a substantial amount of the whiter sapwood along the edges, so I concentrated that along the center line of the larger leg when edge joining the boards, and faced it to the outside of the table for less visibility

[attachimg=9]

[attachimg=10]

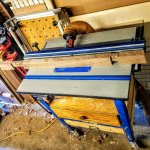
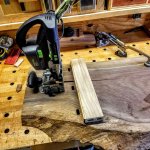
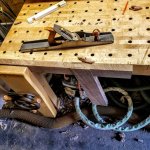
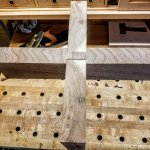
Base is put together with bridle joints made on both the table saw (w/dado stack) and router table

[attachimg=11]

[attachimg=12]

[attachimg=13]


Attachments

  • 20200802_100846.jpg
    20200802_100846.jpg
    469 KB · Views: 1,278
  • 20200731_135218.jpg
    20200731_135218.jpg
    485.2 KB · Views: 930
  • 20200731_184432.jpg
    20200731_184432.jpg
    120.2 KB · Views: 903
  • 20200730_170911.jpg
    20200730_170911.jpg
    545.5 KB · Views: 898
  • 20200801_085750.jpg
    20200801_085750.jpg
    155.9 KB · Views: 907
  • 20200801_084349.jpg
    20200801_084349.jpg
    588.8 KB · Views: 931
  • 20200724_104114.jpg
    20200724_104114.jpg
    477.1 KB · Views: 902
  • 20200724_103725.jpg
    20200724_103725.jpg
    508.4 KB · Views: 896
  • 20200722_144833.jpg
    20200722_144833.jpg
    494.9 KB · Views: 1,001
  • 20200722_202706.jpg
    20200722_202706.jpg
    539.7 KB · Views: 987
  • 20200724_175302.jpg
    20200724_175302.jpg
    507.4 KB · Views: 961
  • 20200727_115417.jpg
    20200727_115417.jpg
    479 KB · Views: 911
  • 20200727_115436.jpg
    20200727_115436.jpg
    553 KB · Views: 910
Base attaches to the top with 14mm dominoes, and then screws through the perpendicular collars on the two supports.  I aligned the dominoes by securing stops to mark the position of the base on the underside, then added 5mm wooden shims to compensate for the 15mm offset of the domino centerline from the XL base (supports had been mortised at 20mm using the preset height on the machine)

[attachimg=1]

[attachimg=2]

[attachimg=3]

All the mortises were done at the wider setting to facilitate the fitting.

Routed the bottom stretcher about 1/16" everywhere except a;long the bridle joints so that it floated slightly above the floor and didn't affect the stability of the table

[attachimg=4]

Had to spend a bit of time preparing the glue up.  Used a pair of 48" and 24" bowclamps to target the clamping pressure.

[attachimg=5]

Finished off with some Osmo matte

[attachimg=6]

[attachimg=7]

[attachimg=8]

[attachimg=9]

[attachimg=11]

[attachimg=10]
 

Attachments

  • 20200802_100948.jpg
    20200802_100948.jpg
    559.1 KB · Views: 884
  • 20200802_101138.jpg
    20200802_101138.jpg
    478.6 KB · Views: 885
  • 20200802_100915.jpg
    20200802_100915.jpg
    398 KB · Views: 872
  • 20200802_101205.jpg
    20200802_101205.jpg
    508.5 KB · Views: 861
  • 20200802_101010.jpg
    20200802_101010.jpg
    458.8 KB · Views: 881
  • 20200802_100758.jpg
    20200802_100758.jpg
    472.6 KB · Views: 887
  • 20200801_165730.jpg
    20200801_165730.jpg
    543.4 KB · Views: 889
  • 20200801_155500.jpg
    20200801_155500.jpg
    546.5 KB · Views: 877
  • 20200801_104203.jpg
    20200801_104203.jpg
    506.6 KB · Views: 882
  • 20200801_101557.jpg
    20200801_101557.jpg
    538.2 KB · Views: 880
  • 20200801_092554.jpg
    20200801_092554.jpg
    503.1 KB · Views: 874
Wow, that is very nice!

One question, how did you allow for wood movement between the top and the base?

Bob
 
[member=37411]ear3[/member]  Another nice build!  Looks great!

In general, I'm not a big fan of butterflies, but I have to say that the shape, with the curve (as well as the choice of wood/grain), really makes yours stand above the rest.

Thank you for sharing and posting so many photos!

Mike A.
 
Another beauty!

Next time you go to Boards and Beams pick me up on the way.
Oh wait, social distancing. Do you have a trailer?  [wink]
 
Thanks!

[member=66813]rmhinden[/member] I slightly slotted the scrfews and left the middle tenon on the perpendicular support floating.  I figured that was enough for a piece this narrow, but I guess we'll find out?  It's a piece of home furniture rather than a commission, so I suppose I can troubleshoot if something goes awry.

[member=297]Michael Kellough[/member]  No trailer unfortunately -- see you on the other side of the vaccine I guess?
 
[member=37411]ear3[/member] very very nice work Edward.  That turned out lovely.

Ron
 
That’s really nice. Helps me a lot to think about how to use some nice slabs I brought to San Diego from Maui: two long pieces of chocolate albezia, and a big slab of mango that will make a great table. When the time comes I will solicit advice on how to flatten the cupped albezia.
No hurry now because we have a two-year-old granddaughter and another on the way soon, and live edges are not exactly kid-friendly. Contrarily, kids are not exactly live-edge friendly.
I will bookmark your post for future reference
 
I wanted to mention that I got the idea for the Bonsai stands I made from:

Bonsai Mirai

The web site says they were built by Jason Eider.  Just found his web site.  Lots of nice work.

Bob

 
Edward I really like the bridle joints. Good job. Did you have to do a lot of sneaking up on the fit or did you come up with a good way to hit it off the bat?

Ron
 
Thanks for the reference [member=66813]rmhinden[/member]

[member=3192]rvieceli[/member] I got it pretty close with the table saw using digital calipers to monitor depth of cut (did the legs first, and then the crosspiece second).  Was able to do the finish work with just a paring chisel to take off last few thousandths to get a perfect fit.  For the angled joint, I obviously had to chisel off the ends of the notch to match the angle.  Then used a jointer plane to even out the crosspiece relative to the bottoms of the legs.

Mixed in a little blood with the wood in the process:

[attachimg=1]

[attachimg=2]

[attachimg=3]

[attachimg=4]
 

Attachments

  • 20200731_094512.jpg
    20200731_094512.jpg
    545.5 KB · Views: 731
  • 20200731_093750.jpg
    20200731_093750.jpg
    422.6 KB · Views: 747
  • 20200730_183934.jpg
    20200730_183934.jpg
    510.9 KB · Views: 737
  • 20200730_174104.jpg
    20200730_174104.jpg
    505.3 KB · Views: 739
More wood art...great stuff.  I've worked in glass industry for the last 40 years (among other things), told an ER nurse after slicing my forearm 14 stiches worth that I felt that it was good to bleed on a regular basis so my body would know what to do in a serious accident...she didn't think much of my theory, but isn't that how the body develops disease resistance, she still was not convinced.  Maybe not but I have tons of scars and at 67 still rapidly.
 
[thumbs up] Nice job Edward...the 11º angle makes all the difference.  [big grin]

Never really been a fan of bowties/butterflies but those were really executed nicely. Again, the continuous curve makes the difference. How did you finish off the pockets? Maybe an 1/8" diameter router bit and then a sharp knife for the corners?

[attachimg=1]
 

Attachments

  • EAR.jpg
    EAR.jpg
    105.4 KB · Views: 622
Yeah, angle definitely helps.

Correct, initial pocket with a 1/4 bit, then finishing inside cut with an 1/8 bit, then just chiseled out the corners.  I didn't think of using a knife, but I see now that might have been effective too.  Found that I could have really used a fishtail or skew chisel for that work, which I don't have, but which going forward I guess I will have to remedy.  EDIT: Lol, speaking of which, I was looking at the bluespruce skew and dovetail chisels -- yesterday they were set to ship in late September, this morning I checked again and they are now set for late October shipping.  Guess I should act soon.

Cheese said:
[thumbs up] Nice job Edward...the 11º angle makes all the difference.  [big grin]

Never really been a fan of bowties/butterflies but those were really executed nicely. Again, the continuous curve makes the difference. How did you finish off the pockets? Maybe an 1/8" diameter router bit and then a sharp knife for the corners?

[attachimg=1]
 
Thanks  [member=61712]six-point socket II[/member] ! I had considered doing an even steeper angle -- maybe 13-15 degrees -- but I was worried about deflection from the downward clamping pressure during the glue-up.  11 degrees was the steepest I could get where there was an imaginary perpendicular line that still intersected a portion of the top and bottom edges of the support.  The bridle joint ended up being pretty tight and effective though, and I probably could have gotten away with a few more degrees in the end.  But by the time I realized this I had already cut the joint and could not change it. 

six-point socket II said:
Looks great, love the bow ties & 90 degree turned and angled foot.

Kind regards,
Oliver
 
Back
Top