JessEm Stock Guides

Birdhunter

Member
Joined
Jun 16, 2012
Messages
4,145
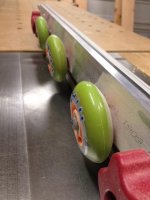
I bought a set of JessEm stock guides for my router table and liked them so much that I bought a set for my table saw.

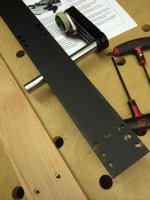
The table stock guides come with a track that is supposed to be mounted to the table saw's fence. The kit comes with a drill bit and self tapping screws.

However, I just could not bring myself to "deface" the embossed top of my Sawstop fence.

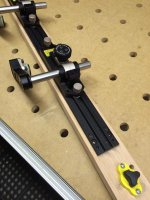
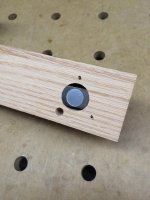
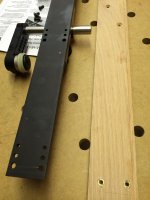
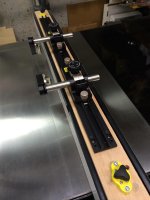
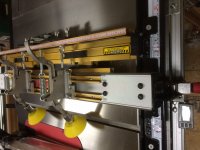
The second thing I tried (the first solution was butt ugly) was to mount the track on a 3/4" piece of oak that was just a tad narrower than the top of my fence. The track is held to the top of the fence by a Magswitch at each end.

This solution not only works well, but is also somewhat elegant in its simplicity.


Attachments

  • IMG_0168.jpg
    IMG_0168.jpg
    209.3 KB · Views: 976
Brilliant solution!  Very clean.

How well do the ones for the table saw work???

Steve
 
I like what you've done.  My Sawstop fence has become a kind of Frankenstein to support the cast iron router table top on the right side of my saw and a set of board buddies that help keep things running smoothly when cutting sheet goods
 

Attachments

  • photo.JPG
    photo.JPG
    558.8 KB · Views: 658
Any idea when those Jessem TS stock guides came out on the market?

I think I might get a set.
 
They were released in the past couple of months.  There have been a few discussions on them and the router guides on the forum.

Search Jessum guides and you can find the threads.
 
I have tried the table saw stock guides twice and they work well as do the router table guides..... Excellently in fact.

I'll post a photo of the underside of the supplied track Sunday, but I'm curious as to why you want to see it.

I used 4 1/4-20 threaded inserts in the oak board for fastening the track. JessEm included 4 bolts that went into the threaded inserts.
 
Birdhunter said:
I have tried the table saw stock guides twice and they work well as do the router table guides..... Excellently in fact.

I'll post a photo of the underside of the supplied track Sunday, but I'm curious as to why you want to see it.

I used 4 1/4-20 threaded inserts in the oak board for fastening the track. JessEm included 4 bolts that went into the threaded inserts.
\

I have the same saw and have never used the mag switches in jig building. Just trying to see how to build it.

Thanks,
Frank
 
I'll post some pictures now that I understand your issue. Fundamentally, you drill either a 30mm hole or a 40mm hole through a 3/4 inch board depending on the size of the Magswitch. The "ears" on the Magswitch accommodate screws to fasten the Magswitch to the board.

I've made 5-6 jigs using Magswitches. Being able to attach a stop or a feather board anywhere on a table saw or a bandsaw leads to a lot of neat ideas.
 
grrrr. I've been waiting for them to offer the pieces individually as stated in the advertisement since I don't need mounting brackets and been told in a few weeks multiple times now. Hope someone from Jessem sees this post, hehe
 
Brilliant idea about attaching it to a 3/4" board.
I just installed my set this morning.  I was apprehensive about drilling into my fence too, but I took the plunge.  If I would have seen your post earlier, I'm sure I would have copied your approach.
That said, now that I have mine installed, I'm pretty happy them on day 1. :)
 
Here are the photos I promised.

Assembly off Sawstop. Then close up of bottom of Magswitch. Then two shots of underside of supplied track.


Attachments

  • Dismounted.jpg
    Dismounted.jpg
    254.2 KB · Views: 607
  • Magswitch.jpg
    Magswitch.jpg
    216.1 KB · Views: 558
  • Track 1.jpg
    Track 1.jpg
    261.8 KB · Views: 547
  • Track 2.jpg
    Track 2.jpg
    255.1 KB · Views: 476
This is one area where my Grizzly has you beat.  I have no problem drilling holes in my fence!  Seriously though, your solution is better than screwing it down.

I'd seen the router table solution but I didn't realize Jessem had a solution for the table saw.  I went to the site and watched the video.  Awesome fixture.

One thing concerns me though.  Frankly it looks clumsy a little clumsy on rips where there is no room to the left of the guides for a push stick.  Looks like you have to stop the motion to lift and reengage your push stick.  Since most of my important ripping is for rails and stiles less than 2 1/2" it could be a problem for me.  Currently, if I stop a piece in progress I'm likely to get a little swirl.  On the other hand, with the board held against the fence by the guide maybe it would never be a problem.  What has your experience been so far?
 
I can get the guide rollers pretty close to the fence but I have not yet cut pieces less than about 3".

A trick I use on narrow cuts is to tape the stock piece to another board to give me more room for a push stick.
 
I saw these and thought about it but then decided to make my own version. The JessEm are easy to adjust from the looks. I used inline skate wheels I tapped at an angle to attach to an aluminum plate which has holes for height adjustment to my 20/80 home made fence. the narrowest strips which I can cut and they still hold down is about 3/4" but there is no room for a push stick at the narrow to the inside.
 

Attachments

  • photo 1.JPG
    photo 1.JPG
    35.6 KB · Views: 446
  • photo 2.JPG
    photo 2.JPG
    34 KB · Views: 468
One thing to consider if you are making your own is that the board buddies, and I believe the JessEm guides, use one way bearings so the wheels only rotate in one direction.  This helps prevent kickback. 
 
jbasen said:
One thing to consider if you are making your own is that the board buddies, and I believe the JessEm guides, use one way bearings so the wheels only rotate in one direction.  This helps prevent kickback. 

I have enough downward pressure that the boards don't slip back. I have never had a piece slip back or kick back. I do use my roller  hold down with the MJ micro splitter which helps keep wood pushes away from the blade and with my wheels at an angle also keep the wood pressure off the blade and toward the fence which keeps the wood from kicking back. It's quite effective. I use to have this as a clamp on version before I built my fence.
 
Back
Top