Birdhunter
Member
- Joined
- Jun 16, 2012
- Messages
- 4,111
I recently made two coffee tables out of some highly figured walnut. The tables were 36" by 36". I milled the wood on my 8" Powermatic jointer and a Powermatic thicknesser.
Whe I was gluing up the tops and the lower levels, I noticed unsightly gaps in the middle of the boards which averaged 6" wide. I ran the boards back through the jointer and still got the gaps. I used my SawStop table saw and got perfect joints.
The boards that went through the jointer had a slight bow where they were a few thousandths thiner in the middle than at the ends. I knew I had a jointer issue.
I watched a video by the Wood Whisperer. He advised getting a 6' rule from Lee Valley to do the adjustments. Not available i the USA. Bought a Starrett 48" rule from Highland Woodworking. Very expensive. He also advised not touching the outfeed table and doing all adjustments on the indeed table.
I watched a number of other videos, but the Wood Whisperer was best for me. All the videos showed using feeler gages.
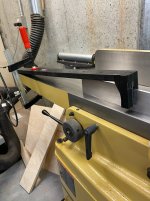
I rigged up the 48" straight edge and it showed the indeed table was high at the end forest from the cutter. I didn't
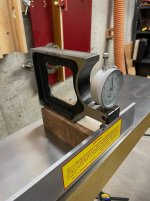
like using feeler gages so rigged up a way to use a dial indicator.
I read and reread the Powermatic manual 4-5 times (slow learner) and started making adjustments. The unit has 4 cams, one at each corner of the indeed table. Adjusting one affects the other 3 so the process has a lot of trial and error (mostly error).
After about 3 hours, I got the indeed table coplanar with the outfeed table within 1 thousandths at each corner. I think the use of a dial indicator works better than feelers because you can watch the effect of moving the cams as you move them.
I have included two pictures of the aids I made as I did't see them in any videos.
Whe I was gluing up the tops and the lower levels, I noticed unsightly gaps in the middle of the boards which averaged 6" wide. I ran the boards back through the jointer and still got the gaps. I used my SawStop table saw and got perfect joints.
The boards that went through the jointer had a slight bow where they were a few thousandths thiner in the middle than at the ends. I knew I had a jointer issue.
I watched a video by the Wood Whisperer. He advised getting a 6' rule from Lee Valley to do the adjustments. Not available i the USA. Bought a Starrett 48" rule from Highland Woodworking. Very expensive. He also advised not touching the outfeed table and doing all adjustments on the indeed table.
I watched a number of other videos, but the Wood Whisperer was best for me. All the videos showed using feeler gages.
I rigged up the 48" straight edge and it showed the indeed table was high at the end forest from the cutter. I didn't
like using feeler gages so rigged up a way to use a dial indicator.
I read and reread the Powermatic manual 4-5 times (slow learner) and started making adjustments. The unit has 4 cams, one at each corner of the indeed table. Adjusting one affects the other 3 so the process has a lot of trial and error (mostly error).
After about 3 hours, I got the indeed table coplanar with the outfeed table within 1 thousandths at each corner. I think the use of a dial indicator works better than feelers because you can watch the effect of moving the cams as you move them.
I have included two pictures of the aids I made as I did't see them in any videos.