Extending [member=45813]JimD[/member] 's argument. Perhaps you should look into see that you do not have excessive play between the saw and the track, There are these 2 green cams on the base of the saw that can increase or decrease the slop between the saw and the track.
You are using an out of date browser. It may not display this or other websites correctly.
You should upgrade or use an alternative browser.
You should upgrade or use an alternative browser.
Jointing using track saws
- Thread starter Haugummobelsnekkeri
- Start date
Personally I think you are expecting to much from what is basically a hand held circular saw. If the wood is to long for the jointer get the hand plane out. The result you are looking for will possibly only come from a table saw and maybe not even then.
semenza
Member
Cut both boards together splitting the single cut / kerf between them. You will get an identical match.
Seth
Seth
tjbnwi
Member
- Joined
- May 12, 2008
- Messages
- 7,381
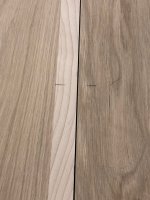
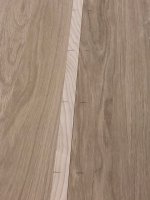
This top came to the shop from a large millwork company ready for finish and assembly. They were not close to getting it right.
We placed the slabs next to each other, set the rail so the blade would cut each side (mirror cut). As you can see, the cut solved the issue.
Dominios, finish, field assembled, finished product.
I've never had a problem with the entry/exit of a cut being off.
Tom
We placed the slabs next to each other, set the rail so the blade would cut each side (mirror cut). As you can see, the cut solved the issue.
Dominios, finish, field assembled, finished product.
I've never had a problem with the entry/exit of a cut being off.
Tom
Attachments


Mike Goetzke
Member
- Joined
- Jul 12, 2008
- Messages
- 1,208
As others have mentioned make sure to push the saw completely through the cut and don't retract the saw while it's running.
I've been using track saws for probably close to 25 years now. Converted to Festool/Makita plunge saws about a year ago. Couple weekends ago I was trimming down a couple of table top glue-up for my son and he noticed a slight curve at exit toward the rail. We had some extra width so experimented with a couple things and found I was lifting the plunge saw before it stopped and fully exited the cut. With my non-plunge saw I would always make sure I was through the cut and let the saw sit until it stopped. Guess I got over confident with the plunge saw - lessen learned for sure.
As far as jointing with a track saw I do it all the time. I have a jointer but found it's not necessary to run the board through it after sawing.
Mike
Cheese
Member


Haugummobelsnekkeri said:Having some issues using the Festool track saws for jointing.
The material i use is 25mm++ oak. For edge jointing i prefer to use track saws with long rails, AS the boards are little too long for my jointer imo.
Problem being in the very start and end of the cut, the saw digs in a little, maybe by .5mm. When accumulating this on two boards, the ends is not jointed. Ive solved this by cutting away this part after glue up.
Ive tried both ts55 and 75, and ive used several rails - long or short. The problem shouldnt be faulty equipment. Ive tried numerous techniqes and ways of putting pressure, so it shouldnt be my technique.
The excessive rail Are supported by same widht stock, and the rail Are that much longer than the boards so that the rail cams doesnt go outside the rail.
The only thing that works is putting some sacrificial stock which the blade can saw in at end and front, but then again i found it easier just using longer boards than end product.
But this is a waste of material, and it annoys the the life out of me not getting this sorted out.
Any toughts??
First of all, thank you for posting this question and also thank you to all of the people who have made informed responses based on their experiences. The one thing I have not seen posted in this thread is a question about which blade you are using for the glue line rip cut. In my, admittedly limited, experience I have had much better luck with the 28 tooth blade on the TS 55 and the 36 tooth blade on the TS 75 (I own and use both saws). I think it was Sean who pointed out that the actual method of using these tools matters as well. If one can arrange an ergonomic approach in which you push the saw from directly behind the handle (like cutting a dovetail with a handsaw sort of), it will contribute to a better cut as you can still flex the saw body even on the track. The point about having a track long enough to accommodate starting the saw and plunging before entering the work and continuing past the end of the cut before raising and stopping the saw is a good one too. I hope your issues are solved. I have had customers who have had similar issues and we've eventually found a combination of the above mentioned solutions that seemed to work quite well. [thanks]
I have the same issue with TS 75 mounted on CMS-TS module. I have blade square to CMS module top, everything green tightened up etc, but once i rip cut board i cannot join pieces back because of beginning and end has GAPs [crying] exact same as OP, but not on track.
Basically the whole setup of TS75 is useless because it works only for construction wood cutting projects that such GAPs make no difference.
I don't buy that this is normal or I expect too much from these overpriced products, because for such price they should be calibrated from factory so we don't have to tear our hair out to just make what it is supposed to do ... i'm so disappointed with Festool [sad]
sancho57
Member
- Joined
- Jan 13, 2011
- Messages
- 6,903
[member=72436]BMG[/member]
What fence are you using and hae you adjusted it?
I had a simular issue. I spent some time with a well known FT rep and we went over the fence adjustment.
I now use the anglestop that comes with the CMS/ MFT (CMS one is longer).
First make sure the saw is mounted in the module correctly.
tighten the green rail adj jibs on the saw tight so no movement on the module plate.
take a small square. make sure the blade is square to the table and the table is flat to the CMS.
Mount the angle stop on the CMS turn the fence parallel to the blade and run it up tight against the blade.
Loosen the 2 allen head screws on the angle stop thats how you actually set the fence for repeatability.
Take a piece of paper I used a post it and place at the rear of the fence to give you about .003-.004 clearance between the fence and the rear tooth of the blade.
tighten the 2 allen head screws locking the blade in place lock everything else down then move the fence away from the blade and test your fence for repeatability. If not repeat. Once you get a repeatable fence placement take a few practice cuts.
Make sure the V groove is free of saw dust and glue etc.
Hope this helps.
Why do you think so?
It has great blade, great motor etc. Blade just needs to be square to the table and fence parallel to the blade. No need for fancy materials and adjustments etc. To make glue ready wood cuts you don't need "space technology".
I'm surprised so many people think you need 4000$ table saw to make anything precise.
Lincoln said:I really doubt you'll ever get consistent 'glue ready' cuts using a track saw in a module. I think that's asking way too much of a portable frame that holds an upside down plunge saw.
FestitaMakool
Member
I think what [member=10147]jobsworth[/member] has given is vital to set up for such extreme accuracy.
And the solution of mirroring cut with a track is also very good suggestion. When aligning wallpaper same method is used, by overlapping the wallpaper and then cut through both with a knife. You will end up with a ner perfect fit. You could use a much cheaper saw and set up. A Festool saw won’t remedy the user. Craftsmanship does make the difference. It is all about learning to use the equipment at it’s best. If you use the TS and the module you would probably even clamp the fence in order to have no movement in the cuts and between the cuts.
It’s a tall order, I have not done such cut, but following jobsworth’s suggestions make a very good start.
sancho57
Member
- Joined
- Jan 13, 2011
- Messages
- 6,903
[member=71478]FestitaMakool[/member]
Thank you. I was very frustrated with the saw in the table ready to sell it. I tried everything I knew to get it cutting good. The Festool Rep took the time to show me how to set the fence up parallel to the blade.
the Key is loosening the fence up, running it to the blade loosening those 2 allen screws setting the fence using the paper to set clearance for the rear blade.
Similar threads
- Replies
- 11
- Views
- 719
- Replies
- 0
- Views
- 80
- Replies
- 58
- Views
- 3K