So with time on my hands I decided to try to organize my MFT supplies. Got tired of hearing them clang around and having to dig thru everything.
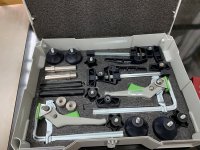
Having never used Kaizen before I was pretty happy. I was hoping to put the smaller parts on the Kaizen attached to the top but they kept falling out when I closed the lid. Poorly thought out on my part.
So..it’s pretty cramped but it works. Thinking of trying a SYS 2 for Fuji mini mite spray gun and accessories. But being a just a home workshop it’s probably over kill.
View attachment 1