I have been wanting a Kapex (and the clean shop that I knew would follow it) for several years. I finally took the leap a few months ago and bought it. I wanted to integrate it into the shop cabinets that I was about to build, so I bought it just before cabinet construction began. I wanted to incorporate a space for Dust Extractor into my plans. I am sure that many of you have done similar things and I wasn't smart enough to join FOG first and look at other's ideas. Day one.
[attachimg=1]
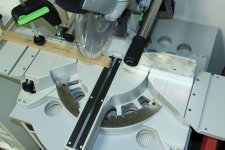
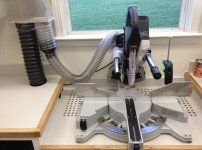
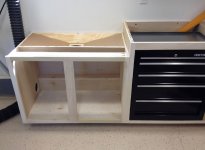
I wanted the Kapex to recess into my countertop so I had support on either side the saw for long material. Even though the Kapex with a CT33 extractor creates very little uncaptured dust, I knew some still got away– I had seen the Kapex in action at my Woodcraft store, and there was a pile of dust behind it. So I set out to incorporate a downdraft table under the Kapex in my design. So here is what I came up with.
[attachimg=2]
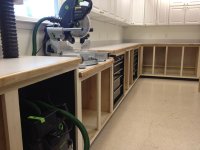
I have a ClearVue Cyclone 5hp system in my shop, but even with that power, I knew the velocity had to remain high for the downdraft table to be effective. I made the area small and shallow, concentrating on the back 2/3 of the table. I decided 3" in the center, tapering to 0" at the very edge. Why did I choose these measurements? Just sounded about right…
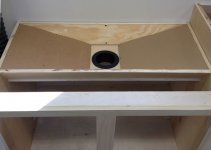
A closeup to the internals of the tabletop. I put a standard 4" port in the bottom to facilitate connection to the cyclone.
[attachimg=3]
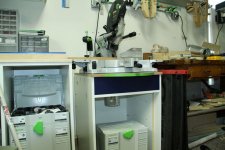
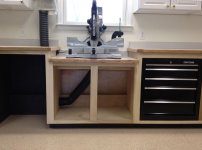
With more of the construction complete, you can see how the plumbing connects. I have a blast gate above the countertop so I can shut off the airflow when using other tools. Notice the Dust Extractor "garage" next door. I painted inside the garage black so it would just "disappear" in the front of the white cabinets. I ran wire and put an outlet in that area so the extractor cord can remain almost totally rolled up on the back of the unit while in use. No cords running across the countertop.
[attachimg=4]
I put grommets in the sidewall of the cabinet to allow for quick removal of the cord and extractor hose for use with other tools.
[attachimg=5]
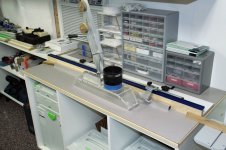
By this time I am able to use the saw in place to aid in constructing the cabinets and countertops that support it.
[attachimg=6]
So after a little use, swapping back and forth the extractor hose to other tools, I decided that was getting old. Dust collection was good, but it was a hassle. I started playing around with connecting the Kapex to the unused port on my blast gate. I had to tinker with hose sizes, but found a premium 2-1/2" hose about 24" long gave me the volume as well as the velocity to evacuate the Kapex–and it worked even better than the CT33 extractor. I mention premium hose here because I tested several sizes and lengths and used cheap hose to test with. It simply didn't work. It would collapse when the cyclone was turned on. I arrived on this hose setup and now, I no longer have to move the hose back and forth through the (now sealed) grommet. This photo was taken after I made all of the crosscuts for my door frames. Dozens of cuts and no dust left on the table! The downdraft is picking up everything that gets past the hose. I am crosscutting almost 100% dust-free!
[attachimg=7]
I used a piece of pegboard as a template to mark the holes for the downdraft tabletop. I taped it in place and misted black paint from a spray can over it. That showed up well on the white countertop. I then drilled 1/8" pilot holes, then drilled 3/8" holes and then used a countersink bit to bevel the holes–all 429 of them. Yes, 429 holes, drilled three times. That was a lot of drilling…
If I were doing this project over again, what would I change? Only one thing. I would expand the downdraft area another two inches forward on the table, maybe three rows. The dust I do see accumulating is in that area. Nothing in the back and nothing in front of that area. Otherwise, I would build it over again exactly as it is.
If you have any questions about what I did or why, feel free to ask. I will answer to the best of my ability.
[attachimg=1]
I wanted the Kapex to recess into my countertop so I had support on either side the saw for long material. Even though the Kapex with a CT33 extractor creates very little uncaptured dust, I knew some still got away– I had seen the Kapex in action at my Woodcraft store, and there was a pile of dust behind it. So I set out to incorporate a downdraft table under the Kapex in my design. So here is what I came up with.
[attachimg=2]
I have a ClearVue Cyclone 5hp system in my shop, but even with that power, I knew the velocity had to remain high for the downdraft table to be effective. I made the area small and shallow, concentrating on the back 2/3 of the table. I decided 3" in the center, tapering to 0" at the very edge. Why did I choose these measurements? Just sounded about right…
A closeup to the internals of the tabletop. I put a standard 4" port in the bottom to facilitate connection to the cyclone.
[attachimg=3]
With more of the construction complete, you can see how the plumbing connects. I have a blast gate above the countertop so I can shut off the airflow when using other tools. Notice the Dust Extractor "garage" next door. I painted inside the garage black so it would just "disappear" in the front of the white cabinets. I ran wire and put an outlet in that area so the extractor cord can remain almost totally rolled up on the back of the unit while in use. No cords running across the countertop.
[attachimg=4]
I put grommets in the sidewall of the cabinet to allow for quick removal of the cord and extractor hose for use with other tools.
[attachimg=5]
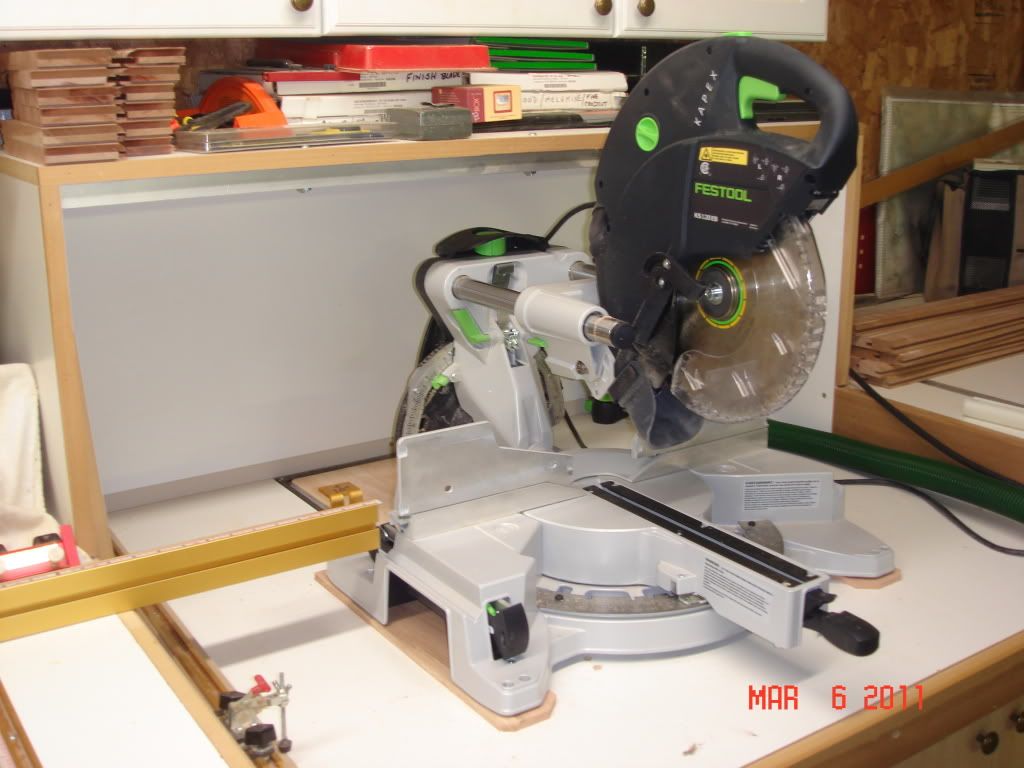
By this time I am able to use the saw in place to aid in constructing the cabinets and countertops that support it.
[attachimg=6]
So after a little use, swapping back and forth the extractor hose to other tools, I decided that was getting old. Dust collection was good, but it was a hassle. I started playing around with connecting the Kapex to the unused port on my blast gate. I had to tinker with hose sizes, but found a premium 2-1/2" hose about 24" long gave me the volume as well as the velocity to evacuate the Kapex–and it worked even better than the CT33 extractor. I mention premium hose here because I tested several sizes and lengths and used cheap hose to test with. It simply didn't work. It would collapse when the cyclone was turned on. I arrived on this hose setup and now, I no longer have to move the hose back and forth through the (now sealed) grommet. This photo was taken after I made all of the crosscuts for my door frames. Dozens of cuts and no dust left on the table! The downdraft is picking up everything that gets past the hose. I am crosscutting almost 100% dust-free!
[attachimg=7]
I used a piece of pegboard as a template to mark the holes for the downdraft tabletop. I taped it in place and misted black paint from a spray can over it. That showed up well on the white countertop. I then drilled 1/8" pilot holes, then drilled 3/8" holes and then used a countersink bit to bevel the holes–all 429 of them. Yes, 429 holes, drilled three times. That was a lot of drilling…
If I were doing this project over again, what would I change? Only one thing. I would expand the downdraft area another two inches forward on the table, maybe three rows. The dust I do see accumulating is in that area. Nothing in the back and nothing in front of that area. Otherwise, I would build it over again exactly as it is.
If you have any questions about what I did or why, feel free to ask. I will answer to the best of my ability.


") Also want to route a roundover into the port to make it a mini bellmouth. I can picture that helping alot.
Also want to route a roundover into the port to make it a mini bellmouth. I can picture that helping alot.