Kerfed ply table base finished not painted (now it is painted)

Crazyraceguy

Member
Joined
Oct 16, 2015
Messages
4,897
Two-piece table base with a cool asymmetrical look. The round column will get tile, in the field, after installation. The wider section gets that same half-round Poplar that I used a week or so ago, on a different job. This time it gets painted though. Don't know about color yet pending approval.
10" radius
 

Attachments

  • 222 table base.jpg
    222 table base.jpg
    191.6 KB · Views: 224
  • 222 table base elong.jpg
    222 table base elong.jpg
    171.4 KB · Views: 233
Very cool kerf work. Wouldn't want to push that through the table saw though! (yay, CNC...)

I'm curious about the vertical ply boards on the inside. They poke through holes in the base. Do they do the same on the other end? I presume it is to add vertical strength and take the load off the kerfed ply
 
I took a few more pics today. It makes more sense, standing up.

Yes Paul, they extend through both ends. The gap at the ends of them was a bit of a dumb moment from the engineering department. The guy who out-put the parts to the CNC, only did about half of the job. Rather than asking me, he just did part of it and waited for me to come complaining (and give him input to how I wanted it)
When I gave him my opinion, he overthought it. Those ribs are 5" wide, with a 2" tenon on the ends. There is no need for that at all. It was a waste of material, though adding some mass to a table base is not necessarily bad. The slots being deeper, rather than registering against, was the dumb part.
Having the ribs like that made a paddlewheel looking assembly. It was much easier to wrap around a stable core.
Yes, the programmable beam saw makes that kerfing simple.
 

Attachments

  • 222 table seam.jpg
    222 table seam.jpg
    187.3 KB · Views: 155
  • 222 table bases.jpg
    222 table bases.jpg
    206.1 KB · Views: 182
Interesting to see in the closer pics of the kerfs that the blade does not carve a flat bottomed kerf but is curved to make the bending area even thinner in the middle of the kerf. Probably also reduces cracking of the veneer, or maybe that is the primary reason for the tooth shape.
 
[member=297]Michael Kellough[/member] That is just an artifact of the Tripple Chip tooth shape. It gets exaggerated when bent.
The particular saw I use for this has a pretty large blade. Seems to me that it is somewhere around 400-450 mm range? 16"+ with a kerf width of 4mm.
That's why the kerfs don't close, the gap is just too much for that.
 
I wanted to make a round base like that several years ago.  The math defeated me.

I ended up making a hex.  The math was vastly simpler.

Nice job (craftsmanship and math.)
 
It looks like your tabletop mounting plates are an off-the-shelf item.  Who makes them and where can I buy them so I don't spend hours fabbing my own?
 
Crazyraceguy said:
[member=297]Michael Kellough[/member] That is just an artifact of the Tripple Chip tooth shape. It gets exaggerated when bent.
The particular saw I use for this has a pretty large blade. Seems to me that it is somewhere around 400-450 mm range? 16"+ with a kerf width of 4mm.
That's why the kerfs don't close, the gap is just too much for that.

That's a good post... [smile] ... I wondered why the kerfs weren't closing down, now I know.
Is there a formula for kerf width versus kerf depth. Obviously, the smaller the bend radius affects both the kerf width and the kerf depth. At what point does the kerf width and kerf depth start to telegraph through to the surface?

Guidelines?

As WastedP mentioned, those tabletop mounting plates are pretty cool and would minimize the fabrication time. [smile]
 
WastedP said:
It looks like your tabletop mounting plates are an off-the-shelf item.  Who makes them and where can I buy them so I don't spend hours fabbing my own?

They are indeed a commercially available item. They come from FastCap. They are called Stealth Speed Brace. They're about 1/4" thick and 12" or 16" long. You can get them up to 24", but those are thicker 3/8" I think. The 12" are less than $15

[member=44099]Cheese[/member] There are on-line calculators to figure it out. I think some of them even go to the point of exactly where the radius lands, when the kerfs close. That is most important when the end product is not supported very well. The way I use it, permanently glued to a structure, that isn't important.
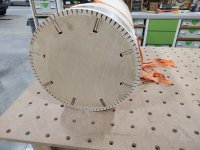
Telegraphing depends on a couple of factors, the distance between cuts and the depth of cut, for this application.
You kind of have to balance it, to some degree. The more cuts you have, obviously takes more time, but it also weakens the panel. That part only matters as far as handling, until it is attached.
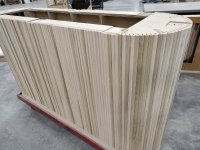
The depth matters in the tension that is left in the sheet. The more you have to force it to bend, the smoother the curve. You are stretching the outside, so it flows. The deeper the kerf, the more they act like a hinge, this causes the facets that "telegraph". When it is minimal, you can sand that away, to some degree anyway. That also has an effect on how hard it is to bend. Some of this depends on the strength of the structural core. If the core is not strong enough, the plywood will tend to straighten it, instead of the other way around.
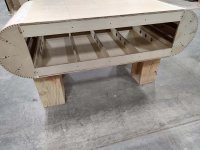
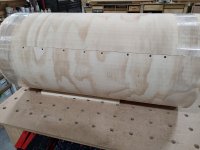
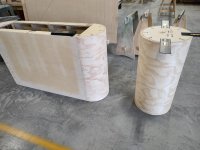
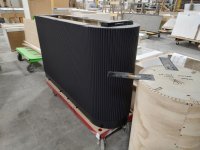
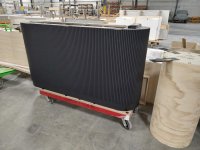
The other factor is, what happens next? (IE will it matter) It the case of this specific job, it doesn't. The round one gets tile applied to it, on site. The elongated one gets the half-round strips, just like the job from a week or so ago. It gets painted this time though. More care must be taken, when it gets laminated or veneered. Shiney makes it more obvious, so it has to be smoother.
Most of the time (for me) the radius is larger, 24" or more. Kerfs spaced at 1" and around .650"-.700" deep will wrap around that just fine. I test for wider spacing on larger radii, say over 48", just because it's faster to produce.
 
[member=58857]Crazyraceguy[/member] thanks for the detailed explanation...very interesting. I really like the support structure on the inside, that certainly prevents anything from moving.  [smile]

Seems like if the average Joe takes a project like this on 1 or 2 small sample pieces would be necessary despite the on-line calculator guides.
 
CRG,

You do a lot of curved plywood work  Is bend-able plywood an option for your type of job?
 
ChuckS said:
CRG,

You do a lot of curved plywood work  Is bend-able plywood an option for your type of job?

It is and I have used it for years, still do on occasion. The main reason I do the kerf ply is speed/simplicity.
The bending ply requires more material too. It is usually done with either 2 layers of 8mm or 3 layers of 5mm. This means gluing and stapling for each layer, being sure to keep them tight to each other. Plus, it does not bend as nicely, it goes with the grain, which is not likely to be square to the long edge. It can spiral, which means you have to cut it oversized and flush-trim to fit.
Because of that computerized saw, I could have it kerfed and applied, before anyone would ever get two layers stuck. Bonus of not having to even be present, while the saw is cutting.
I use the bending ply for un-supported things like doors. We keep a couple of sheets in stock, just in case.
 
woodferret said:
Packard said:
I wanted to make a round base like that several years ago.  The math defeated me.

I ended up making a hex.  The math was vastly simpler.

Nice job (craftsmanship and math.)

Should you ever need to again in the future...
https://www.blocklayer.com/kerf-spacingeng

Thanks for the link.  I have saved it. 

At the time, I made 6 or 8 samples to try to get a smooth radius.  But I kept getting a series of short straight lines with sharper bends at both sides.

I might have continued with the trial and error approach, but I had convinced myself that the plywood I was using was not up to the task.

The hexagon was easier and less work. 

I did consider making it with canoe (bead and cove cedar) strips, but that presented another set of issues including an arduous amount of sanding.

cedar-strip-effective-width-diagram.jpg


Those Speed Braces are pretty cool, and they come in a variety of configurations. I especially like the ones that can bolt to studs before drywalling to support shelves and the like with a very low profile.

Here's their promotional video:
 
Packard said:
I might have continued with the trial and error approach, but I had convinced myself that the plywood I was using was not up to the task.

That may have been the case. I find that the lower-end of what could be called "Shop ply" works the best. It is a fairly crude, by comparison to Baltic Birch (and the somewhat reasonable copies).
It's a Pine ply that has rather thick outside layers. Your typical veneer ply has an extremely thin "beauty layer" and that is just not so great for bending. That thin skin has very little integrity itself and the next layer is running perpendicular to it, which makes it too "soft". It acts like a hinge and you get high spots at the bend points. You can reduce that, by making the cuts closer together, but that adds to the complexity and makes the whole panel harder to handle.
 
Pics of the bead strips. Gives the appearance of tambor. I also found out the paint color is black.
I'm not so sure about that. It seems like the detail will get lost? Shadow lines and black components just don't work so well together. It gets lost and turns into a big blob and since it's a table base, it will get covered, from above.
The finishing guy is really loaded down, so it might be a while.
 

Attachments

  • 222 table base bead.jpg
    222 table base bead.jpg
    196.3 KB · Views: 111
  • 222bead moulding.jpg
    222bead moulding.jpg
    194.9 KB · Views: 109
I was surprised by how well it turned out. I was expecting the black to make it look like a huge indistinct blob. It may be partly due to the fact that it's not a true black, there is a slight yellow/gold cast to it. Once it gets covered by a tabletop, that may go away though? I still have no idea about the tile color of the other part. I think it gets delivered next week.
 

Attachments

  • 222 table base paint.jpg
    222 table base paint.jpg
    185.7 KB · Views: 86
  • 222 table base painted.jpg
    222 table base painted.jpg
    167.9 KB · Views: 82
Back
Top