Kitchen cabinet doors and drawer fronts

fignewton

Member
Joined
Jan 5, 2016
Messages
143
Whew!  Just getting around to posting this.  Our kitchen had builder-grade cabinets with standard 3/4" overlap doors and drawer fronts.  My bride had painted them in the past and they looked ok, but it wasn't what she wanted.  The face frames were Benjamin Moore dark grey with the doors, etc. a few shades lighter for a slight contrast.  After looking at options, and considering that the boxes were OK, we decided to make 27 all new doors and 14 drawer fronts.  This project took about 5 months.
For the doors, I used soft maple for rails and stiles, and MDF for panels.  I have an excellent Sommerfeld router table/cabinet with Triton router, and I used their shaker style bit set.  I've used this set a bunch, and they work super.  (You can even get an optional shim kit that lets you vary for 1/4 true panels.) We wanted to minimize the face frame exposure, so I ordered Blum Compact hinges with 1 9/16 overlays.  I had to calculate the door sizes for each opening, but the effect is what we wanted.  Did a new maple lazy susan insert, and trimmed out around the doors for it.

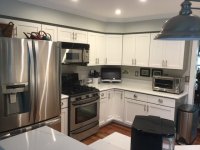
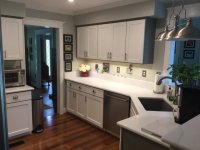
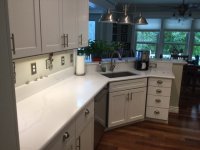
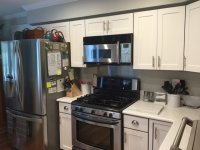
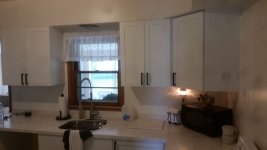
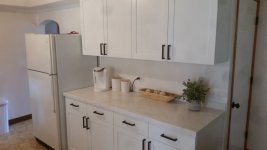
Making the doors was pretty straight-forward, but finishing was more of a learning curve.  At first, I tried to spray Sherwin Williams Emerald, but my Earlex wouldn't do the job. Then tried BM Advance, and same story.  So, after much research, I got a Fuji Platinum 4-stage system with the GLPC gun.  Much better finish, but then another breakthrough.  Reading on forums, discovered the General Finishes white pigmented poly, and that's what I used.  That stuff is spectacular.  Did white satin finish.  What made the project take so long was my finishing process.  I'd make about 6 doors at a time.  Then, prime the backs, wait a day, then shoot the poly, wait 2 days.  Then flip them over and start again.  Pics show the after, along with new countertops and sink.


Attachments

  • IMG_0316.JPG
    IMG_0316.JPG
    95.7 KB · Views: 859
  • IMG_0317.JPG
    IMG_0317.JPG
    91.6 KB · Views: 666
  • IMG_0318.JPG
    IMG_0318.JPG
    90.5 KB · Views: 679
  • IMG_0320.JPG
    IMG_0320.JPG
    97.2 KB · Views: 694
Good job, Im sure the wife is happy.  I feel your pain on the finishing issues.  It can be tough to find room to stack and dry all the doors while they are drying.  One thing I did was take some 2x4's and drilled some holes for 1/2 ENT conduit on a slight upward angle and clamp it to some HD shelving.  Im thinking I might sandwich the 2x4's permanently between the floor to ceiling cabinets I plan on building.  That way I can just pop in the conduit when needed for drying rack. 
 
I really like the contrasting cabinets and doors.  I would never have thought to do that, but it looks spectacular!  Sweet job!  [smile]

Question - how did you treat the cabinet interiors? 
 
countertops are a beautiful quartz in pure white with slight grey veining.  Sink is a Blanco granite in steel grey. Interiors of the boxes are the original natural color light oak plywood with clearcoat of some kind. 
 
Looks great!  When I want a durable white finish I use Resisthane.  I have used a bunch of it in clear too.  I get it from Hood Industries who also sell a great stain blocking primer that is very compatible.  I can do three coats in a day with my 3 stage Fuji. 
 
Great job,  one question, was it a design choice to not make the drawer fronts in the same style I see the drawer front for the sink has the same shaker style but nowhere else?
 
I spray Advance with my stage 4 HVLP sprayer.  I do have to thin it slightly with water, but it sprays out really nice.  I used to use PPG's Break-Through! but the local PPG dealer went out of business.  Break-Through! dries faster and harder than Advance.  I have also sprayed B-M's Command and that dries faster than Advance, but not as fast as Break-Through! nor as hard. 

But both Command's and Advance's satin looks better than Break-Through! and seems to be hard enough.  Try Advance with about 2 to  4 ounces of water per quart.  You will find they spray fine.

I am going the same route as you, but with slab doors.  I have a lot of work to do filling the grain on the honey oak face frames.  I planned on using 1-¼" overlay hinges on this. 

How much exposure did you leave top and bottom on the doors?
 
It's cool that this jumped back up. I just finished the first phase of a kitchen build for my daughter's house. The cabinets were built a couple of weeks ago, in pretty much the same way we would for any customer job, minus the doors, drawer fronts and the drawers themselves. CNC cut parts, edgebanded, doweled and case-clamped. After that, I built the drawers from Baltic Birch ply (tongue and dado) with exposed ply edges and Grass undermount slides. The doors are simple flat panel, made from MDF, on the router table. I sealed the edges with Varathane sanding sealer. Primed and painted with Lenmar Ultralaq, satin. Grass soft-close hinges. Corian "Sandstorm" tops. I made some temporary backsplashes from the drop, but they will probably never get used because subway tiles are going in soon.
It is very similar to the original layout. The side with the refrigerator is exactly the same size and location. The sink side is the same footprint, but left a space for a dishwasher that was not there before. The original corner had a lazysusan and nothing to the right of it. I replaced that with a blind-corner cabinet and a drawer stack next to it. This pushes the stove over a few inches and makes that corner more useful. I forgot to take a pic of it, but the blind-corner unit has a "Rev-a-shelf" lazysusan that pulls out after a quarter turn.
After she gets her new appliances and microwave/range hood, I'll be back in building something to enclose it and tie it back into the 45 degree corner upper.
It was a dramatic change in the span of about 10 hours. The old "golden oak" box-store cabinets and gold laminate countertop out and these back in. Even though I recommended against it, the floor is being done last.
 

Attachments

  • IZkitchen.jpg
    IZkitchen.jpg
    108.8 KB · Views: 269
  • IZkitchen3.jpg
    IZkitchen3.jpg
    1.2 MB · Views: 283
  • IZkitchen2.jpg
    IZkitchen2.jpg
    141.2 KB · Views: 262
Looks great!

This post and another one recently just keep pushing me in the direction of wanting to take a class or apprenticeship in cabinetmaking and trim carpentry.  Not the most convenient time with a little one on the way, unfortunately, but maybe I'll figure something out.
 
squall_line said:
Looks great!

This post and another one recently just keep pushing me in the direction of wanting to take a class or apprenticeship in cabinetmaking and trim carpentry.  Not the most convenient time with a little one on the way, unfortunately, but maybe I'll figure something out.

I learned by making simple cabinets and reading books (now I would read online).  The individual techniques are not hard to master.  Putting down a finish was the most challenging for me. 

If you can cut panels accurately the rest all seems to fall into place.  No special classes are required in my opinion.

Make an open cabinet with shelves for your garage to get going.  After you've made a few, the mystery is gone.
 
Packard said:
squall_line said:
Looks great!

This post and another one recently just keep pushing me in the direction of wanting to take a class or apprenticeship in cabinetmaking and trim carpentry.  Not the most convenient time with a little one on the way, unfortunately, but maybe I'll figure something out.

I learned by making simple cabinets and reading books (now I would read online).  The individual techniques are not hard to master.  Putting down a finish was the most challenging for me. 

If you can cut panels accurately the rest all seems to fall into place.  No special classes are required in my opinion.

Make an open cabinet with shelves for your garage to get going.  After you've made a few, the mystery is gone.

I definitely appreciate the prod to just start cutting and learning.  I'm thinking more in terms of creating a serious side hustle that eventually turns into a full time career with cabinetry and built-ins if it works out that way, but sometimes I can't see the forest for the trees...
 
Even if I planned on going into it commercially I would gain some experience on cabinets for my home.

When I started, biscuit joinery was all the rage.  Then pocket hole.  I now use a combination of dowels and pocket holes.

I have a sheet goods specific dowel jig that makes dowels just about as quick as pocket holes and cheaper and stronger.  So until the next greatest thing comes along, I am a dowel, pocket hole, Confirmat guy.
 
Packard said:
Even if I planned on going into it commercially I would gain some experience on cabinets for my home.

No doubt, that was my takeaway from your post.  I get so focused on the details of my supposed future plans that I forget that I need to move towards taking the first step which is usually "just start making sawdust already!"
 
The easiest place to start (in my opinion) is garage cabinets.  You can use melamine clad shelving for stock, so finishing is not an issue.  It is relatively inexpensive, and the garage is my least fussy environment.  You can convert open shelf units by adding doors.  If you keep them under 24" wide, you can use the 12" shelves for doors. 

Of course if you want to create face frame cabinets, the shelves are not a good option.
 
Back
Top