Kitchen Island Overhang

tiralie

Member
Joined
Jan 26, 2010
Messages
3,617
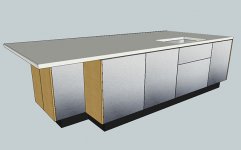
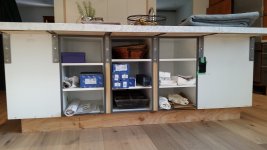
I am working on a kitchen design well actually a renovation and one of the components is this island

[attachimg=#]

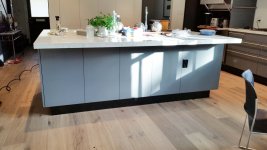
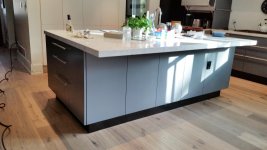
The client doesn't want to see any brackets to support the quartz top, but my supplier says anything over 12" requires a bracket. The quartz is 3/4" thick with a 1 1/2"  built up edge

Has anyone had a similar installation issue and can suggest any solutions to supporting the overhang? Other than a steel plate or maybe steel "L" bracket buried in supported plywood I can't think of a solution.

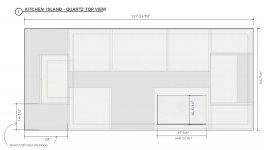
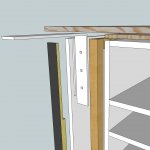
Here is a plan view to show the quartz overhang dimensions.

[attachimg=#]
 

Attachments

  • Island3D.jpg
    Island3D.jpg
    100.3 KB · Views: 2,222
  • IslandQrtzOverhang.jpg
    IslandQrtzOverhang.jpg
    47.2 KB · Views: 2,176
Woodn't It Be Neat said:
FastCap has something they call "stealth speed brace" just for this.

If the stealth speed brace isn't invisible enough for your client, hire a very small installer for the task.

Charles
 
I would want some steel under there if it was mine. I can buy 1" x 3/4" x 1/4" thick hot rolled angle, so that's probably what I'd use since your built-up edge will cover it.

Just my 3 cents worth - adjusted for inflation.
 
Tim,
I run into this situation quite often. I agree with the stone installer that extra support is needed, especially with natural quartz. I probably tend to put in more supports than needed, but I sleep well at night knowing that when aunt Bertha jumps up to sit on the counter, it won't fail.

We use 12 x 12 x 3, 3/8" steel L brackets set on solid framing. ( not just to the cabinet back or sides.) These brackets are fabricated to our own specs.

I like to set the top elbow in plane with the cabinet or wall top, but shim the bracket slightly to bring the outer end up above about an 1/8" , or so. This allows the bracket to flex just a hair when the heavy stone is set, keeping a good tight, solid full contact with the top.

I also use the same brackets and technique when setting floating cabinets.

Hope this helps, Dan
 
Dan Rush said:
Hope this helps, Dan
Dan:
Yes, perfect thanks very much.

Dan Rush said:
We use 12 x 12 x 3, 3/8" steel L brackets set on solid framing. ( not just to the cabinet back or sides.)  These brackets are fabricated to our own specs.

I am assuming that those "L" brackets are cold formed hot rolled 3/8" steel plate.
Any idea what the inside radius is?

Thanks again.

Tim
 
That's a pretty substantial overhang.

If you do the Fastcap route, note that most of their SpeedBrace system is wide/flat, but the largest size is 3/4" square and therefore not as helpful for this application.

I would probably spec a solid 3/4" frame and bracing, with angle welded to support some plywood between.
 
Woodn't It Be Neat said:
FastCap has something they call "stealth speed brace" just for this.
Thanks.

CharlesWilson said:
If the stealth speed brace isn't invisible enough for your client, hire a very small installer for the task.

LOL, a spry, green, gregarious Irish gentleman is currently holding it up, he is quite loquacious....the homeowner thinks he's cute.
 
wow said:
I would want some steel under there if it was mine. I can buy 1" x 3/4" x 1/4" thick hot rolled angle, so that's probably what I'd use since your built-up edge will cover it.

Thanks, I will have my fabricator make some 18", 3/8" thick  steel "L" brackets and as Dan kindly indicated, attach them to a short framed supported wall fixed to joists.
Tim
 
I make a 1" thick wood frame to support my solid surface tops with large over hangs.  The frame runs the full width of the top & is fastened down to the cabinets.
I do this if I am using supports or not.

Wood will not work for your job, because you only have 3/4" to work with.
The same thing could be done with a welded up steel frame made up of 3/4" X 3" or wider steel tubing.
Make it about 4 feet long & a little narrower than the space between the built up edges. Attach the frame to the cabinets.

Below is a picture of my kitchen top.


Attachments

  • DSCF2522.JPG
    DSCF2522.JPG
    480.7 KB · Views: 730
Tim Raleigh said:
Dan Rush said:
Hope this helps, Dan
Dan:
Yes, perfect thanks very much.

Dan Rush said:
We use 12 x 12 x 3, 3/8" steel L brackets set on solid framing. ( not just to the cabinet back or sides.)  These brackets are fabricated to our own specs.

I am assuming that those "L" brackets are cold formed hot rolled 3/8" steel plate.
Any idea what the inside radius is?

Thanks again.

Tim
the fabricator really does a nice job.  Maybe a 1/4-3/8" inside radius. It's tight enough that when set inside a face frame, I have to shave just a bit for a flush fit.
 
I have finally a little time in between waiting for paint to dry to post an update to this thread.
The island went through some design changes and the overhang changed to 10" along a 7.5' foot length. Because the top is large and weighs a fair amount (800 lbs) I wanted to make sure there was enough support on the length of this overhang. While the installer felt it wasn't necessary I went ahead and put some brackets every 18" on the underside of the island. Because of timing I bought some Freedom hidden brackets from Federal Brace.

The brackets will be/have been covered with panels and doors.

[attachimg=1]

[attachimg=2]
 

Attachments

  • IslandBrackets.jpg
    IslandBrackets.jpg
    685.3 KB · Views: 4,653
  • IslandBracket2.jpg
    IslandBracket2.jpg
    676.5 KB · Views: 3,452
I like your solution, Tim.  3/4" is pretty thin for any stone with over 12" free overhang.  The built up edge does not add as much strength as some might think. 

As you noted, sometimes, a heavy person might decide to sit on that overhanging stone.  Not very comfortable when stone lands of back of leg and body lands on the pile of stone and bone.  They tend to get a little grumpy when that happens.  Even a heavy sack of potatoes could be cause of an unhappy situation when sack and stone land on toes.
Tinker
 
Tim, those are huge brackets. Great job so far on the island. I've been waiting to see how you were going to do the large overhang with no visible brackets. Looking forward to see the finished project.
Cheers,
 
Tyler Ernsberger said:
Go to www.countertopbracket.com they have a big selection of hidden brackets.

The counter top in the add for Tyler's site seems to be a lot thicker.  It is also granite.  A much stronger and more stable material than quartz.  Quartz can break off if you look at it wrong way.
I think your brackets in both individual stability as well as in extra numbers will be strong and stable.  you have also shortened up on the overhang which should give you lots of great sleep nites when finished. 
As extra precaution, I think some wood will be hiding the vertical portions of the brackets.  Keep the edges of the wood, no matter how thin, as tight against the undersides as possible.  End grain if apt all possible.  Wood runs horizontal at the top, as thick as you can get away with.  But, I always had a tendency to go overboard with support in situates as you are showing.  i never did any horizontal overhang with quartz but have done a couple of fireplace faces. 
Actually, the last fireplace facing with quarried flat pieces was a verte antique marble.  So far, that has gotten me into just over 50 years of trouble.  That job led to getting married almost 49 years ago. (hey, that must have all been condensed.  I'm only 39 you know)
Tinker
 
Thanks Wayne!
Lots has gone wrong on this clients renovation, including severing ligaments in her ankle on an improperly installed window well, she doesn't need her Quartz top cracked.
Tim
 
Here are some pics from my cell phone of the (almost) completed island. The island looks bluer than in reality. It is painted with ML Campbell - Agualente tinted to BM Trout gre(a)y.

This is the side with the brackets. They are hidden behind panels between doors. I will take a picture and post it with the doors open later.

[attachimg=1]

This is the side. The far side is a fixed panel, and the near panel is a push to open door.

[attachimg=2]

This is the front where the sink and dishwasher are located.

[attachimg=3]
 

Attachments

  • IslandCompleteBack.jpg
    IslandCompleteBack.jpg
    932.9 KB · Views: 4,060
  • IslandComplete3-4.jpg
    IslandComplete3-4.jpg
    933.9 KB · Views: 4,910
  • IslandCompleteFront3-4.jpg
    IslandCompleteFront3-4.jpg
    960.6 KB · Views: 3,096
I like the finished project.  I hope you are close enough with the customer that you can get back to observe in a couple of years just for your own satisfaction to see how the whole thing held up.  Of course, i am sure that if any crack does show up, you will hear about it.  You had quite a large problem to solve and i like the way you handled the solutions.  Of especial note for my outlook was that you made the overhang along only one side.  In the original drawing, it appeared the overhang was ging to happen in three directions. With quartz, with grain and cracking potential in irregular pattern, potential for breakage would have been astronomical.  I think your bracing was the best solution.

How did you finish off the brackets. You said the countertop was 3/4" thick with a 3" edging.  It appears you put 3/4" panels between the brackets that ended up flush with the bracket thickness.  Were the horizontal portions of the brackets 3/4" thick? or were the top edges of the brackets finned the extra 3/8" for added strength? (I think it was mentioned in one of the posts that the brackets were 3/8" steel)

Tinker
 
Tinker said:
I like the finished project.

Thanks.
Tinker said:
Of especial note for my outlook was that you made the overhang along only one side.  In the original drawing, it appeared the overhang was going to happen in three directions. With quartz, with grain and cracking potential in irregular pattern, potential for breakage would have been astronomical.  I think your bracing was the best solution.

Thanks again, but my clients change of mind made this turn out for the better. This was version 8 of the design. and is turned 90 degrees from the first design.
It works better in the room.

Tinker said:
How did you finish off the brackets. You said the countertop was 3/4" thick with a 3" edging.  It appears you put 3/4" panels between the brackets that ended up flush with the bracket thickness.  Were the horizontal portions of the brackets 3/4" thick? or were the top edges of the brackets finned the extra 3/8" for added strength? (I think it was mentioned in one of the posts that the brackets were 3/8" steel)

Thanks for your questions, I think a picture will save a bunch of words there are many parts.

Here's an exploded version of one of the middle bracket assemblies.

[attachimg=1]

The brackets are 1/4" thick 2" wide and each leg is 10" long.  For the three end brackets, I bolted those to the side of the melamine boxes and then routed out a 2"x10" dado 3/8" deep where each bracket was and then fixed those panels to the side of the carcass. For the remaining two, in the middle I wanted to have extra support so I ripped and planed some 2" x 10" fir to a uniform 1.5" wide x 1.5" and made a frame which I then sandwiched between the boxes. I routed a 1/4" groove vertically down the side of each carcass to catch the bracket. The frame was short the thickness of a 3/4" cover plate which I then dadoed to cover the brackets.
The quartz top was 3/4" thick with a 2" mitered edge.
I built up the top 1.5" with a layer of half inch of plywood, and a 3/4" ply. The 1/2" ply was notched out to leave a space for the bracket to support the 3/4" and then the counter went over that.
Hope that explains it. It sounds more complicated than it is.
Let me know if you have other questions.
 

Attachments

  • Island9Explode.jpg
    Island9Explode.jpg
    227.5 KB · Views: 2,480
Back
Top