iamnothim
Member
- Joined
- Feb 5, 2014
- Messages
- 1,436
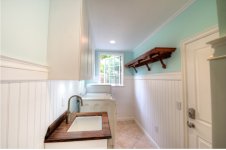
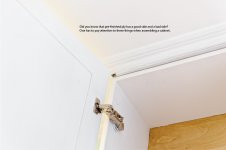
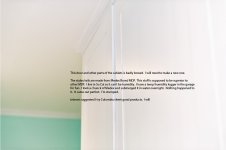
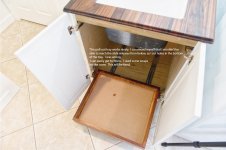
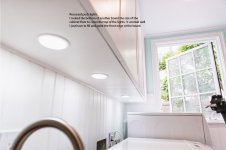
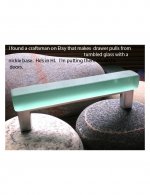
Except for a moderately long punch list, I finished my laundry room make-over. (I wish I had a before picture)
Since we are on FOG, and FOG is all about learning and sharing I thought I’d post annotated pictures of what’s behind the
pig’s lipstick.
They illustrate the difference between the Pros and the Posers (me). The good news is my wife loves it.
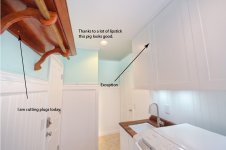
EDIT: A couple of door screw ups not pictured. Because I have an LR32 I convinced myself that the door cups needed to be drilled at a 32mm offset. If I paid attention to erock's great video and the Blum spec sheet I would know that's not the case. (Can't remember the correct LR32 stop setting at the moment) To fix this I added a trim strip around the face of the cabinet.
Continuing on the warped sheet goods theme.... The 155 deg Blum hinge settings would be maxed in one direction for one door and in the other direction for the companion door. Thankfully Blum makes a hinge plate shim. This did not work for another set of doors. I had to rotate one door 180 and drill cups on the other side. Thankfully they make Bondo.
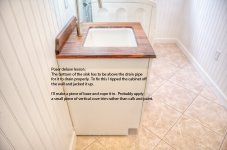
EDIT EDIT: The counter top is made from Tiger Rosewood. I initially started to put a Epifanes marine coating on but I didn't like it. I ended up using Danish Oil because I figured I could easily apply more when necessary. The wood top is an experiment. Time will tell.
[attachimg=1]
[attachimg=2]
[attachimg=3]
[attachimg=4]
[attachimg=5]
[attachimg=6]
[attachimg=7]
[attachimg=8]
[attachimg=9]
[attachimg=10]
[attachimg=11]
[attachimg=12]
[attachimg=13]
Since we are on FOG, and FOG is all about learning and sharing I thought I’d post annotated pictures of what’s behind the
pig’s lipstick.
They illustrate the difference between the Pros and the Posers (me). The good news is my wife loves it.
EDIT: A couple of door screw ups not pictured. Because I have an LR32 I convinced myself that the door cups needed to be drilled at a 32mm offset. If I paid attention to erock's great video and the Blum spec sheet I would know that's not the case. (Can't remember the correct LR32 stop setting at the moment) To fix this I added a trim strip around the face of the cabinet.
Continuing on the warped sheet goods theme.... The 155 deg Blum hinge settings would be maxed in one direction for one door and in the other direction for the companion door. Thankfully Blum makes a hinge plate shim. This did not work for another set of doors. I had to rotate one door 180 and drill cups on the other side. Thankfully they make Bondo.
EDIT EDIT: The counter top is made from Tiger Rosewood. I initially started to put a Epifanes marine coating on but I didn't like it. I ended up using Danish Oil because I figured I could easily apply more when necessary. The wood top is an experiment. Time will tell.
[attachimg=1]
[attachimg=2]
[attachimg=3]
[attachimg=4]
[attachimg=5]
[attachimg=6]
[attachimg=7]
[attachimg=8]
[attachimg=9]
[attachimg=10]
[attachimg=11]
[attachimg=12]
[attachimg=13]
Attachments
-
 Laundry-1.jpg132.1 KB · Views: 2,103
 -
 Laundry-2.jpg100.7 KB · Views: 1,906
 -
 Laundry-3.jpg87.1 KB · Views: 2,090
 -
 Laundry-4.jpg165.5 KB · Views: 2,061
 -
 Laundry-5.jpg160.8 KB · Views: 2,062
 -
 Laundry-6.jpg124.9 KB · Views: 2,072
 -
 Laundry-7.jpg123.2 KB · Views: 2,052
 -
 Laundry-8.jpg138.5 KB · Views: 2,056
 -
 Laundry-9.jpg267.4 KB · Views: 2,034
 -
 Laundry-10.jpg216 KB · Views: 2,045
 -
 Laundry-11.jpg242.2 KB · Views: 1,887
 -
 Laundry-12.jpg257.4 KB · Views: 2,051
 -
 pulls.jpg124.9 KB · Views: 2,057