For those who have never used a Leigh dovetail jig, they are great for production work once dialed in. The YouTube videos make it look easy, but I was struggling with it for a small project using walnut, cherry, and maple panels. I wasted so much time chasing the setup problems and could have hand cut the dovetails in a small fraction of the time I spent on the Leigh jig and OF1400.
Cutting half blind dovetails with the Leigh jig uses only one cutter and the depth of cut is the same for the pin and tail boards. The art of setting the cutter depth is finding the sweet spot where the joint is tight. Leigh has a recommended depth of cut for each of the four cutters used for half blind dovetails, and the cutter choice depends on the thickness of the pin board. Small adjustments are made in the cutter projection to compensate for loose or tight joints. Once the joint is tight on the test cut, the settings are not changed for the rest of the project.
In my case, the pin and tail boards are both 18mm, but they can be different thicknesses. The router must be fitted with the 7/16-inch outer diameter guide bushing. The OF 1400 (and OF 2200) use a snap-in bushing plates and are supposed to be factory set so the center of the bushing guide is over the center of the arbor. This sounds great, if it works, but there is no way for the user to adjust the guide bushing using a centering mandrel.
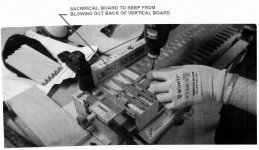
I started with the recommended depth of cut of 13mm for the router bit I was using, and cut a pin and tail board using some offcuts I saved from the milling process. This produced a joint that was too loose with a 1.5mm gap in the joint. I did not expect such a large gap, but followed the directions and extended the bit by the correct amount to close up the gaps. I made a second set of cuts on a fresh edge of the offcuts. These were also too loose by about the same amount as the first set of cuts and I was nearly at the point of no longer having a half blind dovetail.
Since I didn't want to use up my precious walnut offcuts, I milled a four-foot length of 3/4-inch thick poplar to 18mm thick. Then I cut it in half lengthwise so I had a pair of two-foot long practice pin and tail boards. No matter what changes I made to the cutter depth, I could not reduce the gaps in the joint. After each failed attempt, I cut off the pins and tails so I had a fresh edge for the next attempt. I divided my time to reading the well-written manual for the Leigh jig (it really is well-written) and watching lots of YouTube videos to see where I was failing. I was doing everything correct, yet the joints would not close up. To make matters worse, most of the workers in the videos were using the OF 1400. I was almost at the point of hauling the jig and router to the nearby river and letting them become a new artificial reef project.
Near the end of the second day, I decided to reset everything to the Leigh recommendations and make another trial run. That is where I noticed the problem. The snap-in guide bushing adapter plate in the OF 1400 was moving side to side as I moved the router through the guide fingers of the jig. I unplugged the router, turned it upside down on the workbench, and gave the adapter plate a wiggle. Sure enough, there was movement of the plate in the base of the router. This is why the joints were always loose no matter what I did with the router bit depth.
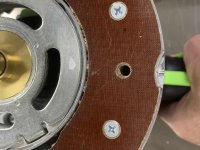
After a lot of research on the Internet and here, I discovered this is a well-documented failing of both the OF 1400 and the OF 2200. This problem does not exist with the OF 1010 because the guide bushings are attached to the base by screws and the mounting holes are large enough to allow for adjustment when used with a centering mandrel.
To demonstrate the movement, here is a very short YouTube video from ten years ago showing the amount of movement of the guide bushing adapter plate on the OF 1400. This is not my video, but my OF 1400 has the same amount of movement.
I didn't have the adapter plate for my OF 1010, so I ordered two and waited. With shipping from Austria, the total cost was about €20. When they arrived two days later, I attached the 7/16-inch guide bushing to one of the plates, centered the bushing to the arbor, set the depth of cut to 13mm, and made another test run. I think I heard angels singing in the background. The fit was almost perfect, but there was a 0.4mm gap in the joint (I used a feeler gauge to check). I made a 0.4mm adjustment to the cutting depth and made another test cut on fresh edges of the boards. It was a perfect fit. I made two more sets of joints to make sure the second test cut was not a fluke, and they were identical. Success! The total time with the OF 1010 to complete the trial runs and make two proof of concept runs was about 30 minutes. I spent the better part of two days chasing shadows with the OF 1400.
Bottom line: I had never used guide bushings with the OF 1400 until I bought the Leigh jig, and I bought the OF1400 solely because of the Leigh jig. If you need to make precise cuts using guide bushings, I would NOT recommend the OF 1400 or OF 2200, as they are not fit for purpose in this operation. Otherwise, they are great routers for use with fence guides or guide rails, or bearing guided cutters, but don't rely on them when using guide bushings. I cannot explain why others in YouTube land have great success using the OF1400 with their Leigh jigs, but it didn't work for me.
Since I also use the Vacuum and Router Support (VRS) rail with my jig, dust collection through the router is not required. The vacuum hose connects to the sliding tray on the VRS and is great. If I had access to a fixed base router with a fine depth adjustment, I would use it instead of the Festool routers. Unfortunately, all of the routers I have found in the 1400W range have a plunge base.