Living Room Entertainment Center

ear3

Member
Joined
Jul 24, 2014
Messages
4,341
I had another thread describing certain parts of the build because I had to do some trickery with magnets to create a removable panel:http://festoolownersgroup.com/various-woodworking-crafts-topics/fun-with-magnets/

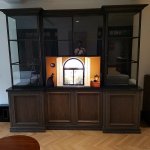
But since the project is finished, thought I'd post pictures of the completed unit here, showing the Entertainment center in action.

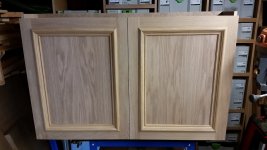
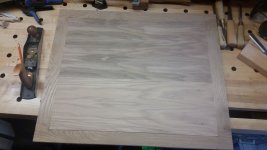
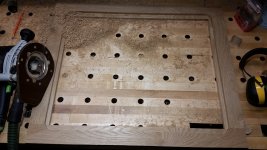
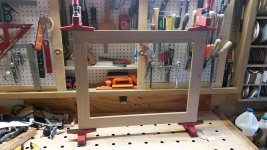
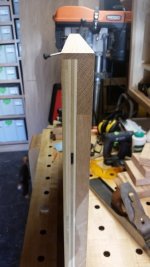
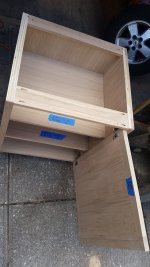
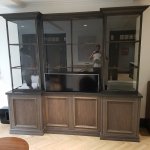
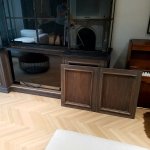
In brief, I was commissioned to build the base cabinet assembly out of white oak (plywood for panels and cabinet carcasse) for this entertainment center.  The tricky part was fulfilling the request to have the front panel be removable so they could easily install the lift mechanism for the TV.  What I ended up doing is embedding rare earth magnets underneath the hardwood edges I applied to the ply of the carcasse body in the center, and put in corresponding magnets on the panel.  The magnet idea worked out fantastically -- the panel is very secure when mounted (I put thin wood strips on the back of the panel at the bottom so these catch the panel against the carcasse bottom and prevent it from sliding down), but can easily be popped off by pulling it towards oneself.

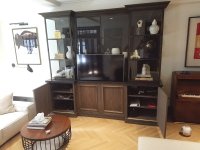
I did shelfpins on the left and right units with the LR32 for adjustable shelving.

I used prefab inset panel moulding for the doors, sides and the front panel.  The base moulding I milled myself.  I also created a faux-double door look by cutting a 1/4" groove in the center panel with the tracksaw.

Cabinet is finished with Rubio Monocoat fumed solution.

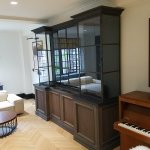
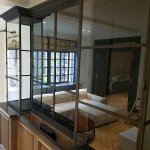
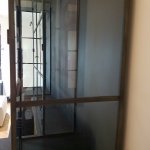
The counter and the top were supplied by the designer.  The top is a thin metal frame inset with glass, and even the crown moulding is made out of metal.

The base cabinets, which were made in three separate units, rests on a 4" plywood platform to level everything out.

Pictures come from two separate days, which is why they show the top cabinets as both empty and loaded with stuff.
 

Attachments

  • Living Room Cabinet - Front view, closed door.jpg
    Living Room Cabinet - Front view, closed door.jpg
    351.3 KB · Views: 482
  • Living Room Cabinet - Open doors.jpg
    Living Room Cabinet - Open doors.jpg
    204.3 KB · Views: 427
  • Living Room Cabinet - TV lift going down.jpg
    Living Room Cabinet - TV lift going down.jpg
    297.9 KB · Views: 436
  • Living Room Cabinet - Removable Panel.jpg
    Living Room Cabinet - Removable Panel.jpg
    349.4 KB · Views: 349
  • Living Room Cabinet - Side View.jpg
    Living Room Cabinet - Side View.jpg
    364 KB · Views: 412
  • Living Room Cabinet - Mirrored glass.jpg
    Living Room Cabinet - Mirrored glass.jpg
    320.7 KB · Views: 347
  • Living Room Cabinet - Glass see-through.jpg
    Living Room Cabinet - Glass see-through.jpg
    286.5 KB · Views: 302
Very nice. 

Have questions about the doors?

Can you share any details about the construction and design?
What type of wood? (looks like Walnut). 
How did you do the decorative elements of the doors/
 
Hi,

One of the nicest solutions for a hidden TV entertainment center I have seen in a long time! Great design!

Question: Is there going to be some sort of cover for when the TV is all the way down?

Kind regards,
Oliver
 
[member=43773]Neal W[/member] It's white oak -- the graying effect is a function of the Rubio fuming solution, which interacts with the tannins in the wood to get that color (sort of like an extreme version of a vinegar and steel wool solution):http://www.monocoat.us/Fumed/

The doors are pretty straightforward in their design and constrcution.  Frame memebrs made from solid white oak, which were dominoed together.  Then used a rabbeting bit to excavate a rabbet in the back for a 1/2" piece of plywood to sit in.  Then took the inset panel moulding, which requires a 1/2" lip/step between the frame members and panel (which is why I installed the pannel with the rabbet, as opposed to using a thinner panel trapped in a groove/dado along the inside edge of the frame members) and secured it with 23 gauge pins and glue around the front.  Pictures below show the process.

[member=61712]six-point socket II[/member] No cover.  The TV lift is set to automatically ascend/descend every time it is turned on/off, so having a cover was deemed to be too much of a hassle.


Attachments

  • Door - Panel moulding 2.jpg
    Door - Panel moulding 2.jpg
    155.1 KB · Views: 298
  • Door - Plywood.jpg
    Door - Plywood.jpg
    137.4 KB · Views: 292
  • Door - Rabbet.jpg
    Door - Rabbet.jpg
    219.5 KB · Views: 305
  • Door - glue up.jpg
    Door - glue up.jpg
    213.4 KB · Views: 303
Real nice job Edward...a couple of questions:

How deep is the saw cut for the double panel look? I'm needing to do the same thing (just a bit wider) on some Ambrosia maple drawer fronts I'm working on as we speak.

Are the shelves ply or solid stock?

If ply, are they veneer edge banded or did you glue solid stock to the front edge?
 
Excellent.

When I saw the pic with the TV up, it was jarring against the light design of the upper case.  Then I saw it half way up and had the "I get it now" moment.  Very nice work.

How is the Rubio Monocoat Fumed solution applied, and how does it work to get the fumed look?
 
[member=44099]Cheese[/member] The groove is only 1/4", surprisingly enough.  I might have made it a bit deeper if the wood remained untreated, but the graying of the wood through the fuming process provided more than enough dark contrast to get the proper effect.

The shelves are ply -- side cabinets are essentially 24x24, so solid wood would have been excessive.  I almost always use a solid hardwood cap on shelving.  I don't have any good pics of the shelves, but here's one of the cabinet sides.  The hardwood cap allowed me to essentially match the grain along the side so there was no sharp transition between it and the frame members.

[member=61231]HarveyWildes[/member] With a sprayer.  You can use a brush, but that raises the chance of contamination and blotching.  The stuff is pretty finnicky.  I actuallyy had to redo the moulding and be more conscientious about grain selection.  I used a few face grain pieces on the first batch, and so ended up getting some blotchiness.  The second batch I tried to use rift grain or something close to it.

[member=44540]simo.ahtola@netikka.fi[/member] The designer supplied the mechanism, so I forget the brand name.  But I can find out if you want.
 

Attachments

  • Edge Banding.jpg
    Edge Banding.jpg
    158.4 KB · Views: 310
  • Edge banding side view.jpg
    Edge banding side view.jpg
    153 KB · Views: 273
  • Interior shelves.jpg
    Interior shelves.jpg
    231.7 KB · Views: 303
My comments are not meant as criticism of your work, but rather for discussion.  I really like the delicate metal frames for the upper cabinets.  However, those delicate metal frames kinda make the base cabinets look a bit chunky.  Right off I'm not sure how I would have solved that design challenge.  I might have looked at narrower rails and stiles.  I'd also think about nixing panel mold, it adds more thickness, or heaviness to the door's look.  I'd possibly add a fairly narrow face frame, maybe inset the doors.  Thoughts?           
 
That's a good observation [member=1146]Brice Burrell[/member] and I actually agree with you.  I did end up slimming  down the cabinet sides to 1 1/2" (they were supposed to be 2" in the original design), and I actually suggested doing a face frame to create some balance at the top and bottom.  The designer ultimately didn't want to go the face frame route, however.  The problem was the center panel -- because of the way the TV and lift had to be installed, he didn't want to add a cross piece at the top of that center cabinet, and so it could not have a face frame.  Thus, putting a face frame on the left and right units would have given them a different look than the center unit, whereas he wanted consistency across all the faces.  The client likes it, though.

Brice Burrell said:
My comments are not meant as criticism of your work, but rather for discussion.  I really like the delicate metal frames for the upper cabinets.  However, those delicate metal frames kinda make the base cabinets look a bit chunky.  Right off I'm not sure how I would have solved that design challenge.  I might have looked at narrower rails and stiles.  I'd also think about nixing panel mold, it adds more thickness, or heaviness to the door's look.  I'd possibly add a fairly narrow face frame, maybe inset the doors.  Thoughts?         
 
Wow, that's really nice, inspiring, and I love how it all works together with the depth of the cabinets.
 
[member=9356]pettyconstruction[/member] Yes, lol.  To get a big enough lip for the plywood panel to sit in (and thus have a more secure fit with glue and pins), I used the large rabbeting bit from Whiteside, which is 1 7/8" in diameter:https://www.amazon.com/Whiteside-Router-Bits-1959-Diameter/dp/B0012JEVZI

I should also add to my previous answer [member=44099]Cheese[/member] about the groove, that it probably enhances the effect that I ended up building that panel out of two separate square frames which were then joined together.  So the center vertical is actually two separate stiles, with slightly different grain patterns.  I then cut the groove down the joint -- taking care of course not to cut too deep so as to expose the dominoes attaching the two together!

[member=2912]Don T[/member] I ended up billing 47 hours on the construction of the base cabinets.  I spent more time than that, but I didn't bill for things like testing out various magnet experiments.  There was additional billing for the installation, but I forget how much that was.

pettyconstruction said:
Looks very nice.
Is the bit in the router as big as it looks?
Charlie

Sent from my iPad using Tapatalk Pro
 
ear3 said:
I should also add to my previous answer [member=44099]Cheese[/member] about the groove, that it probably enhances the effect that I ended up building that panel out of two separate square frames which were then joined together.  So the center vertical is actually two separate stiles, with slightly different grain patterns.  I then cut the groove down the joint -- taking care of course not to cut too deep so as to expose the dominoes attaching the two together!

Thanks for the additional information Edward. I'll be fabbing a prototype for my cabinet this weekend.  [smile]

I know the client is happy with the cabinet as it exists, however, for others who may wish to replicate  a similar build but would want to have a cover over the LCD exit/entry point, I have a question.

I noticed there is a black bracket at the top of the opening that appears to travel up & down with the lift. Could a thin piece of matching wood or a piece of smoke/gray tinted glass be secured to that bracket to act as a cover when the lift is in the retracted position?
 
Back
Top