Hello all,
Here is my method, to get the most out of the LR 32-SYS with the FS 1080/2-LR 32 guide rail.
First you will have to change the way you make your cabinet heights, for starters they MUST be in multiples of 32mm You might ask why must they be this length, and the answer: The jig will not be left or right specific and can be used any way, and believe me it is dead, balls on accurate. The second to last pic shows this.
Here are the Increments I use the most:
20" = 512mm
24" = 608mm
30" = 768mm
36" = 928mm
40" = 1024mm
The Imperial mesurments are +/- But are just a guide line to get the height you want.
The formula:
40" X 25.4mm =1016mm Divided by 32mm = 31.75 round up to 32 X 32mm = 1024 so thats how you get the magic number.
Remember to always round up.
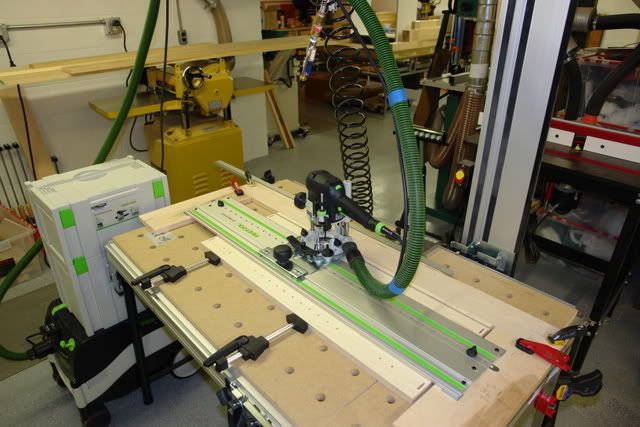
Here is how you set up the guide rail, use both of the supplied bar stops that come with the kit and bolt them to the ends of the guide rail, use the last hole on each end (first pic). If these stops over lap by 16mm you have instaled them correctly.
If you measure between the two stops it should be 1024. (second pic) shows the stops in place.
In the second pic you can see how the cabinet gable is being held for drilling, by way of the stop clamped to the front of the MFT table. I use the Lee Valley bench pups to hold it there.
The guide rail is held in place by two pins that are bored into the end stops on the sides of the MFT. They keep the guide rail in position to drill holes 37mm in from the edge. 37mm is the standard for euro style hinges that I use. (Third pic) shows this stop.
I found that when you push the router along it wants to push against these pins, therfore there is no need to clamp the guide rail down.
I color code the rail, and the meanings of the colors are:
All blue holes = Tall 40" upper cabinet with two shelves with three hinges
All Yellow holes =36" upper cabinet with 2 shelves two hinges
All green holes =24" cabinet
All Red holes = 30" upper or lower Cabinet with full height doors
I also use the blue holes for base cabinets with a sink(5th pic) and single door and drawer cabinets, this is the 24" setting (shown in the 4th pic)
Remember to delete the hinge holes for the back edge and situations that require one left/right door only. (4th pic Cabinet in the background)
I drill my Cabinets on the day of assembly, this way you minimize the risk of error, It goes quite quik maybe a minute or two per Cabinet.
When you set up for a new size you should move the end stp on the rail to the appropriate increment, so it holds nice and tight side to side.
The beautiful part, is all your doors are drilled with 96mm centeres on each end, and doors with three hinges get drilled in the middle. Set up the drill press or the MFT and its a piece of cake!
NOTE: you can NOT use the jig to drill doors because the holes ar not set up for 32mm centers
There are many combination, but the Idea is to find standard uses for the projects in your shop.
Some people may feel that drilling holes all the way up the gable is better/faster but I feel that this look is not only generic looking, but kinda cheap.
I feel that when a customer looks at the finished product It all looks balanced and well thought out, unlike some of the Production Kitchen shops that drill all there gables with same pattern. This leaves you thinking "somthing is missing here".
Conclusion: The kit with all the Festool goodies, is great but it falls short in living up to being a easy to use (walk up and use) jig because there are too many parts, and the standard guide rail linear stops get in the way and can not be left on the rail for any of the combinations I have discribed in this post.
Give your customers that extra 10% by drilling the gables the right way. And if anyone has questions feel free to PM me and I can send more Pictures if necessary. Thanks for looking
Mirko
Here is my method, to get the most out of the LR 32-SYS with the FS 1080/2-LR 32 guide rail.
First you will have to change the way you make your cabinet heights, for starters they MUST be in multiples of 32mm You might ask why must they be this length, and the answer: The jig will not be left or right specific and can be used any way, and believe me it is dead, balls on accurate. The second to last pic shows this.
Here are the Increments I use the most:
20" = 512mm
24" = 608mm
30" = 768mm
36" = 928mm
40" = 1024mm
The Imperial mesurments are +/- But are just a guide line to get the height you want.
The formula:
40" X 25.4mm =1016mm Divided by 32mm = 31.75 round up to 32 X 32mm = 1024 so thats how you get the magic number.
Remember to always round up.
Here is how you set up the guide rail, use both of the supplied bar stops that come with the kit and bolt them to the ends of the guide rail, use the last hole on each end (first pic). If these stops over lap by 16mm you have instaled them correctly.
If you measure between the two stops it should be 1024. (second pic) shows the stops in place.
In the second pic you can see how the cabinet gable is being held for drilling, by way of the stop clamped to the front of the MFT table. I use the Lee Valley bench pups to hold it there.
The guide rail is held in place by two pins that are bored into the end stops on the sides of the MFT. They keep the guide rail in position to drill holes 37mm in from the edge. 37mm is the standard for euro style hinges that I use. (Third pic) shows this stop.
I found that when you push the router along it wants to push against these pins, therfore there is no need to clamp the guide rail down.
I color code the rail, and the meanings of the colors are:
All blue holes = Tall 40" upper cabinet with two shelves with three hinges
All Yellow holes =36" upper cabinet with 2 shelves two hinges
All green holes =24" cabinet
All Red holes = 30" upper or lower Cabinet with full height doors
I also use the blue holes for base cabinets with a sink(5th pic) and single door and drawer cabinets, this is the 24" setting (shown in the 4th pic)
Remember to delete the hinge holes for the back edge and situations that require one left/right door only. (4th pic Cabinet in the background)
I drill my Cabinets on the day of assembly, this way you minimize the risk of error, It goes quite quik maybe a minute or two per Cabinet.
When you set up for a new size you should move the end stp on the rail to the appropriate increment, so it holds nice and tight side to side.
The beautiful part, is all your doors are drilled with 96mm centeres on each end, and doors with three hinges get drilled in the middle. Set up the drill press or the MFT and its a piece of cake!
NOTE: you can NOT use the jig to drill doors because the holes ar not set up for 32mm centers
There are many combination, but the Idea is to find standard uses for the projects in your shop.
Some people may feel that drilling holes all the way up the gable is better/faster but I feel that this look is not only generic looking, but kinda cheap.
I feel that when a customer looks at the finished product It all looks balanced and well thought out, unlike some of the Production Kitchen shops that drill all there gables with same pattern. This leaves you thinking "somthing is missing here".
Conclusion: The kit with all the Festool goodies, is great but it falls short in living up to being a easy to use (walk up and use) jig because there are too many parts, and the standard guide rail linear stops get in the way and can not be left on the rail for any of the combinations I have discribed in this post.
Give your customers that extra 10% by drilling the gables the right way. And if anyone has questions feel free to PM me and I can send more Pictures if necessary. Thanks for looking
Mirko