LR32 base + DeWalt 618pk

nicholam77

Member
Joined
Mar 7, 2019
Messages
118
Hi all,

Long story short I've made several homemade jigs to mimic the functionality of the LR32, and at the end of the day I'm just not happy with the accuracy.

I love Festool but realistically as a hobbyist I can't be shelling out $500-$1k for a tool here and there. So a Festool router is off the table. I already have a DeWalt 618 router with plunge base, that I really like. And a collet adapter and good 5mm brad point bit. But I'd be willing to grab a barebones LR32 kit with the plate, centering mandrel, and end stops.

Searching the forum here I see one failed attempt to get the DW618 to match up to the LR32 baseplate:
https://festoolownersgroup.com/index.php?pretty;board=festool-tools-accessories;topic=lr-32-hole-system-help-whats-realty-necessary.msg119304#msg119304

Applicable section from that thread:
Wood_Junkie said:
I drilled the holes in the LR-32 sled, to match up with the DW618 router body (this took some precise geometry).  And attached it! ...

... And then realized that because of positioning the screws holding the DW plunge base would be scraping along the guide rail, which eventually would cause some rail damage, and putting the router off level (rocking on the screw heads).  Since the sled is just sheet steel, there isn't enough material to countersink the screws.  And the DW router base is webbed, not solid, so there's really no where else to tap new screw holes.  And because of the size of the DW plunge base, there isn't a lot of option for rotating the base to fit in another orientation, unless you give up on having the bit centered in the LR32 sled.

There's no getting around it that I could think of.  Unless you want to cut off the hold-down bolts on the LR32 sled.  That'd give you some more options for rotating and aligning the router base for a bit better advantage.  But I still don't think it would work and would have seriously ruined the LR32 sled.  The Festool routers attach to the phenolic footings that serve as screw anchors, and they don't tear up the guide rail.

Looking at pictures of the LR32 baseplate and the Festool OF1010 and OF1400 routers, it's difficult for me to tell exactly how they attach.

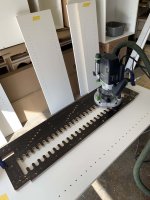
I'm wondering if there would be any way to add a polycarbonate or acrylic sub-base to the DeWalt 618, that then the hold down clamps attach through. Something like done with this Makita...

DSC-1080.jpg


DSC-1077.jpg


DSC-0792.jpg


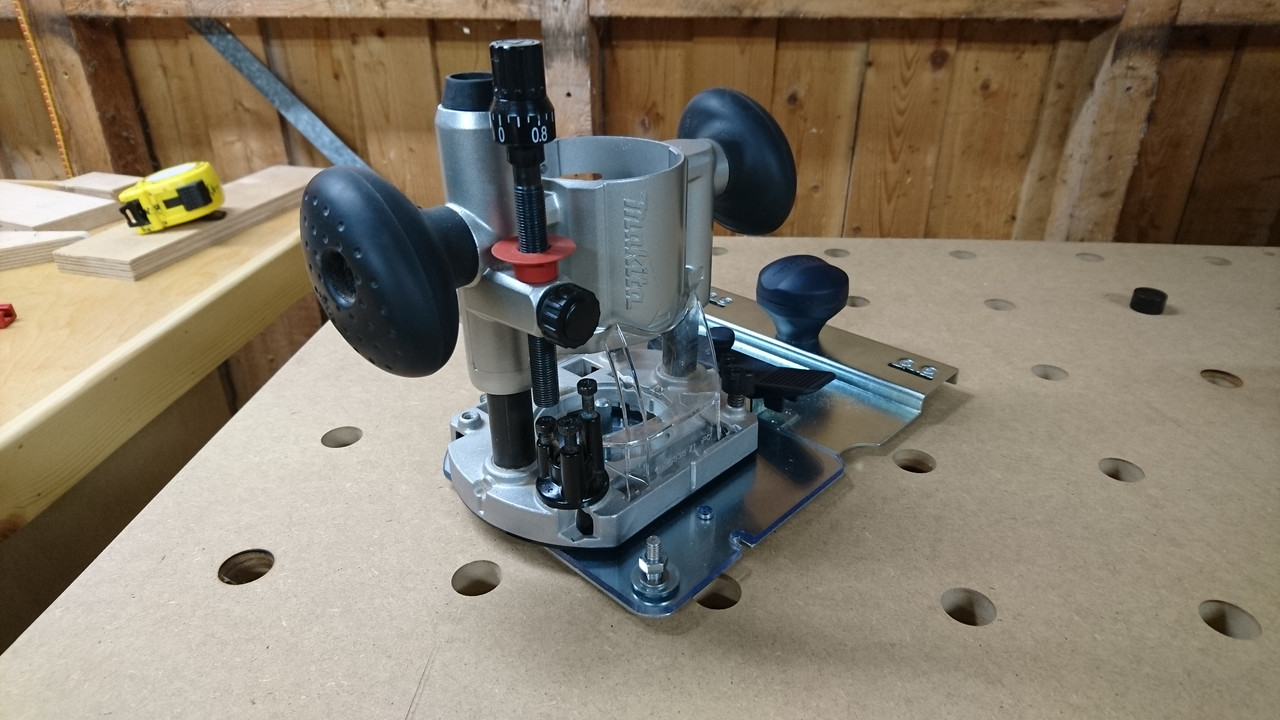
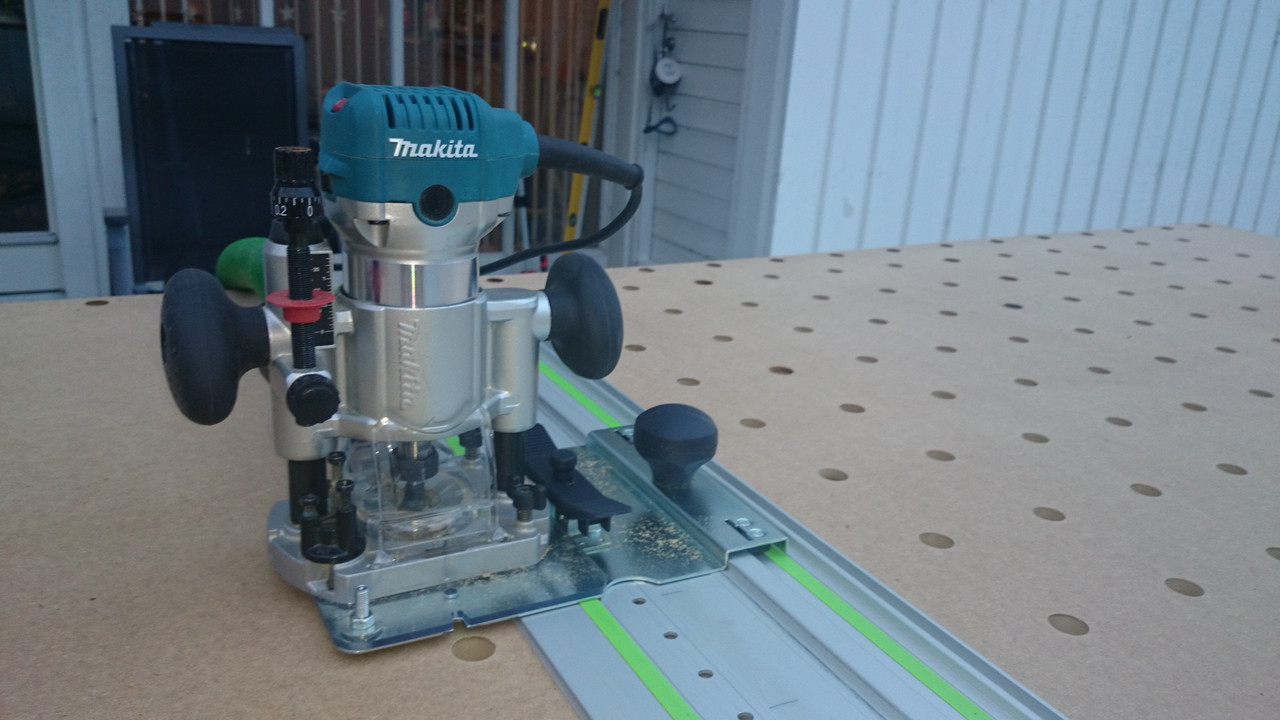
All credit to [member=30025]knutmagne[/member] on those images.

So... looking for any one who can tell me more! If the router is screwed onto the LR32 base, do the screws stick out on the underside? Is there room for this? Anyone have a DW618 that they have since gotten to work with this system? Anyone have a pic of how the DW618 could sit on the LR32 plate?

Or even could anyone give me measurements of the area I'd have to work with to position on the baseplate, without interfering with the clamp down posts or the indexing pin lever?

Maybe it's just not possible but if someone happens to have this router and the LR32 plate any insight would be much appreciated!

 
I no longer have a LR32 but it has two knobs that tighten/clamp down the 1010.  It looks to me like there is a acrylic plate that is screwed to the bottom of the Makita (guessing some 4mm flat heads countersunk into the acrylic). most likely using a few of the old baseplates screw locations. Then the acrylic is fastened down using the 2 threaded studs that the festool 1010 clamping knobs attach to. 
 
afish said:
I no longer have a LR32 but it has two knobs that tighten/clamp down the 1010.  It looks to me like there is a acrylic plate that is screwed to the bottom of the Makita (guessing some 4mm flat heads countersunk into the acrylic). most likely using a few of the old baseplates screw locations. Then the acrylic is fastened down using the 2 threaded studs that the festool 1010 clamping knobs attach to.

Thanks for the reply [member=73094]afish[/member]

Yes, that makes sense about how the baseplate is fastened, I sort of gathered that much. I did learn from your post that the clamping mount points are studs! That is helpful information.

I guess the main question then, is can the DW618 plunge base fit between the threaded studs with enough room to get a nut on them, and not interfere with the indexing lever.

I've seen several of the smaller trim routers work like the Makita pictured, just unsure if my router is too big.

Is anyone who has the LR32 baseplate able to tell me the distance between the baseplate "studs" (green arrow), or the distance from the indexing lever to the center of the plunge hole (yellow arrow)?

dimensions.jpg


The other thread I read ( [member=7486]Wood_Junkie[/member] ) seemed they got the 618 to sort of fit the plate but the clamping knobs didn't work. I'm wondering if maybe I could get away with the acrylic baseplate method! But would rather know some dimensions instead of buy and try without having a clue.

 
Sorry I cant give a definitive answer on the 618.  I can say I had mounted a DW621 on the LR32 base and it fit fine.  However the 621 has a more rectangle base and the 618 looks to be a perfect circle. So, im not 100% it will fit between the studs.  With the 621 I was able to easily fit and didnt even need to make a plexi baseplate.  I was able to utilize an existing hole to pass one stud through and cut one of the festool nuts that came with it.  It wasnt as pretty as the one in the pic but it centered perfectly and never moved.  If you are planning on using the LR32 enough I would suggest getting a dedicated router just to leave attached to the base. That way its always ready to go with minimal setup.  I love the dw621 other than the on/off switch was annoying.  I could find them used from time to time for $100 I hate setting up routers and prefer to have one dedicated for most tasks.  Using dewalt routers allows this if i hads to spend 500-1000 for each router it would never happen.  If I was doing it again I would get a Dewalt 600b and a plunge base for it and mount that to the LR32 but I have 6 of them already. If you search my name and lr32 you will see some old posts from me.
 
[member=73094]afish[/member] thank you. Yes, buying another router is an option. I am a total hobbyist, making the occasional project on my own schedule in between work and kids, so I don't have a strong need for a dedicated shelf pin router, which is why I'd love to make my existing router that I'm happy with work. But if it can't I would consider getting a smaller trim router + plunge base, either the DeWalt or Makita.

I looked up some of your pics and I saw some Makita rails in the background. I'm guessing I'm in a similar situation... I have the Makita track saw and rails *gasp*, and of course the DeWalt router. So trying to dip my toes in the LR32 without spending $1k since I already have some other non-Festool equipment.

At barebones I figure I'd need the LR32 base plate, end stops, 55" holey rail, and if I can't get the 618 to work, another smaller plunge router.

Anyways, thanks for your replies. Anyone else out there willing to measure the baseplate for me?  [big grin]
 
Yes I have the makita track saw and rails.  I had to add the Holy rail when I got the LR32 What I will say is the makita rails are still holding their rubber, my festool started falling off in about 6 months... I only used it for shelf pin/door hinges so the rubber didnt matter but was kind of annoying.  Still happy with the Makita rails but dont use them very often.  If you want to get into LR32 you will need at a min.

1. Festool 583290 (The end stops are included even though they are not pictured)
2. Festool FS1400/2-LR32-55" (I used 1 55" for many 8' tall panels so I dont see the need for more or longer one)
3. A router of your choosing + a little ingenuity to adapt if other than Festool
4. 5mm boring bit (They almost all have 10mm shank so a 1/2 collet reducer will be needed) which makes the 600b a problem after thinking about it. There is a place elaire (spelling) precision collets that makes really good stuff but I think 10mm is to big for 600b I have an 8mm collet in one of mine but that looks like the max. 
5. 35mm hinge bit.

I will say two things about the LR32 On one hand I consider it one of the better items festool makes and is by far the best complete 32mm system available and I have tried many.  HOWEVER, those stupid side setback rails drove me nuts.  I mean I really really hated those things with a passion. Always with the on/off clamping/unclamping and they are always in the way. Im not sure if you have a mft top but if you do look at my posts on how to batch panels with the lr32 on a mft top it changed my life.  Once I figured out how to eliminate those bars 99% of the time, I went from thinking the LR32 was just OK to a full on love affair.  It makes it sooooo much more enjoyable to use when batching out panels. 
 
Yes, I have even considered attempting to mill 32mm holes in one of my Makita rails... but I see the Festool rail holes are slightly oval which complicates it a bit. Not sure if that's entirely necessary or not.

Without even having used them I can tell the front stops are a PITA. I was planning on getting just the LR32 baseplate for that reason, and then adding the end stops (that go under the rail) separately. I was planning to either do something like you have set up on an MFT for repeatability, or just use a measuring tool like the Woodpecker Paolini rule to manually do the setbacks. Or just make my own from plywood. And yes, I do have a DIY MFT bench.

I also have a 5mm boring bit that works great with a 10mm collet reducer for DeWalt 1/2" collet.

I have a 35mm forstner style bit from Rockler but it's labeled for drill press or hand drill use. I've not been able to find one (other than the almost $100 dollar Festool bit!) that's rated specifically for router use. If you know of any sources on that front, let me know, otherwise I could probably manage doing the door cups on the drill press, or shelling out for the Festool 35mm eventually.

Sorry for all the questions, but curious how you use a single 55" rail for 8' tall panels?
 
First I would say that the side stops ARE a necessary evil.  They are only a PITA when you are using them for every panel.  I used them to get the setback for first time for each row of holes then adjust my back stops on the MFT to the setback rails.  Once the MFT stops are set you can fly through all the panels without using the setback rails until its time to setup a different row of holes, then same process once the first panel is set up you wont need them again.  The #1. Festool part includes the base, 2 end stops and 2 side stops. For 145 bucks the holy rail is a bargain and unless you have access to a very nice machine shop I wouldnt even try to save that 145. If its not drilled perfect you will get all kinds of funky shelf issues. Some people have these issues but everytime its a out of square panel issue or rail moved.  However 9 out of 10 its a unsquared gable.  If the gable isnt square that will transfer into misaligned holes and rocking shelfs, it can be unforgiving you can usually get by if if your box is slightly out of square until you try to put a shelves in and they only touch 2 pains at a time.  [sad]

As far as one 55' rail doing 8' gables. There are a couple methods but the best is to come from both ends.  As long as you cut the panels in increments of 32 you can hook one end stop from each end and leave the endstop that is in the middle of the gable off.  You will have to clamp a piece of scrap as a backer to prevent the rail from moving.  As long as your panels are cut accurately that will get you within a few thousands if not exact.  Just to be safe I would always drill the same number of holes from the top and bottom so if there was any slight error you dont end up with a rocky shelf. No one will ever notice if one set of holes is 32.125mm apart.  If you dont cut your panels in 32 then you just have to figure the difference and cut a small block to place between the panel and end stop. Just as good measure to check your math I would take a mechanical pencil and trace the last couple holes through the rail holes.  As long as your math is right you should be able to hook the rail from the other end and sight down through the rail holes and see your pencil marks with even margins inside the rail holes. If you dont already own one get the true 32 tape measure from fast cap. It helps when cutting everything in 32 they also make one to stick on your tablesaw rail.  It makes a big difference and prevents errors. 
 
[member=70130]nicholam77[/member] - OK I am in my shop looking at my LR32. Without going too crazy on precision it appears that the green arrow distance is 5 5/16” and the yellow arrow distance is approximately 5 3/16” from the front of the welded bracket to the inner edge of the indent. I hope this helps.

FYI, the radius of the mounting cups (that go around the studs) adds another 1/2” on each stud.
 
Alanbach said:
[member=70130]nicholam77[/member] - OK I am in my shop looking at my LR32. Without going too crazy on precision it appears that the green arrow distance is 5 5/16” and the yellow arrow distance is approximately 5 3/16” from the front of the welded bracket to the inner edge of the indent. I hope this helps.

FYI, the radius of the mounting cups (that go around the studs) adds another 1/2” on each stud.

Thank you so much for taking the time to do that, I really appreciate it!

That actually gives me hope! The DeWalt plunge base is a circle with one flat side, so roughly 5 1/2" x 5 3/8" at it's widest points. It would be a tight fit I'm guessing but since it's circular would obviously be less depth at the edges where the studs are. Maybe just enough.

I think I might try to take my plunge base to a Rockler or Woodcraft and see if they will let me check it out in person.

Thanks!
 
Im 99.5% sure it wont be an issue.  Worst case scenario you would have to notch the plunge base here or there if needed which wouldnt be the end of the world.  If I had access to a lr32 base I would consider making a universal LR32 adaptor to allow some of the more popular routers to bolt onto the lr32 base.
 
not sure if you aready pulled the trigger but i just saw this video and thougut it looked like a very nice option and much cheaper. lr32 still looks faster but for 150 bucks or so I would be interested
 
afish said:
not sure if you aready pulled the trigger but i just saw this video and thougut it looked like a very nice option and much cheaper. lr32 still looks faster but for 150 bucks or so I would be interested

Thanks for this! No I haven't pulled the trigger, I'm not really in a rush. I've also looked at the Woodpecker jig that can use a router and is even a bit less at ~$90 I believe. For some reason I like the idea of the LR32 rail based solution, but I am definitely going to think it over and the Sauter jig gives me one more option to consider!
 
Digging this post up to say I did end up geting the LR32 holey rail, end stops, and router sled. I'll need to make an acrylic adapter, but my DeWalt DW618 does fit.

Thanks for everyone who chimed in!

IMG_5861.jpg


IMG_5862.jpg
 
if you have access to a drafting program or sketchup and need something precise, check out sendcutsend.com I found their rates very reasonable and have a plethora of material choices/options.
 
dupe said:
if you have access to a drafting program or sketchup and need something precise, check out sendcutsend.com I found their rates very reasonable and have a plethora of material choices/options.

Ah yes, I always forget about sendcutsend. I've never used it but it looks neat. I already have some 1/4" acrylic coming from Amazon so I'll probably make my own this time, but that's a good reminder!

afish said:
Sweet, looks like you are on your way with some extra cash in the bank.

Thanks! Looking forward to trying it. I do have a homemade MFT, so definitely going to try your process there and skip the set back stops.
 
I forgot to ask how did you adapt the 10mm shank on the 5mm boring bit?  Did Elerie have what you needed?  Did you end up getting the setback bars?
 
afish said:
I forgot to ask how did you adapt the 10mm shank on the 5mm boring bit?  Did Elerie have what you needed?  Did you end up getting the setback bars?
I already had a 1/2”-to-10mm collet adapter from Amana Tools, as well as a 5mm brad point router bit (w/10mm shank) from a DIY 32mm shelf pin jig I made.

I also just ordered a 1/2”-to-8mm collet adapter from Amana to be able to fit the LR32 centering mandrel. Definitely annoying to use all these adapters but it should work.

I did not get the setback bars, as I was trying to keep the cost down and with those added I might as well have gotten the full systainer kit. I have a metric Woodpecker Paolini rule I can use to push back the rail the appropriate distance registering off the front edge. Also have some 3D printed + Incra TT parallel guides to leverage. Or possibly make a setback jig from MDF or plywood like the one Peter Millard does. Or maybe just use some dogs and stops on the MFT. Basically I didn’t think the front stops were essential. I did get the end stops because they were only $30 for the pair.

I’m not sure if I’ll get it yet, but I discovered Amana also makes a router-rated 35mm boring bit for a bit less than the Festool one.

Amana Tool - 203431 Carbide Tipped Hinge Boring Bit R/H 35mm Dia x 60mm Long x 1/2" Shhttps://www.amazon.com/dp/B000P4OMB...t_i_8WTNCDTDWQ57MPE92KGK?_encoding=UTF8&psc=1

Not sure when I’ll be able to get it all working and give it a test run, but I’ll try to report back with results.
 
I think your personal 32mm-related nirvana maybe lies here as a fish has already said above…
https://www.sautershop.com/system-32-router-template-laminate-sa-mfs3202-1.0

I bought mine after being commissioned to build a 24-foot-wide cabinet/bookshelf wall unit with infinitely variable shelf spacing. It was most likely the only time I’d ever get hired to do something like that. Deadly accurate. Global shipping - mine was here in the UK from Germany 48 hours after I ordered it.
 

Attachments

  • 655BECD1-E454-4CA3-B915-20BEA2404BF0.jpeg
    655BECD1-E454-4CA3-B915-20BEA2404BF0.jpeg
    333.9 KB · Views: 286
  • 619C2D04-86F7-4DC9-918E-0077C41AEFE2.jpeg
    619C2D04-86F7-4DC9-918E-0077C41AEFE2.jpeg
    404.9 KB · Views: 225
Back
Top