QuailRider43
Member
- Joined
- Feb 16, 2015
- Messages
- 85
My current project is cabinetry for my basement workshop reno. I needed to make a bunch of 32 mm system holes in the upper cabinets for shelves and hinges. Enter the LR32. I wanted to batch the process, and came up with the idea of using the MFT/3 fence and QWAS rail dogs as a rapidly repeatable setup in lieu of using the LR32 lateral stops to position every panel. This borrows from the concept of using the LR32 with parallel guides, as discussed by Shane Holland in his YouTube video. Using the MFT/3 fence solves a couple of issues I had with using the parallel guides: it eliminates errors by using the same front facing reference point for both setup and material placement, it's less fiddly to set up, panels wider than the length of the parallel guides can be used, and the QWAS rail dogs are a lot cheaper than the parallel guides. Hope you guys find it useful.
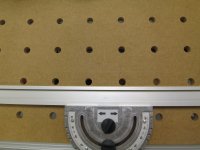
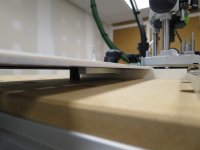
1) Install your MFT fence, and make sure your fence is actually square to the table holes. Don't skip this step! Mine was out 1 mm end to end the first time I checked the fence. Adjust the fence using the hex bolts if necessary.
View attachment 1
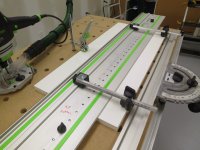
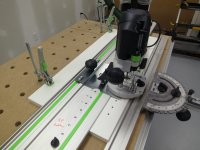
2) Install the LR32 end stops as per usual (16 mm "up and out" in my case), and attach QWAS rail dogs lined up with holes just beyond your panel length. The rail dogs will keep the LR32 secured in place.
View attachment 2
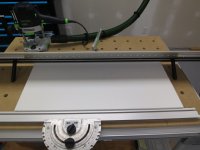
3) Butt the panel against the end stop and LR32 lateral stops, again as per Festool instructions. This will define where you need to place the fence. Clamp down the panel.
View attachment 3
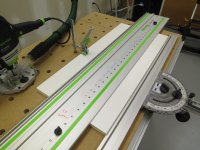
4) Remove the lateral stops, and move the MFT/3 fence into position. Lock down the fence. Setup is now done. The rail, end stop, and fence will always stay in the same position, allowing you to batch out the holes for a given set of panels.
View attachment 4
5) Just make sure your panel is correctly butted against the end stop and fence before making the holes
View attachment 5
6) After running a line of holes, lift off the rail, swap in a new panel, place rail back down in the same spot, butt panel against fence and end stop, clamp panel against table (optional - seems pretty solid without it), and repeat.
View attachment 6
Left and right panels can be done at the same time using the appropriate end stop. Just keep track of whether you should be butting against the left end stop or the right (depending on your top or bottom reference point - pick one and don't change). Use different color dry erase markers to mark out the correct hole pattern for each side (e.g. red=right). To do the back row, you can rotate the panel 180 deg for a balanced "37 mm from edge" layout. If you prefer an unbalanced hole layout, or a single front reference point for high accuracy (e.g. for drawer slides), re-position the rail and fence accordingly.
1) Install your MFT fence, and make sure your fence is actually square to the table holes. Don't skip this step! Mine was out 1 mm end to end the first time I checked the fence. Adjust the fence using the hex bolts if necessary.
View attachment 1
2) Install the LR32 end stops as per usual (16 mm "up and out" in my case), and attach QWAS rail dogs lined up with holes just beyond your panel length. The rail dogs will keep the LR32 secured in place.
View attachment 2
3) Butt the panel against the end stop and LR32 lateral stops, again as per Festool instructions. This will define where you need to place the fence. Clamp down the panel.
View attachment 3
4) Remove the lateral stops, and move the MFT/3 fence into position. Lock down the fence. Setup is now done. The rail, end stop, and fence will always stay in the same position, allowing you to batch out the holes for a given set of panels.
View attachment 4
5) Just make sure your panel is correctly butted against the end stop and fence before making the holes
View attachment 5
6) After running a line of holes, lift off the rail, swap in a new panel, place rail back down in the same spot, butt panel against fence and end stop, clamp panel against table (optional - seems pretty solid without it), and repeat.
View attachment 6
Left and right panels can be done at the same time using the appropriate end stop. Just keep track of whether you should be butting against the left end stop or the right (depending on your top or bottom reference point - pick one and don't change). Use different color dry erase markers to mark out the correct hole pattern for each side (e.g. red=right). To do the back row, you can rotate the panel 180 deg for a balanced "37 mm from edge" layout. If you prefer an unbalanced hole layout, or a single front reference point for high accuracy (e.g. for drawer slides), re-position the rail and fence accordingly.