LR32 setup for Middle Row of holes

rdr

Member
Joined
Jul 3, 2016
Messages
78
I used my LR32 set for the first time today and it worked at treat except for the middle row of holes I wanted.

The parallel guide only goes to 110mm which couldn't reach where I needed for a middle row. No problem I thought looking at the LR32 guides I bet those Pins are 5mm diameter and slot into the front row of holes I just drilled and I can work from there. I tried and they were too wide  :-\

If Festool were to make the Pins 5mm diameter it would make it much easier to accurately stretch further into a piece of work from another row of existing holes. But thinking about it not sure if the distance being referenced from the edge of the pin would make that work  :-\  Anyway, am I missing anything guys? or do you just need to manually line the rail up for middle rows of holes?

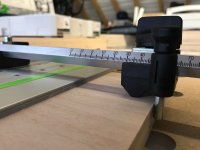
Its these Pins I'm talking about, apologies if my terminolgy is wrong - total noob !
[attachimg=2]
 

Attachments

  • IMG_1168.jpg
    IMG_1168.jpg
    189.2 KB · Views: 284
  • IMG_1168.jpg
    IMG_1168.jpg
    189.2 KB · Views: 1,053
I follow what you are suggesting, and don't see why it wouldn't work as you think it would.

Seems it would make it easy to create a line of holes spaced off the first set of holes or an edge.

Just need a pin that will fit the holes drilled. This would let you step in and make repetitive lines
of holes, as many as you needed. You could space them 96 mm and layout a MFT top with pilot
holes, better be right on the money though or your error would multiply with each iteration.
 
Have you tried turning the parallel guide around and index off the other side of the rail for those middle holes?
 
Hi

I had play and hit  the same issue from the rear holes. I'm making some 600 mm deep cabinets and was looking to put a 3rd run of holes to give the runners a bit more support and allow for short shelves. I have just had a brain wave though when I read your post, I could try and use the rail Parallel guides. I would have to set the distance manually but at least if they work they will allow accurate and quick repeatability as I have 8 panels to do.
 
Corwin hit upon the answer.

Here is a Festool video from 7 years ago:


Peter
 
Aha !

I miss understood, that should do the trick [emoji16]

Thanks for the advice.

Sent from my iPhone using Tapatalk
 
Eric also covers this in his series of videos on the LR32 system, its in part 5 about 7 minutes in.
=6m52s
 
Thanks for all the comments guys really useful. Finished the holes this afternoon all bang on when it came to fit the runners so very pleased. I still think it would be nice to have the Pins be 5mm so they could fit in previously drilled holes it could be useful in some situations I think.

Erics videos are really good, I've been working through his channel whilst at the gym these past few months  [big grin]
 
In my mind,you could use the pins,just put 2 holes that are the pin size.
A bigger hole on top and bottom that serve no purpose other than for the alignment of the rail?
But it sounds like you found the answer.
Charlie

Sent from my iPad using Tapatalk Pro
 
It would also help you to know that different drawer glide manufacturers use varying intervals for their mounting screws.  I'll use Accuride as an example.  The first hole line from the cabinet front is set in 37mm.  The next line of holes is set back 128mm from the first line of holes.  The third line of holes is inset 96mm from the second line of holes.  The fourth line is inset 128mm from the third line of holes, etc.  Each set of glides comes with a sheet detailing the hole spacing for the specific glide.  If you're going to use drawer glides, check out the glide's specifications and select the best spacing for the glides.  Shelves can use the same line of holes; they're not as fussy as the glides.  If you're doing shelves only, it's OK to go 37mm in from the front, 37mm in from the dado for the back, then split the difference.  That doesn't work if you're using drawer glides, however. 
 
Thanks Sparktritian

I got stung on my first test run of holes. Set them to 37mm then realised when I offered up  the runner I have (GTV) it has a slight offset and the front of the draws would protrude. On googling and looking at the technical diagram I could see the Hole layouts and worked out the hole run positions from there. I did think when scratching my head I wonder if these holes are standard between all Euro Glide hinges incase I want to add more internal draws but I doubt it life is never that simple !
 
rdr said:
Thanks Sparktritian

I got stung on my first test run of holes. Set them to 37mm then realised when I offered up  the runner I have (GTV) it has a slight offset and the front of the draws would protrude. On googling and looking at the technical diagram I could see the Hole layouts and worked out the hole run positions from there. I did think when scratching my head I wonder if these holes are standard between all Euro Glide hinges incase I want to add more internal draws but I doubt it life is never that simple !

Remember, too, that it's far easier to line-bore cabinet sides before assembly, and impossible to use the LR 32 once the cabinet has been assembled.  Pick a range of glides that use common-standard hole spacing, and catalog as many possibilities as possible so you always have alternatives.  Be sure to always reference your LR 32 rail of the top of the cabinet sides to avoid having lopsided drawers. 
 
Thanks thats good advice

I cut the panels using the True 32 system and managed to get them so they were a nice snug fit between the LR32 stops to try and avoid the lob sided runner effect. The Guides are GTV and I was expecting the spacings to be some kind of industry standard but as it looks like there can be variances I will definitely think through how to manage this going forward.

The runners seem like good quality so I may bulk buy 50 pairs or so to avoid mixing the manufacturers for future storage projects.
 
Back
Top