Lutyens Garden Bench

Crox G

Member
Joined
Nov 27, 2012
Messages
93
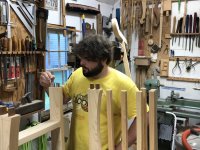
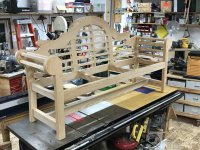
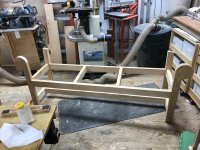
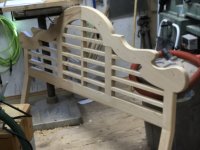
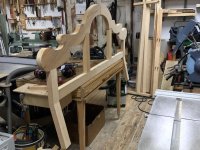
I'm making a Lutyens garden bench from Fine Woodworking plans by Tony O'Malley from issue #143, July/August 2000.  I'm using cypress, available locally in clear 8/4, and Sipo tenons.  This has turned out to be a challenge, and a thorough use of my treasured Domino XL700.  O'Malley used a horizontal mortiser and slip tenons, so the design lent itself to the Domino.  The XL was its usual solid, reliable, precise self.

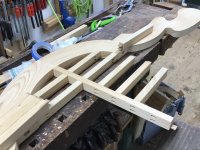
I made templates from the plans for the front legs, back crest halves, and seat stretchers, and used them for my first real effort at pattern-routing in the router table.  I had a Whiteside bit with bearings on the top and bottom, and a 1.5"/38mm cutting depth.  The two bearings allowed me to flip the piece in order to cut downhill with the grain.  I fastened the templates to the workpiece with small brads, not wanting to mess with double-sided tape.

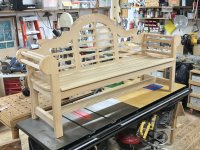
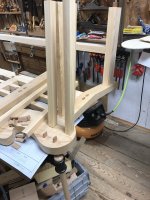
I tried to use two dominoes at each joint if possible.  If I could fit them comfortably in the biggest joints, I used 12mm.  For the smallest joints for the 1"/25mm slats and arm sticks I used 6mm dominoes and cut the mortises with the Seneca adaptor.  For few medium-sized joints I could get away with 8mm, which felt much stronger than the 6mm. 

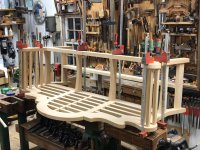
The back is angled back at 6 degrees, and the back legs also rake back at 6 degrees. I used different methods for aligning and cutting the mortises depending on the location.  For the first time ever I held my breath and used the tight setting on all the mortises; it worked out well. 

Glue-up has been a challenge, making sure that I could fit the parts together in the proper order.  Many dry fits helped.  I've also learned that after a section is glued, if I dry-fit that section with the next-to-be-glued parts, without gluing, the joints will align much better for the next step. 

Final glue-up tonight, I hope, if I can enlist the help of my son.  24 dominoes to align at once--yikes!  Apologies for the cluttered shop.

[attachimg=1]

[attachimg=2]

[attachimg=3]

[attachimg=5]

[attachimg=4]

[attachimg=6]


Attachments

  • UNADJUSTEDNONRAW_thumb_11ad.jpg
    UNADJUSTEDNONRAW_thumb_11ad.jpg
    260.9 KB · Views: 2,134
  • UNADJUSTEDNONRAW_thumb_11b8.jpg
    UNADJUSTEDNONRAW_thumb_11b8.jpg
    152.6 KB · Views: 2,071
  • UNADJUSTEDNONRAW_thumb_11b6.jpg
    UNADJUSTEDNONRAW_thumb_11b6.jpg
    250.2 KB · Views: 2,023
  • UNADJUSTEDNONRAW_thumb_11b7.jpg
    UNADJUSTEDNONRAW_thumb_11b7.jpg
    267.7 KB · Views: 2,047
  • UNADJUSTEDNONRAW_thumb_11b5.jpg
    UNADJUSTEDNONRAW_thumb_11b5.jpg
    241.9 KB · Views: 2,070
  • UNADJUSTEDNONRAW_thumb_11b4.jpg
    UNADJUSTEDNONRAW_thumb_11b4.jpg
    129.8 KB · Views: 2,063
Great looking bench.  Don't apologize for the clutter, remember what Einstein had to say “If a cluttered desk is a sign of a cluttered mind, of what, then, is an empty desk a sign?”  [big grin]
 
Fantastic crox- look forward to seeing it finished.
Out of interest, will it live outdoors completely exposed to the elements, or in a more sheltered situation?
 
Hi [member=17405]Crox G[/member]

That is a super bit of work.

We went for a pub lunch yesterday (once a year for us normally !) and I looked closely at one of the Lutyens styled benches. The cheap and cheerful ones cut too many corners and I must say that I like your design. The ones at The Royal Hospital in Chelsea are closer to your design.

Well done.

Peter
 
Thanks all for your kind words.  I expect the bench to be outdoors full-time, and to be painted accordingly. I would be grateful for any recommendations for paint (no sprayer available).  I'm also wondering about sealing the bottoms of the legs by standing them overnight in coffee cans with a coupe of inches of boiled linseed oil or Waterlox.

Last evening my son (pictured below) and I glued the front assembly to the rest of the frame. It was a challenge to glue the mortises and dominoes, align them, and then clamp or beat them together, but everything closed well.  I'm a belt-and-suspenders (-braces, Peter), so I glue the mortises and the dominoes.

The next step will be to fasten the seat slats to the four curved supports.  The slats are about 3.25"/83mm wide and 7/8"/22mm thick.

Mr. O'Malley, who designed the bench (from looking at others), drove screws from the top into counter-bored holes, and filled the holes with plugs.  I want to avoid plugs if possible, and screw in from the bottom, so nothing shows from the top.  What would anyone think about using pocket holes with 1.5-inch weatherproof screws, two (or three?) per stretcher?  Do you think pocket holes would have the strength?  If not, I could counter-bore from underneath, with careful measurements, and pray that the screw doesn't blow through the top surface by mistake.

Cheers,
Crox

[attachimg=1]

[attachimg=2]

[attachimg=3]
 

Attachments

  • UNADJUSTEDNONRAW_thumb_11bb.jpg
    UNADJUSTEDNONRAW_thumb_11bb.jpg
    278.5 KB · Views: 1,857
  • UNADJUSTEDNONRAW_thumb_11ba.jpg
    UNADJUSTEDNONRAW_thumb_11ba.jpg
    315.1 KB · Views: 1,837
  • UNADJUSTEDNONRAW_thumb_11b9.jpg
    UNADJUSTEDNONRAW_thumb_11b9.jpg
    329.8 KB · Views: 1,864
Finished.

I recommend this project to anyone who wants a good Domino workout and a durable and attractive bench.  I've kept notes on mistakes and pitfalls, and would be happy to pass them on.  Thanks for watching.

[attachimg=1]
 

Attachments

  • IMG_0304.JPG
    IMG_0304.JPG
    2.1 MB · Views: 2,089
Hi Crox

A really lovely piece of work, beautifully made and a treasure for the future.

I have written to the Lutyens Society asking about the design of the bench as I am curious about the detail of the arm rests. The design that you have used shows the most common form of the arm rest but I have seen one example of a solid arm which I must confess I prefer. The Lutyens Society have no (as far as I can see) example of a bench on their web site or in their gallery. I will let you know what they say.

Once again, a fantastic bench. Well done.

Peter
 
Well done!  Turned out beautifully.  I can't show this to my wife because then I'll be building it and I have a few other things to do.

I hope you'll keep us posted as you paint and finish it.  I'm especially curious what folks will suggest about the "dip" you mentioned for the legs vs. just brushing a few coats. 
 
That 'dip method' is used often to prevent moisture damage — other methods are tacking some flashing tape on the ends and/or a piece of thin sheet metal.
 
I finished the bench with Pettit marine paint, one coat of sealer, one coat of primer, and three coats of their EZ Poxy semi-gloss.  I had trouble with drips and sags, but was able to scrape and touch-up fairly well.

I set the feet, and a test piece, in small tubs of sealer for a couple of hours.  The legs appeared to soak up the sealer, but that turned out to be mostly on the outside surfaces.  I sliced 10mm off the test piece, and there was no sealer at that height.  Cypress is not particularly porous, I guess.

The bench now sits in the garden of a nearby stately home, with several lovely views.  I partially buried some redwood blocks to keep the feet off the turf.  I cringed at the thought of a gardener whacking the legs with a string trimmer, but the owner assured me that she would insist on the gardener moving the bench in order to trim under it!  She is thrilled with the bench.

[attachimg=1]


Attachments

  • UNADJUSTEDNONRAW_thumb_11cc.jpg
    UNADJUSTEDNONRAW_thumb_11cc.jpg
    335.1 KB · Views: 1,593
Hi Croxton,

I said it before and will say it again - a fantastic bit of work.

Well done.

Peter
 
Crox, I'm holding a celebration in your honor.  3 snaps up...  Great work!  [not worthy]
 
Agreed!  Splendid bench my man.

On thing I saw recently about protecting the legs from rot involved making the legs as "pins" and have them slip into some sort of manufactured concrete, PVC or alike. I can't seem to find the layout I saw but it was a novel idea. It would take two people to move the thing for mowing or trimming but should last a lifetime.

I was late to this thread but one thing I did for attaching some boards (Adirondack chair) from below was to put dominos in the decking with glue or epoxy, and the dry fit them into the chair or bench and screw from underneath. Strong and removable and no top screws and plugs!

Excellent build and documentation.

Cheers. Bryan.

Sent from my iPhone using Tapatalk
 
Peter Parfitt said:
Hi Crox

A really lovely piece of work, beautifully made and a treasure for the future.

I have written to the Lutyens Society asking about the design of the bench as I am curious about the detail of the arm rests. The design that you have used shows the most common form of the arm rest but I have seen one example of a solid arm which I must confess I prefer. The Lutyens Society have no (as far as I can see) example of a bench on their web site or in their gallery. I will let you know what they say.

Once again, a fantastic bench. Well done.

Peter

Peter

Do you have a picture of what you describe?

My google search for images of Lutyens bench did not find any solid arms as such; there are a few examples where the arm is made up of wider slats, rounded at the top, which looks neat and I imagine is more comfortable than the more common square sectioned slats.

Cheers

 
scholar said:
Peter

Do you have a picture of what you describe?

My google search for images of Lutyens bench did not find any solid arms as such; there are a few examples where the arm is made up of wider slats, rounded at the top, which looks neat and I imagine is more comfortable than the more common square sectioned slats.

Cheers

I do not - I am in the middle of a field in The Netherlands and the wifi is not good.

At the Royal Hospital in Chelsea their Lutyens style benches have solid arms. Take a look at this link:
https://flittabus.co.uk/royal-hospital-chelsea/

and you will be able to make out the solid arms on one of their benches.

Peter
 
I built a set of outdoor benches for my club about 4 years ago. They are very crude compared to your bench.

I made them out of Ipe. They have been in the "wild" for all that time with no finish ever being applied. There is no sign of deterioration in the benches. Even the legs touching the ground are still intact.

Putting a footing of Ipe on your benches would protect them from rot or insects.
 
Crox G said:
Finished.

I recommend this project to anyone who wants a good Domino workout and a durable and attractive bench.  I've kept notes on mistakes and pitfalls, and would be happy to pass them on.  Thanks for watching.

Great looking bench. Some nice clear cypress you got there. Thanks for documenting and posting.
Tim
 
Back
Top