Made an odd-looking DIY workcenter for only $30 and 30 hours of my time

ryanjg117

Member
Joined
May 18, 2015
Messages
329
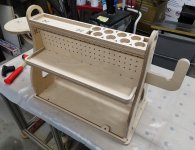
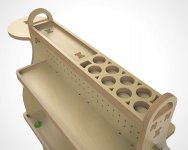
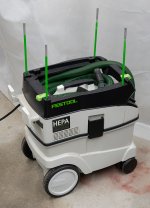
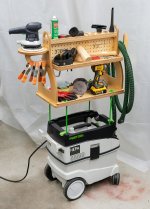
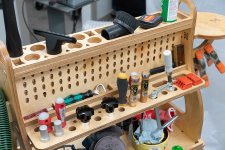
I had some spare Baltic birch plywood sitting around, so taking inspiration from Festool’s Workcenter Organizer WCR 1000 and this project, I set out to make my own little DIY version. Here’s what I dreamed up:

[attachimg=1]
[attachimg=2]
[attachimg=3]
[attachimg=4]

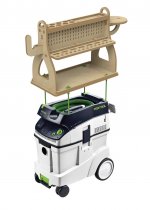
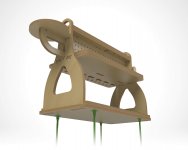
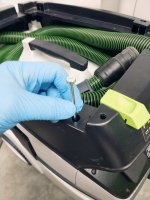
It looks pretty cool in space, but actually pretty dumb when mounted on top of a vac. I should have considered this during my design and adjusted its proportions.

[attachimg=5]

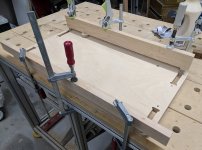
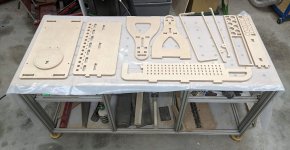
On to the build. Setting up the Shaper station:

[attachimg=6]

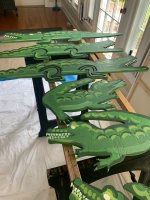
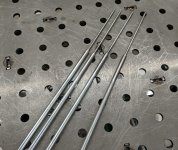
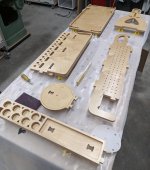
All cut. I won't confess how long this took me at 10 ips.

[attachimg=7]

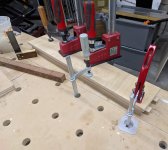
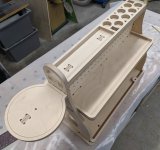
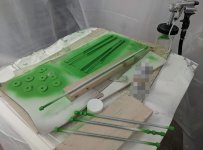
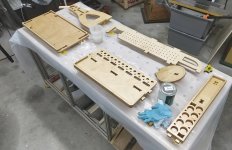
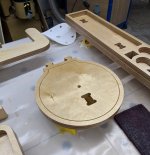
Dry fitting the assembly.

[attachimg=8]
[attachimg=9]

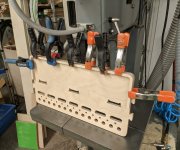
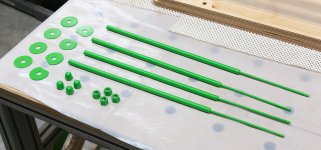
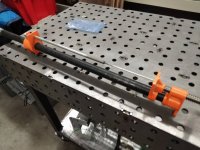
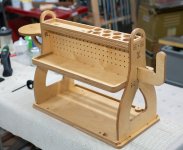
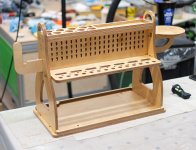
Glue-up. Only a few pieces needed to be glued as most of the assembly is held together with friction and a few strategic screws.

[attachimg=10]
[attachimg=11]
[attachimg=12]
 

Attachments

  • hero-with-callouts.jpg
    hero-with-callouts.jpg
    153.3 KB · Views: 3,361
  • 07.jpg
    07.jpg
    357.9 KB · Views: 2,689
  • 06.jpg
    06.jpg
    371.8 KB · Views: 2,708
  • 05.jpg
    05.jpg
    354.4 KB · Views: 2,715
  • 04.jpg
    04.jpg
    314.3 KB · Views: 2,710
  • 03.jpg
    03.jpg
    342.2 KB · Views: 2,709
  • 02.jpg
    02.jpg
    249.9 KB · Views: 2,703
  • 01.jpg
    01.jpg
    333.2 KB · Views: 2,742
  • festool-ct36-with-diy-cnc-workcenter.jpg
    festool-ct36-with-diy-cnc-workcenter.jpg
    144.7 KB · Views: 3,112
  • Festool-DIY-Workcenter-Textured-MultiLayer-1.jpg
    Festool-DIY-Workcenter-Textured-MultiLayer-1.jpg
    564.1 KB · Views: 2,755
  • Festool-DIY-Workcenter-Textured-MultiLayer.jpg
    Festool-DIY-Workcenter-Textured-MultiLayer.jpg
    227.7 KB · Views: 2,761
  • Festool-DIY-Workcenter-Textured-MultiLayer-2.jpg
    Festool-DIY-Workcenter-Textured-MultiLayer-2.jpg
    155.6 KB · Views: 2,752
Now the fun part. Mounting to the vac. I decided to utilize the long, coarse threaded screws/studs that Festool uses to attach the hose garage to the top of the vac. The benefit: I could retain use of the hose garage, unlike Festool’s own Workcenter which essentially covers up this space, rendering it pretty useless. The downside: I wasn’t sure how strong these studs would be as a mounting foundation, as they are only biting into plastic inside the vac body. But one more potential benefit: three of these mounting locations are outside of the Systainer footprint. Meaning, if the assembly is strong enough on three legs, I could actually keep a Systainer mounted underneath. We’ll just have to see. (Ends up it's plenty strong with just three mounting points, so keeping a systainer down below is totally possible!)

[attachimg=1]

I don’t want to even think about how expensive these custom, torx-headed, extra-long screws would be to replace through Festool’s parts department. I can hear their answer now: “You’ll have to buy a new hose garage and we’ll throw them in at no additional cost.”

[attachimg=2]

I need to weld smooth rod standoffs on top of the torx screws, but first, let’s get rid of that zinc coating with an overnight soak in vinegar. A really handy trick since grinding zinc dust is absolutely atrocious for your health.

[attachimg=3]

Intermission. Time for some staining. I had some old Arm-R-Seal needing to be used, so I threw a few coats on. If I could do it all over again, I would have sprayed High Performance instead, since the real challenge here is getting into all the nooks and crannies.

[attachimg=4]
[attachimg=5]
[attachimg=6]

Back to the mounting studs. Here’s what I’m trying to combine:

[attachimg=7]

Sophisticated welding fixture:

[attachimg=8]
[attachimg=9]

Tack welded, then fully welded, then cleaned up on a 3M 220 grit Scotch-Brite radial bristle brush (a spectacular metal finishing wheel).

[attachimg=10][attachimg=11][attachimg=12]

Paint time. I found some old General Finishes milk paint in RAL 6018 (Festool green) from a, well, failed previous project. Sprayed a few coats and then finished it with High Performance. Blurring out the highly ineffective spray can “clean metal” primer (no free advertising for them). This step ended up taking a bunch of time and totally wasn't worth it.

[attachimg=13]

Made a mistake here – I still needed to thread the top ends of these rods, and figured spraying them first would be best as I could then cut nice, clean threads into them. Problem is, I only have a manual tap and it takes a tremendous amount of rotational force to cut 3/8-16 threads into a solid rod. The only way to secure them for threading was in a big knurled vice, which completely trashed the finish. My tip: don’t finish the hardware. It looks cool but is not worth the time.

[attachimg=14]
 

Attachments

  • 16.jpg
    16.jpg
    269.4 KB · Views: 2,629
  • 17.jpg
    17.jpg
    412.1 KB · Views: 2,614
  • 18.jpg
    18.jpg
    473.1 KB · Views: 2,620
  • 19.jpg
    19.jpg
    593.3 KB · Views: 2,608
  • 20.jpg
    20.jpg
    235.6 KB · Views: 2,588
  • 21.jpg
    21.jpg
    322.7 KB · Views: 2,614
  • 15.jpg
    15.jpg
    263.4 KB · Views: 2,614
  • 14.jpg
    14.jpg
    352.4 KB · Views: 2,629
  • 08.jpg
    08.jpg
    538 KB · Views: 2,772
  • 09.jpg
    09.jpg
    571.2 KB · Views: 2,694
  • 10.jpg
    10.jpg
    222.1 KB · Views: 2,649
  • 11.jpg
    11.jpg
    319 KB · Views: 2,753
  • 12.jpg
    12.jpg
    429.4 KB · Views: 2,656
  • 13.jpg
    13.jpg
    456.5 KB · Views: 2,705
Here’s the assembled organizer, after stain.

[attachimg=1]
[attachimg=2]

Mounting posts installed.

[attachimg=3]

All done, with a completely unrealistic conglomeration of tools. In reality, this vac will mostly be dedicated to the metalworking and finishing side of the shop, so it’s more likely to be holding welding gloves, TIG electrodes and filler rod, and bigger welding clamps. But I figured it would be nice to have this picture before it gets all beat up.

[attachimg=4]
[attachimg=5]

The good news: it’s entirely strongly mounted and tossable with the four mounting points. I don’t have any concern over its strength.

Would I do this all over again? Probably not. I’m not in love with the design, with the pegboard divider down the middle. I’ve never been a fan of pegboard and not really sure why I kept it in… I think the organizer would have been more useful without the divider down the middle, and with large, open levels. If I were to do it all over again, I would probably re-design it to be mostly a SysPort, with storage for a few key systainers, a couple big hooks for the hose and power cord on the side, and an accessible top where I could throw stuff. But I could see that being a bit tippy. This will work for now.

Some other discoveries:

  • Get a fixed CNC machine. Your time is too valuable.
  • I made this out of 5/8” Baltic birch as it’s what I had on hand, but way overkill for this project and heavy. Best to make this as lightweight as possible, especially with the attachment design. A 3/8” Baltic birch would have been just fine for the entire project, and even 1/4" for the pegboard.
  • Even though Arm-R-Seal is convenient, I’m always going to spray in the future. Just too much of a hassle trying to work out dust nibs from the cracks and orifices on a project like this.
 

Attachments

  • 22.jpg
    22.jpg
    414.8 KB · Views: 2,699
  • 23.jpg
    23.jpg
    441 KB · Views: 2,587
  • 24.jpg
    24.jpg
    784.3 KB · Views: 2,768
  • 25.jpg
    25.jpg
    884.4 KB · Views: 3,511
  • 26.jpg
    26.jpg
    519.4 KB · Views: 2,581
Why did you weld those rods? You can't easily remove your workcenter now. Isn't it easier to simply stack it and let gravity hold it or use latches on the vac garage?
 
thats pretty slick those CNC machines definitely changed the scope of wood working
 
I'm usually 10 years behind the curve so it's probably old hat, but going from the model to the parts cut out still astounded me.

Nice build thread [member=51886]ryanjg117[/member], it's cool you have a good handle on wood and metal fabrication, must open up a lot of possibilities.
 
I also have a Shaper Origin ("SO"), but I just haven't found the time to figure out how to use it.  I've used the Festool workcenter ("WC") when I've taken classes at Festool, but I don't have one.  Anyway, looking at your writeup I really admire that you were able to create your design and then fabricate it using the SO.  It occurred to me that, rather than mounting it using the studs, which appeared to have been one of the difficult issues that you addressed, a variant on your design, using a CT mounted FESTOPPER (see my other threads or search on Etsy) would provide both elevation and easier mounting for the WC.

Which software did you use to design the WC to allow you to create the .SVC files for the SO?  Are you willing to share the plans (the original design file and/or the .SVC files)?  PM me if you'd like to trade a set for the FESTOPPER plans.

Sandy
 
Nice work.  It's not just what you built that's cool, but obviously a lot of time went into getting the model right.  Did you have to cut out (m)any pieces more than once?  Now that you've built the first one in 30 hours, how long would it take to build the second one?

I noticed the drone pad on the side, holding a drone that looks remarkably like a sander.  I'd really like to see someone (1) fly the sander off the pad over the work by remote control, (2) modify it to fly unattended, and (3) modify it to change grits and monitor the surface for sanding quality.  It would give a whole new meaning to the "orbital" in orbital sander.  It would be sort of like a Shaper Origin orbital sander.  Yep - I'd buy one of those :).
 
HarveyWildes said:
Nice work.  It's not just what you built that's cool, but obviously a lot of time went into getting the model right.  Did you have to cut out (m)any pieces more than once?  Now that you've built the first one in 30 hours, how long would it take to build the second one?

The Shaper Origin is easy to use. Getting good results with the Shaper Origin that rivals a fixed CNC is NOT. Firstly, Shaper's vision system hates my LED ceiling lights, so I have to turn them off for maximum accuracy. I'm not sure if this has to do with the reflectivity of the Shaper Tape or the strobing effect of LED lights (naked to the eye), but Shaper reports decreased tape in its FOV when my lights are on.

There's a lot more that goes into getting good results, like taking shallow depth passes, adding tolerance to your roughing cuts and then removing that with a full-depth finishing pass. Going slowly, very slowly. Dumping tape all over the workpiece so that Shaper is always reporting full tape visibility.

Side note: my brother is a drone-certified police officer. I did consider featuring one of his drones for the photo shoot.  ;)
 
Great build on the SO.  I have one as well.  It would be great if you posted the project on the Shaper Hub site with the SVG files.  You could also just sell them on Etsy.  I agree that SO is not a CNC, but for my small shop, it's great.  It is slow but easy to use.  My wife and her friends have been using it to make table settings for charity events.  They find an SVG file on the noun project or elsewhere on the internet and cut the shapes out another paints them up.
 

Attachments

  • IMG_6965.JPG
    IMG_6965.JPG
    483.2 KB · Views: 649
ghjaxman said:
My wife and her friends have been using it to make table settings for charity events.  They find an SVG file on the noun project or elsewhere on the internet and cut the shapes out another paints them up.

Super cool. I wish my SO would have the least bit of interest in my SO.
 
Is it possible to see the *.svg *.skp, or *dwg of this project for personal use, if they are not copyrighted too strictly. I've idea of implementing of similar concept, only with some sort of boom arm/hose holder  and "integrated" cyclone/bucket holder at the rear side of CT36 (where originally power cable holder should be installed).
 
I should have studied and trained to be an engineer.
Super impressive.

I'm ready to replace my CT36 E hood.
After an hours search I can't seem to find a how to vid.

Specifically what driver head to use to remove the hood.

Any positive constructive suggestions would be greatly appreciated.
No insult nor aggravation intended.

Thanks in advance.
 
BarrySumpter said:
Specifically what driver head to use to remove the hood.

You need a Torx bit. Though I am not sure which size, I don't have my CT26 anymore. Somewhere between T25 and T35.
 
Great first attempt.  I admire your modeling skills thats for sure, I wish I was that good.  I agree with the cubbies on top or deeper recess for items.  The way everything just sits so high and is more less balanced on top  I would be forever knocking them on the ground.  I think part of the problem with the peg board is the shelf right below it.  It doesn't really offer enough vertical space to hang anything the way peg board hooks were designed to. Not sold on the landing pad either I like the festool V hook design better.  With the landing pad it would seem like you have to disconnect the vac hose every time before setting it down or risk it tipping over too. Im thinking a hook to hang a domino would be good too since that is is another tool that requires setting down and picking up a lot.  Im always setting it down on the work bench but then it gets in the way of moving the parts around.  Im sure festool did several different redesigns too. That's just part of the design build process.  I would probably hold off on finishing until I settled on a design.  You went all in on that one for sure.  Looking forward to seeing what you come up with for V2.0 
 
Hello again, ryanjg117!
Could You send the files of this profect into PM
Thank You!
ryanjg117 said:
ghjaxman said:
My wife and her friends have been using it to make table settings for charity events.  They find an SVG file on the noun project or elsewhere on the internet and cut the shapes out another paints them up.

Super cool. I wish my SO would have the least bit of interest in my SO.
 
Back
Top